Connect to a Chassis.io Vagrant Hosted WordPress Database

Chassis.io is an excellent tool to get you quickly setup for WordPress development. Barring any timeout issues, the setup is typically as simple as following their QuickStart guide.

Chassis.io uses Vagrant and VirtualBox to setup a Virtual Machine that hosts your WordPress site. This post covers how you can connect to your WordPress database that exists on that Virtual Machine. I’ll be using Windows and HeidiSQL for the purpose of this post. The connection information I use in this post comes from this GitHub issue.

Connecting with HeidiSQL

HeidiSQL is my favorite query browser for MySQL and MariaDB databases. I like the layout and the interface is nice and clean.

When you first open HeidiSQL you will see the interface for creating a new Database connection.HeidiSQL Session Manager
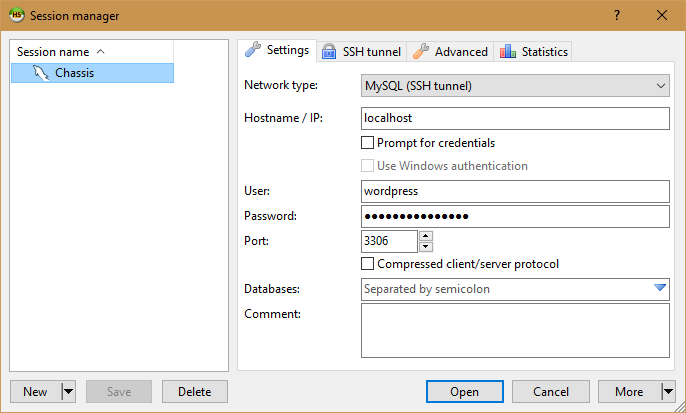
Choose whichever name you want to help you remember what this connection is for. I’ve named mine “Chassis” because it’s my connection to the database Chassis.io setup. You’ll also want to set the following settings:

  • Network type: MySQL (SSH tunnel)
  • Hostname / IP: localhost
  • User: wordpress
  • Password: vagrantpassword
  • Port: 3306

That’s it for the basic settings. Now for the SSH Tunnel settings.

HeidiSQL – Plink.exe and Private Key

HeidiSQL uses a utility called “plink.exe” for it’s SSH capabilities. plink.exe is made by the same author who wrote PuTTY (which I’m sure you’ve heard of). If you haven’t got plink.exe downloaded you can find the latest exe on this page. You’ll want to grab both plink.exe and puttygen.exe. I stuck both utilities inside a “PuTTY” folder in my Program Files (x86) directory. You can stick them wherever you want to.

Ok, before we setup the SSH Tunnel settings we are going to want to setup the Private key file that plink.exe will use to communicate with your Virtual Machine. PuTTY utilities use specific private key files called .ppk files. We are going to want to convert the Vagrant provided private key file to a .ppk file for use by plink.exe. Luckily, the puttygen.exe utility you downloaded makes this conversion simple.

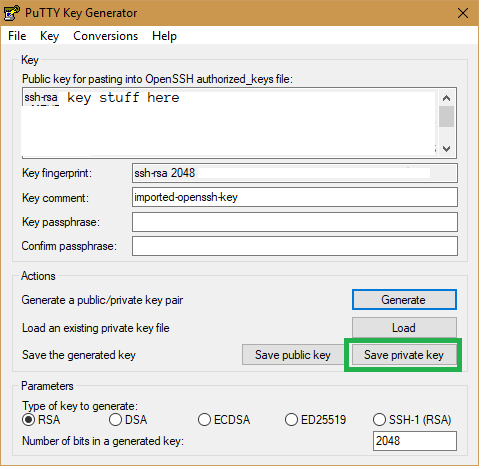
Launch puttygen.exe. This will launch the “PuTTY Key Generator”. Load in the Vagrant provided private key file by using File > Load Private Key. Navigate to the location of your Vagrant private key file. Mine was located in C:\projects\chassis\.vagrant\machines\default\virtualbox. Your location may be different depending on where your Chassis project is. Find the “private_key” file and open that. The PuTTY Key Generator will take care of loading the key in for you. You should see a “Successfully imported foreign key …” message. Now click “Save private key”, choose a name for it, and save it. I just saved it exactly where the other private_key was.

PuTTY Key Generator
Location of the “Save private key” button

Woot! Now we can fill out the HeidiSQL SSH tunnel settings. Remember where you saved that .ppk file because you’ll need it for this next step.

HeidiSQL – SSH Tunnel Settings

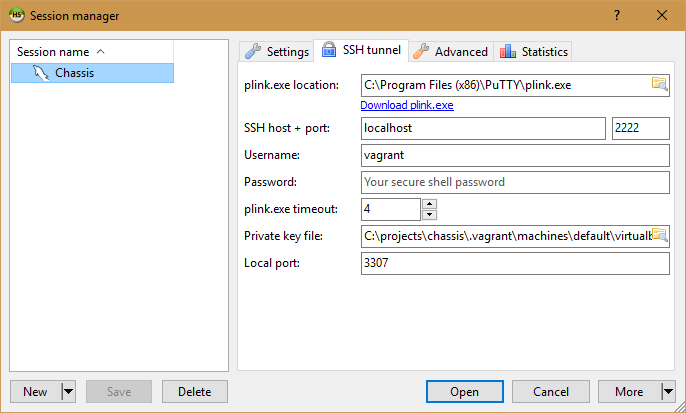
Click on the tab for “SSH tunnel” to access the HeidiSQL Session Manager SSH Tunnel settings.

HeidiSQL SSH Tunnel Settings

Alright, let’s plug in the values!

  • plink.exe location: Insert the path to your plink.exe utility.
  • SSH host + port: localhost and 2222
  • Username: vagrant
  • Password: just leave this blank
  • plink.exe timeout: default is fine
  • Private key file: Path to the .ppk file we created above
  • Local port: 3307 is fine

Now we come to the moment of truth. Push the “Save” button on the HeidiSQL session manager to save your changes. Now push the “Open” button and HeidiSQL should connect to your Vagrant hosted WordPress database. Woot!

Entity Framework: Update-Database Migrates the Wrong DB

Recently I made the switch from using Visual Studio 2015 to using Visual Studio 2017. For the most part the transition was easy. However, I ran into an issue with Entity Framework updating the wrong database. I’m posting the solution here so I don’t forget 🙂

TL:DR
If you are experiencing issues with Entity Framework then check that your startup project is the correct one.

EF Update-Database Is Not Working

My current setup involves using a local SQL Server Express database. I check the database via SQL Server Management Studio (ManStu) when I run Update-Database to ensure my changes take place. When I run Update-Database from Visual Studio 2015 the changes are reflected in the database. When I run Update-Database from Visual Studio 2017 the changes are not reflected in the database.

Why does Update-Database work correctly in Visual Studio 2015 but not correctly in Visual Studio 2017? Why does Visual Studio 2017 tell me that the changes were applied successfully?

I decided to take a look at the output of Update-Database -Verbose to see if it yielded any helpful information. There I saw:

Target database is: 'MySpecialDB' (DataSource: (localdb)\v11.0, Provider: System.Data.SqlClient, Origin: Convention).

Entity Framework was using (localdb) and not the SQL Server Express database I setup in the app.config. That explains why the changes were applied successfully. However, why was Entity Framework using the wrong database?

The Not So Thrilling Simple Solution

I pursued a number of different routes looking for the solution to this issue. In the end the solution is so simple. The wrong startup project was selected. That’s it. In Visual Studio 2015 I was using a different startup project. In Visual Studio 2017 I never setup a startup project and so one was selected automatically.

As it turns out Entity Framework pulls meaningful information (like database connection information) out of the startup project. The fact that I had the wrong startup project selected in Visual Studio 2017 was the reason why my Entity Framework Update-Database commands were not working the way I expected.

So, lesson learned, if you are experiencing issues with Entity Framework then check your startup project. It could be that you have the wrong startup project selected 🙂

SQL Server – Search Tables for a Column

You can use the following SQL to find all tables with a specific column name within your SQLServer database.

SELECT TABLE_NAME, COLUMN_NAME
FROM YourDbName.INFORMATION_SCHEMA.COLUMNS
WHERE COLUMN_NAME = 'YourColumnName'
ORDER BY COLUMN_NAME

Or, use the LIKE() method if you don’t know your specific column name. If I use the LIKE() method I try to only throw the wildcard at the end of the string… it performs a bit better that way.

SELECT TABLE_NAME, COLUMN_NAME
FROM YourDbName.INFORMATION_SCHEMA.COLUMNS
WHERE COLUMN_NAME LIKE('SomeColumn%')
ORDER BY COLUMN_NAME

Figured I’d post this here because I’ll probably forget and want to know again in the future.

Finding a Column with a Specific Name in TSQL

I just recently ran into a situation where I needed to find a table that contained a specific column in the database. I’m not looking for a column value, I’m looking for the name of the column. So, like any good programmer would do, I spent some time Googling…

There were a number of unhelpful articles and answers on the subject. I sifted through everything and finally landed upon an answer that worked! Unfortunately I forgot where it came from, so if any of you know where this little trick came from feel free to let me know.

In order to find a column with a specific name in TSQL you can use the following query:

USE [YOUR_DATABASE_NAME]
GO
SELECT t.name AS table_name,
SCHEMA_NAME(schema_id) AS schema_name,
c.name AS column_name
FROM sys.tables AS t
INNER JOIN sys.columns c ON t.OBJECT_ID = c.OBJECT_ID
WHERE c.name LIKE '%[WHAT YOU ARE LOOKING FOR]%'
ORDER BY schema_name, table_name;

Just replace [YOUR_DATABASE_NAME] with the name of the database you are using and [WHAT YOU ARE LOOKING FOR] with the full column name or a part of the column name you are looking for.