Last year around this time of year, Microsoft added an Autlolaunch feature to Windows 10. This feature will automatically relaunch certain programs after a Restart or Shutdown of Windows. You’ve likely seen this happen most often with Chrome.
The feature was originally introduced to make Windows Updates feel more seamless, and less invasive. The idea was that, while yes, Windows Updates automatically restart your computer, at least it keeps the windows you had open open! That’s good, right?!
No. That’s not good. That’s annoying. We who restart our computers like to know that they are starting from a fresh state. Those of us who don’t restart our computers like to keep a billion random windows open and probably fill our desktops up with icons. Desktop Icon pointillism art is a thing.
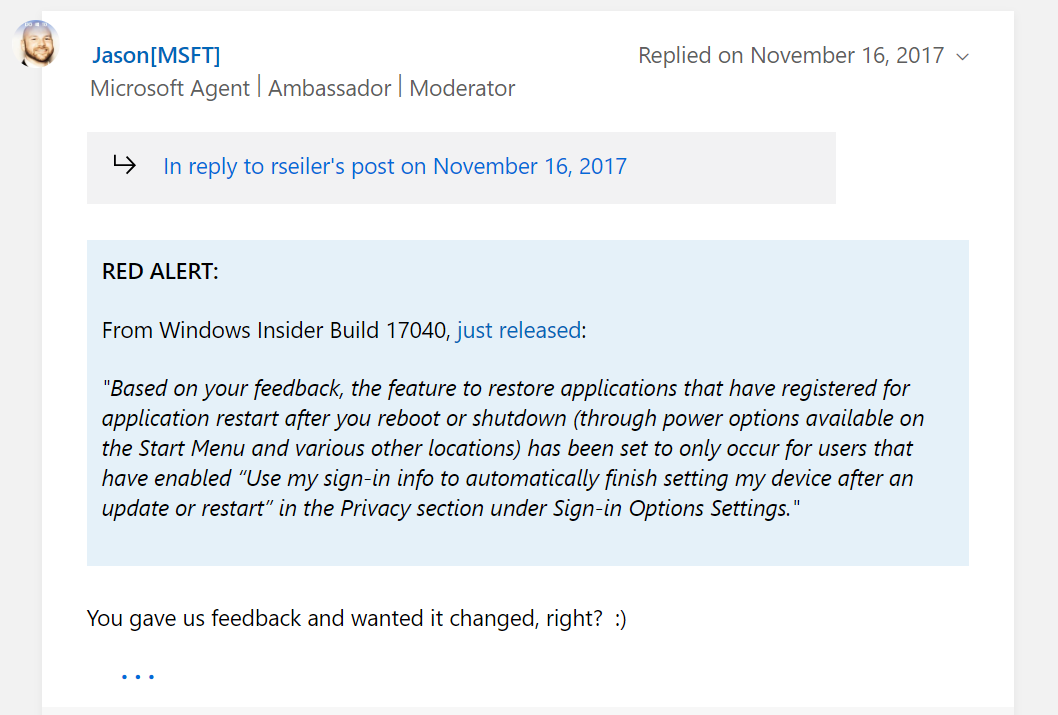
After an extreme amount of backlash from users Microsoft decided to adjust the way the Autolaunch feature worked. This is documented in this thread. You can *disable autolaunch* by disabling the “Use my sign-in info to automatically finish setting my device after an update or restart” setting. You would think Microsoft might make a completely different setting for “Automatically re-launch previously open programs on startup”. But – for now that’s not the case.
You can *disable autolaunch* by disabling the “Use my sign-in info to automatically finish setting my device after an update or restart” setting.
Above we have the description of how to turn off autolaunch, below we’ve got a picture of where this setting is.
Enjoy not having Chrome automatically start when you reboot your computer 😊
I just recently got Visual Studio Code hooked up with the virtual Vagrant machine hosting my local dev version of WordPress. I’m posting the steps I took here. In the end it’s fairly simple to do.
Most of the guides out there show you how to hook up VS Code with a locally running copy of WordPress. However, I’m using Chassis.io for my dev version of WordPress. Chassis.io makes use of Vagrant and a virtual machine. I did not find anything that showed me how to hook VS Code with a copy of WordPress running on a virtual machine, as is the case with a Chassis.io setup.
Setup Chassis for Debugging with Visual Studio Code
The first thing we need to do to setup the Chassis XDebug extension to work with Visual Studio Code is to setup the IDE Key. Setting up the IDE Key consists of two steps.
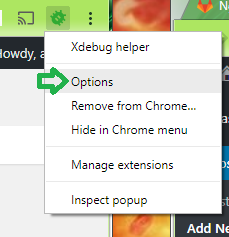
Bring up the XDebug Helper extension options page. You can do this by Right Clicking the extension icon and selecting Options.
XDebug Extension Options
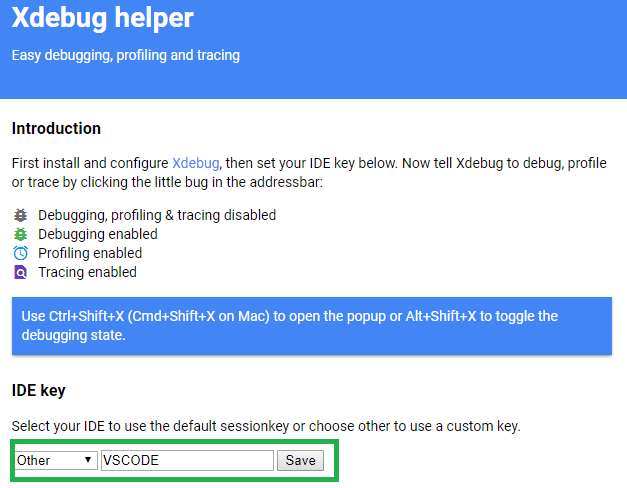
Find the section for the IDE Key. Select Other as the default sessionkey and type in VSCODE.
XDebug Extension IDE Key Setting
Save it. Next we need to set the IDE Key for the Vagrant machine.
Set the IDE Key for the Vagrant Machine
This step is pretty simple. First you need to navigate to the root Chassis directory. Mine is located at C:\projects\chassis.
Create a config.local.yaml file if one doesn’t already exist.
Add ide: VSCODE to the config.local.yaml file.
Run vagrant provision which should update the settings on your local vagrant machine.
To confirm that the IDE Key is indeed VSCODE see the “xdebug” section on the PHPInfo page for the machine.
Example: http://vagrant.local/phpinfo.php
xdebug section on the PHP Info page
Setup Visual Studio Code for Debugging with Chassis
If you are using Visual Studio Code to develop PHP than you should install the PHP Extension Pack. Bring up the VS Code Extensions menu and search for “PHP Extension Pack”. This extension will include the PHP Intellisense plugin and the PHP Debugger plugin. You will need the PHP Debugger plugin for debugging.
Next we need to setup a debugging configuration.
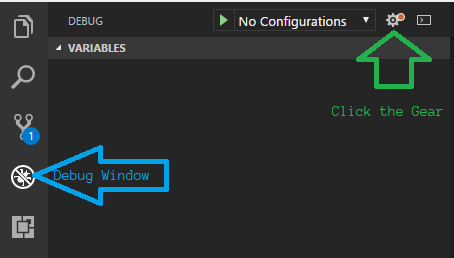
Click the Gear to setup a Debugging configuration.
Bring up the VS Code debugging window.
Click the “Gear” icon.
Select “PHP” as your environment from the popup textbox.
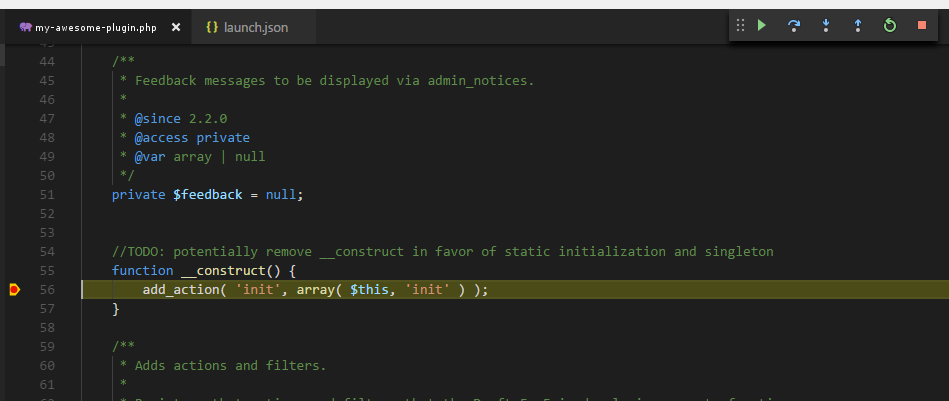
Now you will see a “launch.json” file in your VS Code window. This contains some default settings for debugging PHP. The file will not work for our purposes as it is. We need to add a couple properties to the JSON to hook VS Code up with our WordPress site.
serverSourceRoot – This is the directory for your code on the server (Chassis.io).
localSourceRoot – This is the directory for your code on your development machine.
The serverSourceRoot needs to be the path to your source code on the server. In my case the value is /vagrant/content/plugins/my-awesome-plugin.
The localSourceRoot is used to match the server source up with your local source. In my case I set this to ${workspaceRoot} which is a special variable referring to the path of the opened folder in VS Code.
Alright! That should be it. Save your launch.json file, set a breakpoint in your code, and start the debugger. When you visit the relevant WordPress page on your Chassis box you will notice your breakpoint is hit.
Recently I made the switch from using Visual Studio 2015 to using Visual Studio 2017. For the most part the transition was easy. However, I ran into an issue with Entity Framework updating the wrong database. I’m posting the solution here so I don’t forget 🙂
TL:DR
If you are experiencing issues with Entity Framework then check that your startup project is the correct one.
EF Update-Database Is Not Working
My current setup involves using a local SQL Server Express database. I check the database via SQL Server Management Studio (ManStu) when I run Update-Database to ensure my changes take place. When I run Update-Database from Visual Studio 2015 the changes are reflected in the database. When I run Update-Database from Visual Studio 2017 the changes are not reflected in the database.
Why does Update-Database work correctly in Visual Studio 2015 but not correctly in Visual Studio 2017? Why does Visual Studio 2017 tell me that the changes were applied successfully?
I decided to take a look at the output of Update-Database -Verbose to see if it yielded any helpful information. There I saw:
Target database is: 'MySpecialDB' (DataSource: (localdb)\v11.0, Provider: System.Data.SqlClient, Origin: Convention).
Entity Framework was using (localdb) and not the SQL Server Express database I setup in the app.config. That explains why the changes were applied successfully. However, why was Entity Framework using the wrong database?
The Not So Thrilling Simple Solution
I pursued a number of different routes looking for the solution to this issue. In the end the solution is so simple. The wrong startup project was selected. That’s it. In Visual Studio 2015 I was using a different startup project. In Visual Studio 2017 I never setup a startup project and so one was selected automatically.
As it turns out Entity Framework pulls meaningful information (like database connection information) out of the startup project. The fact that I had the wrong startup project selected in Visual Studio 2017 was the reason why my Entity Framework Update-Database commands were not working the way I expected.
So, lesson learned, if you are experiencing issues with Entity Framework then check your startup project. It could be that you have the wrong startup project selected 🙂
It’s the little things in life that annoy me. Things like Microsoft’s Edge browser icon re-appearing on my taskbar. Or, when Windows decides to update just before a meeting. I find these kinds of things to be very annoying. That’s why I was a smidgen irked when the Windows 10 Action Center icon popped up on my taskbar and showed no signs of leaving peacefully.
For those of you who do not know what the Action Center Icon in Windows 10 is then allow Leonardo to enlighten you.
aRGGG win10 icon, I’ll kill you!
And only now, at the end, do you see your mistake.
Remove the Action Center Icon
Now that we are all aware of the horribleness that is this awful Action Center icon we can set off on our quest to destr… err remove it.
Open the Windows menu
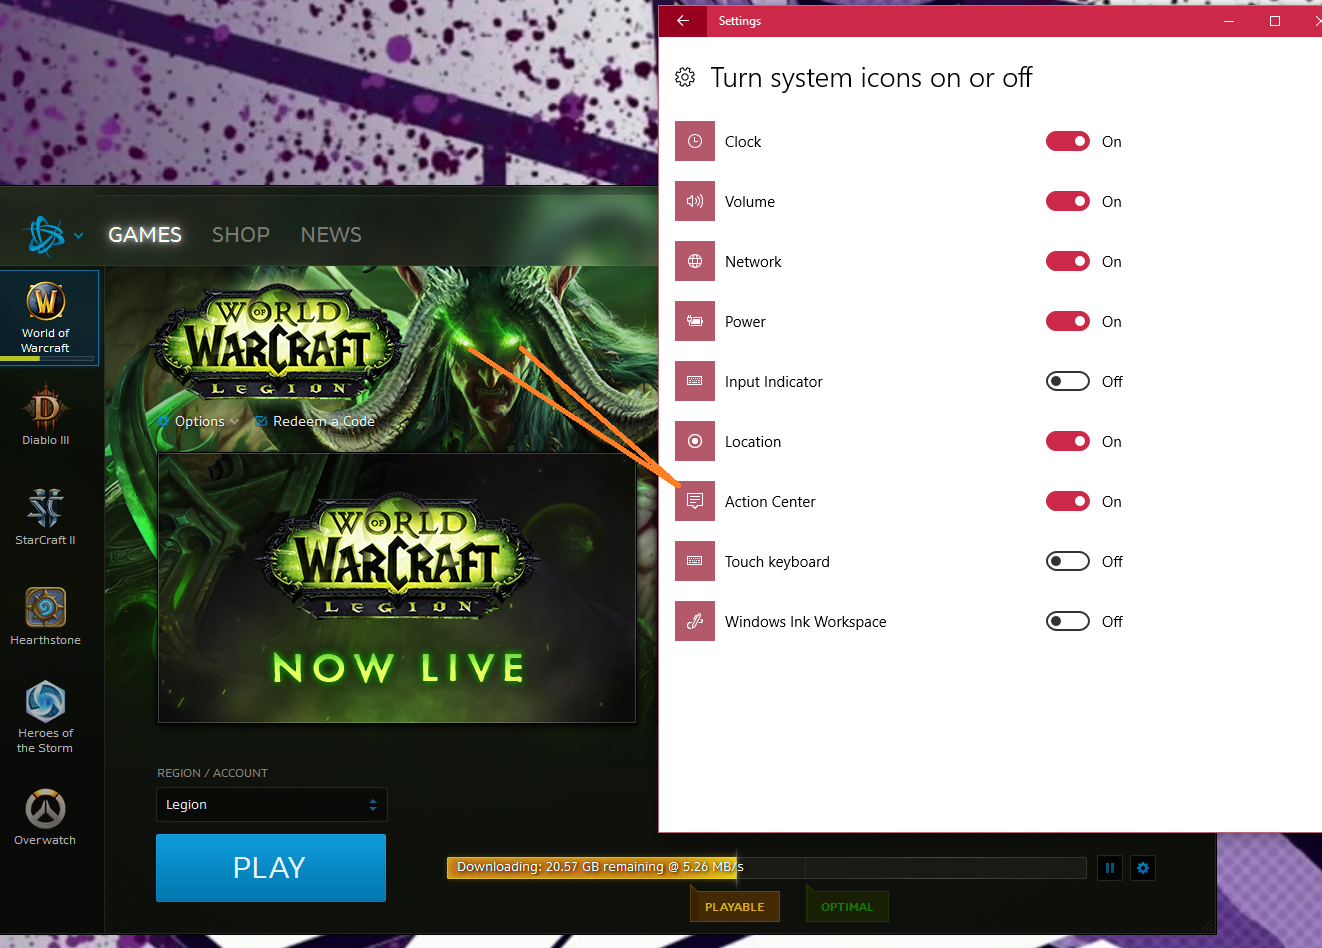
Search for Turn system icons on or off **
Find the Action Center icon.
If you are not sure where the Action Center icon is, let the WoW splash screen show you.
DESTROY…
Turn if off
Rejoice in the boundless fruits of your labor.
**Alternatively, if you are old school and hate things like convenience, you can navigate to this setting section via the Control Panel. So hop on in your Conestoga Wagon and navigate to Control Panel > Appearance and Personalization > Taskbar and Navigation > Turn system icons on or off.
You can use the following SQL to find all tables with a specific column name within your SQLServer database.
SELECT TABLE_NAME, COLUMN_NAME
FROM YourDbName.INFORMATION_SCHEMA.COLUMNS
WHERE COLUMN_NAME = 'YourColumnName'
ORDER BY COLUMN_NAME
Or, use the LIKE() method if you don’t know your specific column name. If I use the LIKE() method I try to only throw the wildcard at the end of the string… it performs a bit better that way.
SELECT TABLE_NAME, COLUMN_NAME
FROM YourDbName.INFORMATION_SCHEMA.COLUMNS
WHERE COLUMN_NAME LIKE('SomeColumn%')
ORDER BY COLUMN_NAME
Figured I’d post this here because I’ll probably forget and want to know again in the future.
When using IISExpress to develop a Website project it is nice to have a specific machine name and port to refer to.
You can specify the machine name and port by editing the binding in the IISExpress applicationhost.config file. The following information was gleaned from this answer on StackOverflow.
Open your applicationhost.config file. It most probably will be %userprofile%\Documents\IISExpress\config\applicationhost.config, but inspect the output from iisexpress.exe to be sure.
Locate your WebSite entry and add following binding with your machine name.
This seems to be working just fine for me. If you are wanting to actually share that url for others to access (maybe within your own work network) you might have to run this in a administrator command prompt as specified in this StackOverflow answer:
The Windows 8.1 experience that I’ve shared below is just that, an experience. Windows 8.1 itself is fine, I’d prefer if it gave me more customization options. Personally, I’d prefer not having a Windows button (I’ve got a windows key on my keyboard). Personally I’d prefer full screen search over the tiny search bar in 8.1. So Microsoft would’ve done better to provide personalization options, not to choose for you.
And I’m a little ticked off.
First off, my computer updated itself without my knowledge nor my permission. It had asked me a few times, to which my answer was always “Not Right Now”. However, it decided, of it’s own accord, that it would update itself. That kind of behavior is not acceptable.
In addition to updating itself to Windows 8.1 it also decided that it would be helpful and download/setup/install a bunch of apps for me. Once again it did so without asking for my permission. It then decided that it wanted me to create a special Microsoft Account to use my personal computer, Luckily, I found a way around that (using my smartphone, because my computer wouldn’t let me use it).
When I finally got into the computer I discovered that it had changed a number of things that I did not tell it to.
It Rearranged my taskbar icons.
It added a Start Button
It threw Internet Explorer onto my taskbar
It changed the way I search for things in the start menu.
It changed the way my start menu looked.
All in all, I wasn’t that happy with the way Windows 8.1 decided to force itself upon my machine.
A few tips for the future.
Do not update my machine without asking me
If I tell you to wait, then you better wait and you better not update without me.
Do not *force* me to make a Microsoft Account to use my own computer.
Make the fact that it’s *optional* more clear.
DON’T CHANGE MY STUFF
I have icons on my taskbar for a reason, don’t mess with them
Don’t try to trick me to use IE by placing it in prominent places on my machine
Don’t add things without asking me
Don’t change things without asking me
It disabled my PS3 controller(that I spent a long time trying to get to work on my computer).
This whole process would’ve been a whole lot less frustrating if it allowed for more input from the user. It should’ve told me about all the changes it wanted to do (add IE, add the Windows button, modify the Startmenu), and more importantly, it should’ve given me the option to keep things the way they were.
So… now I proceed to search the internet for ways to make my computer the way I like it again. Which makes me even more frustrated.
**UPDATE**
It appears there is no built in way to turn off the Windows button in the taskbar. There is also no way to make my Start Screen searches full screen by default anymore. (Ok, so if I actually click the apps view, and then search, the search is the way I want it to work). The only way to get these things back to the way I like them is by re-installing windows 8, which is pretty annoying. All in all I’m really sad with the way this whole update happened.
Note:
Kaira mentioned that she’s been postponing the update by doing the following. Maybe that will help some of you.
What I do is, when the prompt asking to restart at a time of my choosing sets, set it to as late as it goes, then rush over to the Windows Store. Click Updates (top right) and you’ll see it downloading 8.1. Click that and something at the bottom comes up, and you can select Cancel.