PHP: What is the difference between .env files and .ini files?

That’s a good question. You might ask this when you are implementing a new project and trying to figure out where to store your secret configuration values.

Before getting into the difference, let’s state the similarities:

  1. Both allow storage of environment specific configuration values and secrets from outside of your codebase.
  2. Both allow retrieval of environment specific configuration values and secrets from outside your codebase.
  3. Both files use a key value pair type format.
  4. Both allow comments within the files.

So what about the differences?

  1. The names are different .ini vs .env
  2. The method of storing the data is different.
  3. The method of retrieving the data is different.
  4. The syntax is different.

That probably doesn’t answer your question though. You likely aren’t interested as much in what the differences are as you are in why you would use one over the other.

Why use .env instead of .ini or .ini instead of .env?

This is likely what you are wanting to know, why would you use one over the other. So let’s list some pro’s and cons of each format to help make the decision.

.env Pros

  • language-agnostic
  • allows referencing other .env values as variables
  • libraries like phpdotenv provide robust functionality

Let’s expand a little on the language-agnostic pro above.

First Scenario. You are coming to PHP from another environment, like Ruby, you are probably wondering where to put your secrets and configuration values for your code. A .env file just makes sense, these are supported in Ruby so there must be a way to add them in PHP. Voila! There is a package that supports .env files that you can easily include in your PHP code and you don’t have to think anymore about it. It probably doesn’t even occur to you to use the build in .ini support.

Second Scenario. You are using both server side JS, like Node, and PHP. You want to share configuration values between the two systems. Both support .env files allowing you to easily share your secrets between both languages.

.ini Pros

  • built-in PHP Support
  • allows grouping of values via sections
  • supports typed values via INI_SCANNER_TYPED
  • allows interpolating other config values and environment variables

.env Cons

  • requires third party library and composer to work
  • features provided change based on library used for loading
  • *some libraries load configuration secrets into globally accessible variables like $_SERVER or $_ENV which will could expose your secrets to code you don’t intend to

.ini Cons

  • requires familiarity with PHP

Which one should I use?

I’m going to give you the answer you don’t want to hear. That’s up to you. It really depends on the needs of your environment and your program.

As far as my personal preferences go. I don’t like including unnecessary dependencies in my codebase. Therefore, if I’m using PHP to develop my app, and I have no need to share my config secrets with other languages, then I would use an .ini file and the built in support for those that PHP provides.
POST Body not Included with JavaScript Fetch

I just ran into a problem and I wanted to document it for myself and for anyone else who might have issues. First I describe the problem, then I give the solution. Scroll down if you’re looking for the solution.

The Problem

After posting with JavaScript fetch I did not see the “body” arguments come through on the server. The method of the fetch was set to POST and the body included was an instance of FormData. According to the documentation on MDN, everything should’ve worked. So why wasn’t it working?

The Basic Client Side Code

const body = new FormData(myForm)
// assume myForm.action = "https://example.com/ajax/post"
const response = await fetch(myForm.action, {
	method: "post",
	body,
})

The Basic Server Side Code

<?php
// file: index.php within the ajax/post directory

// don't bother processing the post if there is none
if(empty($_POST)){
	exit;
}

// ... processing code below

I spent some time debugging and without a doubt, every POST request to the index.php file did not have the $_POST array filled out. The POST array was empty as well as the REQUEST array, even the oft-touted file_get_contents('php://input') came up empty.

The Solution

You aren’t going to like it. I don’t like it. The solution to this problem is so annoying that you’ll just facepalm like Picard.

Add a slash to the end of the url you are posting to.

The problem url is: https://example.com/ajax/post
The working url is: https://example.com/ajax/post/

Currently, when this url is posted to, the server responds with a 301 Redirect before the index.php file is hit. But why? The problem is that you do not have a trailing slash in your url. That’s it. You are posting to an index.php file within a directory, but your url does not have a trailing slash. So your server helpfully redirects you to a url with a trailing slash, and you lose your posted information along the way.

Yep, that’s it. Add a trailing slash and you’ll see your body come through when debugging.

Change the Display of the Tab Character in PHPStorm

Update 2022-02-18

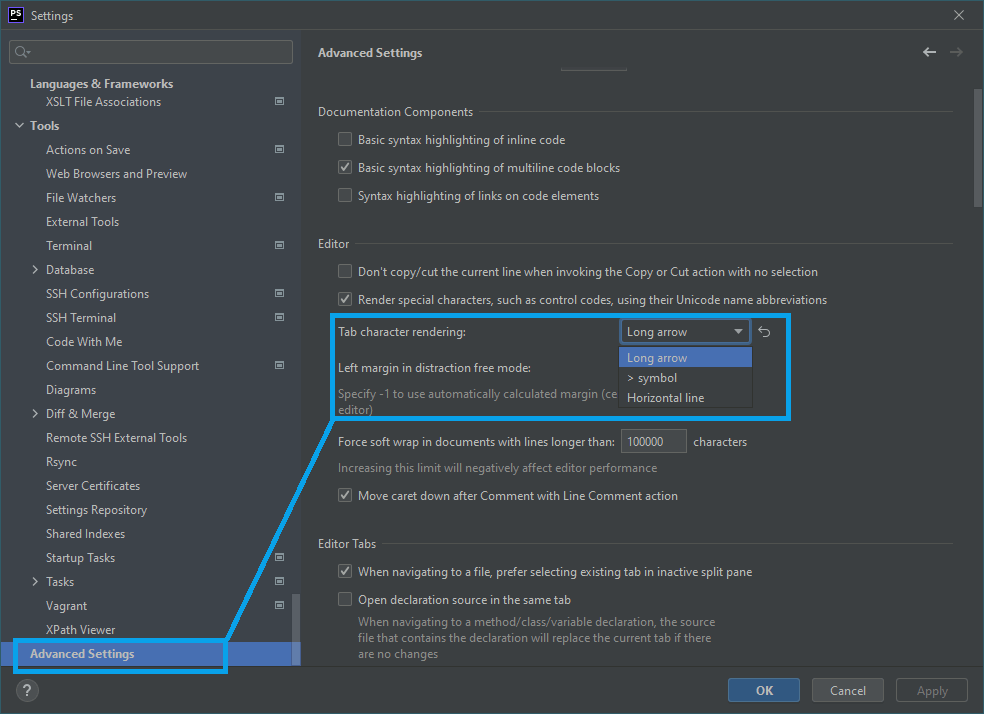
You can now change the display of the Tab Character directly in the PHPStorm advanced settings. (Thanks to a comment by destinydriven!)

The Tab Character Rendering can be changed in Advanced Settings

Original Article

Recently the way the Tab Character is rendered in PHPStorm was changed. The character used to be rendered in a way that allowed you to see the entire tab character. However, after a recent change the tab character now displays as a single >.

The new tab character is likely a welcome change for some. But there are others of us who really appreciated the old rendering. The new rendering does not indicate how much whitespace is taken by the tab character. For this reason I don’t find it helpful and wanted a way to change it back.

Luckily, recently, the JetBrains team threw in a small registry setting to re-enable to old rendering of tab characters. This setting is available in version 2019.3.2. Access this setting by pressing “Shift” + “Shift” while in PHPStorm. Afterwards search for and select the “Registry…” option.

A Comparison of default tab rendering in PHPStorm
A Comparison of styles – it’s nice to have options.

You’ll find the editor.old.tab.painting option about a quarter of the way down the list. Check it to re-enable the old PHPStorm tab rendering. You can breathe freely now.

The location of the editor.old.tab.painting within the registry.
The editor.old.tab.painting option is about a quarter of the way down the list

PHP Get First and Last Day of Week by Week Number

I’m adding a simple post here with a PHP method that has helped me. This method calculates the beginning and ending of a week given the year and week number. The problem I’ve run into is that “first day of the week” is subjective. Some people believe the first day of the week is “Monday” while others believe the first day of the week is “Sunday”. ISO-8601 specifies the first day of the week as “Monday”. Whereas, most western calendars display Sunday as the first day of the week and Saturday as the last day of the week.

To add to the confusion, PHP’s methods themselves seem confused about what the first and last day of the week are.

For example:

$new_date = new DateTime;
// returns Monday, Jan 29 2018
$new_date->setISODate(2018, 5);

// returns Sunday, Feb 4 2018
$new_date->modify('sunday this week');

// returns Sunday, Jan 28 2018
$new_date->setISODate(2018, 5 ,0);

You’ll notice that the string “sunday this week” actually returns Sunday, Feb 4 whereas setting the date to the 0 day of the same week returns Sunday, Jan 28. I’m not saying that Sunday doesn’t happen twice a week… but Sunday doesn’t happen twice a week.

All this to say, the method below is the one I’ve found returns the most helpful results:

function get_first_and_last_day_of_week( $year_number, $week_number ) {
	// we need to specify 'today' otherwise datetime constructor uses 'now' which includes current time
	$today = new DateTime( 'today' );

	return (object) [
		'first_day' => clone $today->setISODate( $year_number, $week_number, 0 ),
		'last_day'  => clone $today->setISODate( $year_number, $week_number, 6 )
	];
}