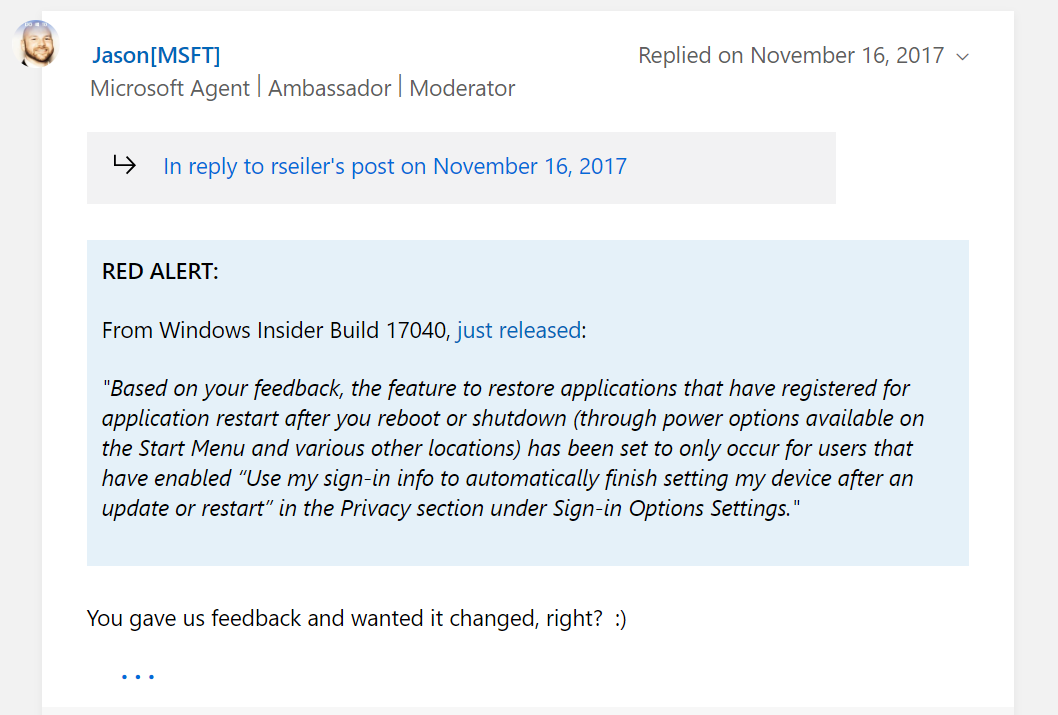
Last year around this time of year, Microsoft added an Autlolaunch feature to Windows 10. This feature will automatically relaunch certain programs after a Restart or Shutdown of Windows. You’ve likely seen this happen most often with Chrome.
The feature was originally introduced to make Windows Updates feel more seamless, and less invasive. The idea was that, while yes, Windows Updates automatically restart your computer, at least it keeps the windows you had open open! That’s good, right?!
No. That’s not good. That’s annoying. We who restart our computers like to know that they are starting from a fresh state. Those of us who don’t restart our computers like to keep a billion random windows open and probably fill our desktops up with icons. Desktop Icon pointillism art is a thing.
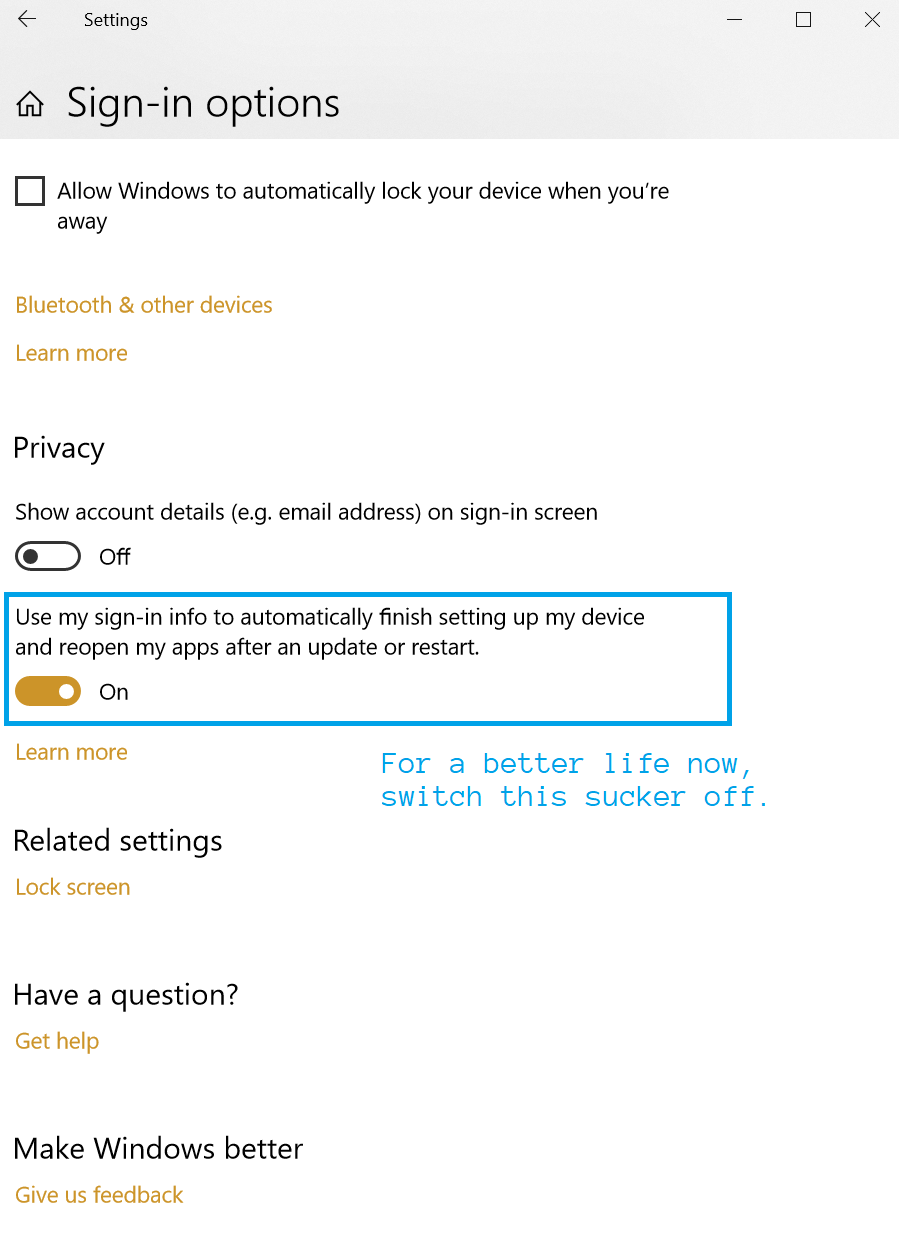
After an extreme amount of backlash from users Microsoft decided to adjust the way the Autolaunch feature worked. This is documented in this thread. You can *disable autolaunch* by disabling the “Use my sign-in info to automatically finish setting my device after an update or restart” setting. You would think Microsoft might make a completely different setting for “Automatically re-launch previously open programs on startup”. But – for now that’s not the case.
You can *disable autolaunch* by disabling the “Use my sign-in info to automatically finish setting my device after an update or restart” setting.
Above we have the description of how to turn off autolaunch, below we’ve got a picture of where this setting is.
Enjoy not having Chrome automatically start when you reboot your computer ?
I find it extremely useful to include surrounding lines when I’m searching through log files or whatnot for a string of text. It certainly helps provide some context as to what I’m looking at.
However, I constantly forget the flag for including surrounding lines. So I’m posting it here so that, at least when I forget, I know where to find it ?
The flag is -C. I suppose it should be easy to remember since I want “Context” and “Context” begins with “C”. ?
Below is a quick example for just in case you want the whole command or you enjoy copying and pasting all the things – hey… no judgement here.
I just recently got Visual Studio Code hooked up with the virtual Vagrant machine hosting my local dev version of WordPress. I’m posting the steps I took here. In the end it’s fairly simple to do.
Most of the guides out there show you how to hook up VS Code with a locally running copy of WordPress. However, I’m using Chassis.io for my dev version of WordPress. Chassis.io makes use of Vagrant and a virtual machine. I did not find anything that showed me how to hook VS Code with a copy of WordPress running on a virtual machine, as is the case with a Chassis.io setup.
Setup Chassis for Debugging with Visual Studio Code
The first thing we need to do to setup the Chassis XDebug extension to work with Visual Studio Code is to setup the IDE Key. Setting up the IDE Key consists of two steps.
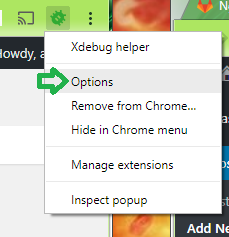
Bring up the XDebug Helper extension options page. You can do this by Right Clicking the extension icon and selecting Options.
XDebug Extension Options
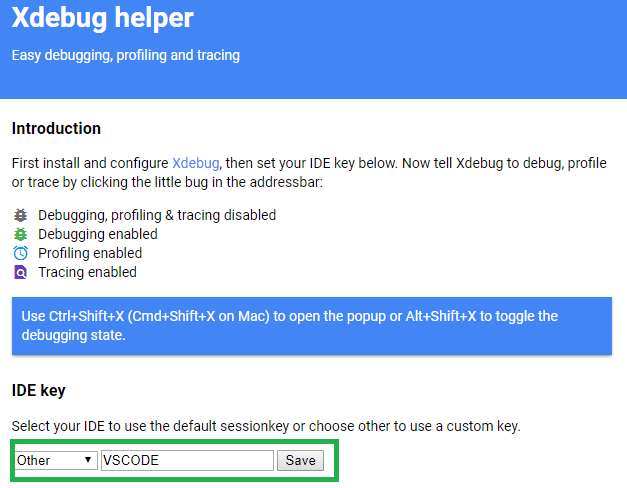
Find the section for the IDE Key. Select Other as the default sessionkey and type in VSCODE.
XDebug Extension IDE Key Setting
Save it. Next we need to set the IDE Key for the Vagrant machine.
Set the IDE Key for the Vagrant Machine
This step is pretty simple. First you need to navigate to the root Chassis directory. Mine is located at C:\projects\chassis.
Create a config.local.yaml file if one doesn’t already exist.
Add ide: VSCODE to the config.local.yaml file.
Run vagrant provision which should update the settings on your local vagrant machine.
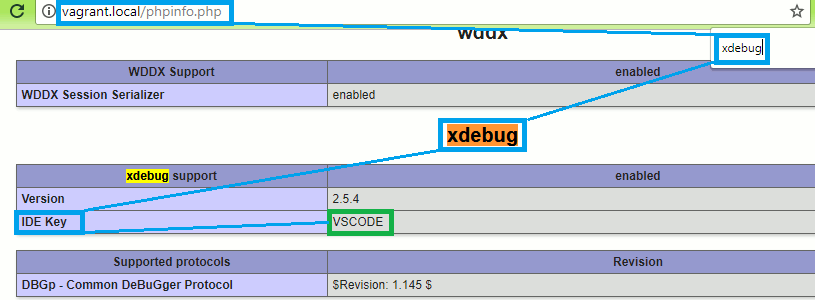
To confirm that the IDE Key is indeed VSCODE see the “xdebug” section on the PHPInfo page for the machine.
Example: http://vagrant.local/phpinfo.php
xdebug section on the PHP Info page
Setup Visual Studio Code for Debugging with Chassis
If you are using Visual Studio Code to develop PHP than you should install the PHP Extension Pack. Bring up the VS Code Extensions menu and search for “PHP Extension Pack”. This extension will include the PHP Intellisense plugin and the PHP Debugger plugin. You will need the PHP Debugger plugin for debugging.
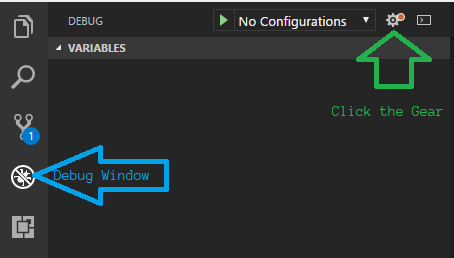
Next we need to setup a debugging configuration.
Click the Gear to setup a Debugging configuration.
Bring up the VS Code debugging window.
Click the “Gear” icon.
Select “PHP” as your environment from the popup textbox.
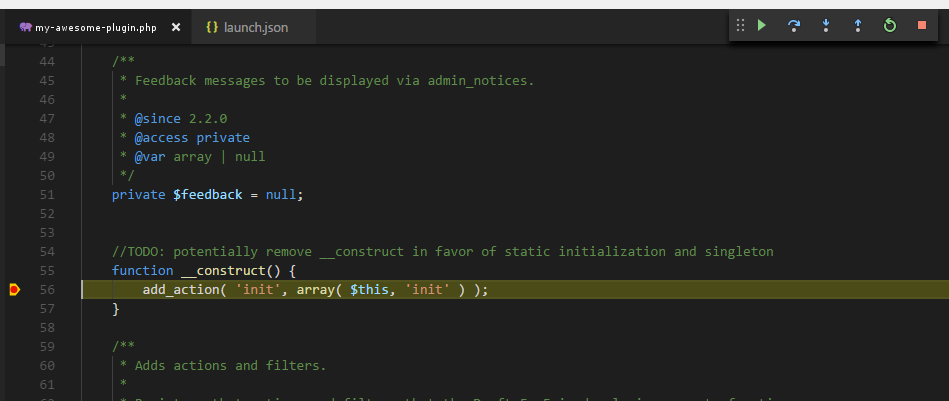
Now you will see a “launch.json” file in your VS Code window. This contains some default settings for debugging PHP. The file will not work for our purposes as it is. We need to add a couple properties to the JSON to hook VS Code up with our WordPress site.
serverSourceRoot – This is the directory for your code on the server (Chassis.io).
localSourceRoot – This is the directory for your code on your development machine.
The serverSourceRoot needs to be the path to your source code on the server. In my case the value is /vagrant/content/plugins/my-awesome-plugin.
The localSourceRoot is used to match the server source up with your local source. In my case I set this to ${workspaceRoot} which is a special variable referring to the path of the opened folder in VS Code.
Alright! That should be it. Save your launch.json file, set a breakpoint in your code, and start the debugger. When you visit the relevant WordPress page on your Chassis box you will notice your breakpoint is hit.
One of my friends recently asked me what my thoughts were on “Working from Home” vs Commuting. So, I wrote down a list.
The Pros of Working in an Office
There are definitely a couple pros that I can think about when working from the company office.
The People.
You get to have the random watercooler conversations.
You don’t feel so “alone”
You can easily bounce ideas off of others or weigh in on conversations that you otherwise would not have been involved in.
It’s harder for people to avoid you. (So you can finally get Bill to provision that extra RAM you requested weeks ago)
You have a better sense of the state of the company.
You overhear information about how the company is doing
You can literally see Manager1 and Manager2 rush down the hall to the CEO’s office. Which gives you a clue that something might be up.
You can take part in the office perks (only available to office goers)
Work provided lunch?
On site Gym?
On site Massage?
Work provided chairs and desks
The Cons of Working in an Office
On the other hand there are certainly some flaws too.
The People
They are loud
They don’t know when to leave you alone.
Manager stands behind you pretending not to look directly at you (might as well be parked in a big white van right across the aisle from your desk).
You overhear conversations you don’t want to hear
Gloria complained that it was too cold in the office so now the thermostat is set at a flat 76 degrees during the summer and 82 degrees in the winter.
Ted never washes his hands after using the restroom.
Ted enjoys randomly giving you back massages while telling you some inappropriate joke.
Ted works here.
The restroom is always out of toilet paper.
Ted is your boss.
The restroom is also out of acceptable toilet paper substitutes, like paper towels, because someone decided using a TON OF ENERGY to heat up and blow hot air at your hands was better for the environment.
Amanda plays with the action figures on your desk when she comes over to ask you a question. (BTW you’ve already answered this question three separate times via email, chat, and in a meeting).
MEETINGS -> you are all literally in the same room. Ted is there.
You have a better sense of the state of the company.
Nobody knows what they’re doing. This company is doomed.
You can take part in the office perks (only available to office goers)
Work provided chairs and desks. Why do they even buy them?
There is no work provided lunch, gym, or massage. But they do pay half the monthly fee for your space at the parking structure a couple blocks down the street.
You have to commute to work, which means you might get stuck in traffic.
Your space at the parking structure has a pillar in it.
That couple blocks is a long way to walk.
Your company believes in an “Open Office” environment. That means you work at a long fold out table in an old warehouse. The good news is that there are no cubes so you can see Ted clipping his finger nails. Also, you’re elbows are constantly bumping into Bills elbows who sits immediately to your right. You don’t bump into anyone on the left, because on your left is the wall and you’re just squished against it all day.
I think that sums it up? Feel free to drop your own Pro/Cons in the comments.
Chassis.io is an excellent tool to get you quickly setup for WordPress development. Barring any timeout issues, the setup is typically as simple as following their QuickStart guide.
Chassis.io uses Vagrant and VirtualBox to setup a Virtual Machine that hosts your WordPress site. This post covers how you can connect to your WordPress database that exists on that Virtual Machine. I’ll be using Windows and HeidiSQL for the purpose of this post. The connection information I use in this post comes from this GitHub issue.
Connecting with HeidiSQL
HeidiSQL is my favorite query browser for MySQL and MariaDB databases. I like the layout and the interface is nice and clean.
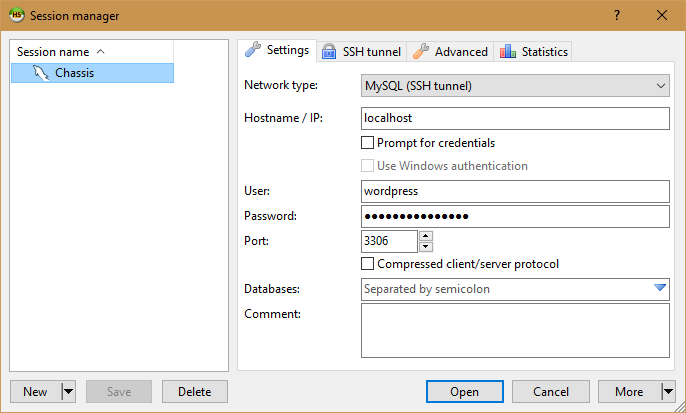
When you first open HeidiSQL you will see the interface for creating a new Database connection.
Choose whichever name you want to help you remember what this connection is for. I’ve named mine “Chassis” because it’s my connection to the database Chassis.io setup. You’ll also want to set the following settings:
Network type: MySQL (SSH tunnel)
Hostname / IP: localhost
User: wordpress
Password: vagrantpassword
Port: 3306
That’s it for the basic settings. Now for the SSH Tunnel settings.
HeidiSQL – Plink.exe and Private Key
HeidiSQL uses a utility called “plink.exe” for it’s SSH capabilities. plink.exe is made by the same author who wrote PuTTY (which I’m sure you’ve heard of). If you haven’t got plink.exe downloaded you can find the latest exe on this page. You’ll want to grab both plink.exe and puttygen.exe. I stuck both utilities inside a “PuTTY” folder in my Program Files (x86) directory. You can stick them wherever you want to.
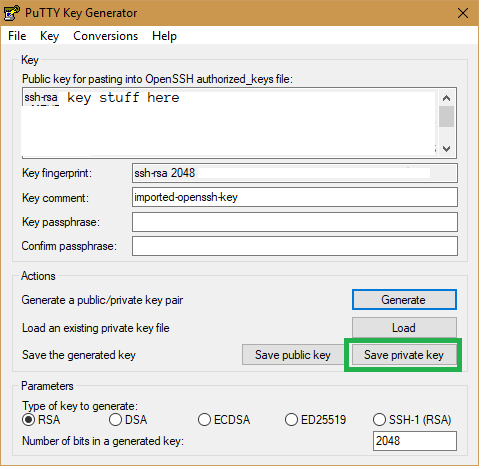
Ok, before we setup the SSH Tunnel settings we are going to want to setup the Private key file that plink.exe will use to communicate with your Virtual Machine. PuTTY utilities use specific private key files called .ppk files. We are going to want to convert the Vagrant provided private key file to a .ppk file for use by plink.exe. Luckily, the puttygen.exe utility you downloaded makes this conversion simple.
Launch puttygen.exe. This will launch the “PuTTY Key Generator”. Load in the Vagrant provided private key file by using File > Load Private Key. Navigate to the location of your Vagrant private key file. Mine was located in C:\projects\chassis\.vagrant\machines\default\virtualbox. Your location may be different depending on where your Chassis project is. Find the “private_key” file and open that. The PuTTY Key Generator will take care of loading the key in for you. You should see a “Successfully imported foreign key …” message. Now click “Save private key”, choose a name for it, and save it. I just saved it exactly where the other private_key was.
Location of the “Save private key” button
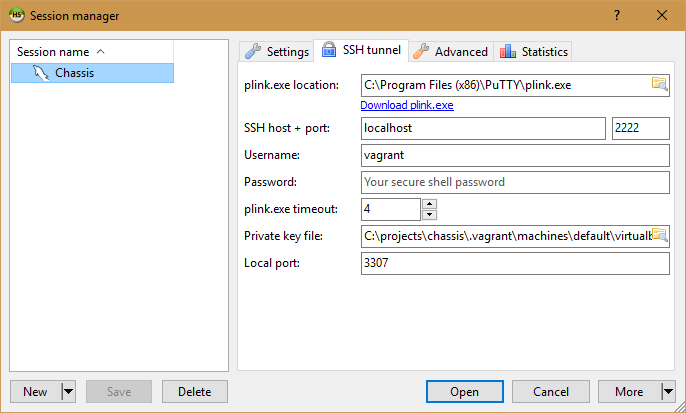
Woot! Now we can fill out the HeidiSQL SSH tunnel settings. Remember where you saved that .ppk file because you’ll need it for this next step.
HeidiSQL – SSH Tunnel Settings
Click on the tab for “SSH tunnel” to access the HeidiSQL Session Manager SSH Tunnel settings.
HeidiSQL SSH Tunnel Settings
Alright, let’s plug in the values!
plink.exe location: Insert the path to your plink.exe utility.
SSH host + port: localhost and 2222
Username: vagrant
Password: just leave this blank
plink.exe timeout: default is fine
Private key file: Path to the .ppk file we created above
Local port: 3307 is fine
Now we come to the moment of truth. Push the “Save” button on the HeidiSQL session manager to save your changes. Now push the “Open” button and HeidiSQL should connect to your Vagrant hosted WordPress database. Woot!
TL:DR -> Try enabling Virtualization in your BIOS.
I’m trying out http://chassis.io as a way to easily setup a WordPress development environment on Windows. It’s actually quite easy and everything works almost exactly like the Chassis Get Started guide describes.
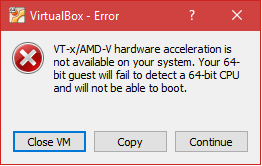
However, I ran into a timeout issue when attempting to boot up the Virtual Machine using vagrant up. On first run the process installed necessary dependencies and wired most things up. However, it hung for a considerable amount of time when booting up the virtual machine. Eventually it told me that it had timed out. It didn’t start the virtual machine.
VT-x/AMD-V hardware acceleration is not available on your system
Hrmm… I wonder why it’s timing out. Chassis.io uses Vagrant and VirtualBox. So I spun up VirtualBox to see if I could manually start the VM myself. As it turns out, I could not. VirtualBox threw up the following error:
VT-x/AMD-V hardware acceleration is not available on your system. Your 64-bit guest will fail to detect a 64-bit CPU and will not be able to boot.
Well, that’s nice… (Hint: it’s not nice).
First Try: Disabling Hyper-V
I did some searching. I found a number of posts that indicated the solution was to disable Hyper-V. It sounds like this works for a lot of people. Scott Hanselman actually wrote up a post about how to “Switch easily between VirtualBox and Hyper-V with a BCDEdit boot Entry in Windows 8.1“. I tried this approach. It did not work for me (you can remove a bcdEdit entry using bcdedit /delete {ENTRYGUID} btw).
Second Try: Enabling Virtualization via BIOS
During my search I stumbled upon this SuperUser answer. The answer indicated that, depending on your system, Virtualization could be enabled via the BIOS.
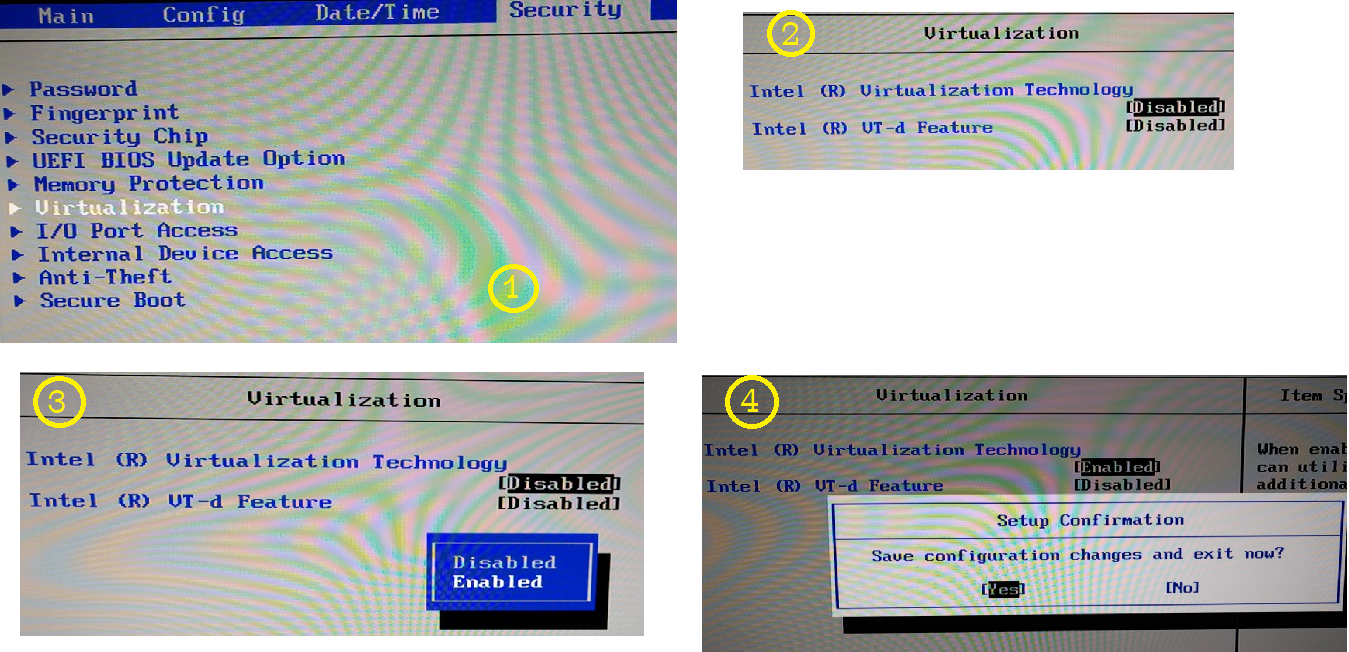
In my case, enabling Virtualization via BIOS involved booting to the UEFI Firmware Settings. I’ve outlined the steps below.
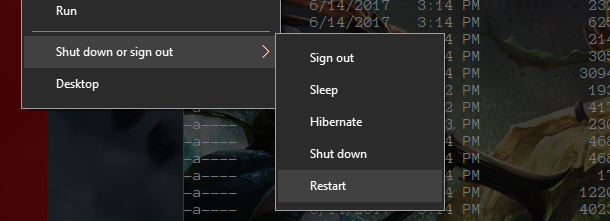
Hold down the Shift key while you click Restart. This will cause your computer to bring up a special menu.
Hold down “SHIFT” and click Restart
Next you need to navigate the option screens to find “UEFI Firmware Settings”
1. Select “Troubleshoot”
2. Select “Advanced options”
3. Select “UEFI Firmware Settings”
4. Restart
Steps to UEFI Firmware Settings
This will reboot you into your PC’s UEFI settings which looks a lot like a typical BIOS menu.
Enable Virtualization
Your system may be different. My system had a “Virtualization” setting located under the “Security” tab. Once I located the “Virtualization” setting I noticed that “Intel (R) Virtualization Technology” was indeed set to Disabled. I enabled it, saved the setting, and restarted my machine.
Enable Virtualization via BIOS
After enabling “Virtualization” I tried to start the VirtualBox VM one more time. BOOM. It worked. I ran vagrant up via a ConEmu console and… success.
In Conclusion
Chassis.io is a pretty sweet project. If your system is setup correctly then Chassis.io “just works”. In my case my system needed “Virtualization” enabled via a UEFI Firmware Setting.
I watched a documentary titled “Disneyland: Secrets, Stories, & Magic” recently. Towards the end of the documentary they interview the Chief Creative Officer of Disney and Pixar Animation Studios, John Lasseter. In his interview he talks about the time he spent as a guide on the Jungle Cruise. At one point he mentions his “favorite joke”.
John Lasseters Favorite Jungle Cruise Joke
As you go through the cruise the guide tells you about various parts of it. At one point the guide sees a pile of skulls and he hides behind a small child. The guide explains how you are now entering the land of the natives. The natives are very dangerous but can sometimes be friendly.
They’re doing their famous “I can’t find the bathroom” dance. Everybody laughs, you let them laugh a little bit and you go on… long pause and then you go “that’s why they call them headhunters”.
But what does it mean?
I’m going to be honest. I had no idea what this meant. I mean it’s one of those jokes that you laugh at because everyone around you is laughing but you really don’t know why anyone is laughing and everyone actually feels the same way just looking at eachother in a weird state of laughter.
I researched it. Turns out that a “head” is what they call a “toilet” on a ship. So. Now you know. They are “head hunters” because they are looking for the toilet. You probably deduced the meaning of the joke from the context. However, you may not have known what a toilet on a ship is called. And now you do. And now it makes a bit more sense why the guide on the jungle cruise might call a toilet a “head”. You are on a boat after all.
Recently I made the switch from using Visual Studio 2015 to using Visual Studio 2017. For the most part the transition was easy. However, I ran into an issue with Entity Framework updating the wrong database. I’m posting the solution here so I don’t forget 🙂
TL:DR
If you are experiencing issues with Entity Framework then check that your startup project is the correct one.
EF Update-Database Is Not Working
My current setup involves using a local SQL Server Express database. I check the database via SQL Server Management Studio (ManStu) when I run Update-Database to ensure my changes take place. When I run Update-Database from Visual Studio 2015 the changes are reflected in the database. When I run Update-Database from Visual Studio 2017 the changes are not reflected in the database.
Why does Update-Database work correctly in Visual Studio 2015 but not correctly in Visual Studio 2017? Why does Visual Studio 2017 tell me that the changes were applied successfully?
I decided to take a look at the output of Update-Database -Verbose to see if it yielded any helpful information. There I saw:
Target database is: 'MySpecialDB' (DataSource: (localdb)\v11.0, Provider: System.Data.SqlClient, Origin: Convention).
Entity Framework was using (localdb) and not the SQL Server Express database I setup in the app.config. That explains why the changes were applied successfully. However, why was Entity Framework using the wrong database?
The Not So Thrilling Simple Solution
I pursued a number of different routes looking for the solution to this issue. In the end the solution is so simple. The wrong startup project was selected. That’s it. In Visual Studio 2015 I was using a different startup project. In Visual Studio 2017 I never setup a startup project and so one was selected automatically.
As it turns out Entity Framework pulls meaningful information (like database connection information) out of the startup project. The fact that I had the wrong startup project selected in Visual Studio 2017 was the reason why my Entity Framework Update-Database commands were not working the way I expected.
So, lesson learned, if you are experiencing issues with Entity Framework then check your startup project. It could be that you have the wrong startup project selected 🙂
I’ve recently begun working with Angular and by extension Angular UI-Router. The fact that you are reading this means that you likely have as well. That said, let’s all pause for a moment and cry together. I know it’s hard. You will get through it. It will be ok. We can do this.
Basic ui-sref-active Usage
One of the things that UI-Router gives you is the ability to add a class to an element if that elements state is currently active. This is done via the ui-sref-active directive.
So above we have some basic navigation with two states. The home state and the notHome state. The ui-sref-active directive takes care of adding the active class to whichever li contains the state that is currently active.
The Problem with Abstract States
The problem is that the ui-sref-active directive does not work correctly (or as we expect) when the parent state is an abstract state.
Let’s say you want to expand your “home” state a bit. Maybe you want to add a “dashboard” state and from there link to a “messages” state. You might set up your $stateProvider a bit like this.
You’ll see we’ve setup home as an abstract view. By default we want to land on our home.dashboard state. We also want ui-sref-active to set the active class on our “Home” link regardless of which child state we are on.
You will notice that in the code above we are now using ui-sref to link to home.dashboard. This is where the problem with ui-sref-active crops up, it will only show the active class if the state is home.dashboard. We want the active class to appear on any child of the “home” state. As it is, the ui-sref-active directive will not detect home.messages as active. So the question becomes, “how can we fix ui-sref-active so that it detects a parent abstract state”?
Tom informs us that there is an undocumented built in solution to this ui-sref-active problem. The solution, he says, is to “use an object (like with ng-class) and it will work”.
Code examples that Tom provides:
<!-- This will not work -->
<li ui-sref-active="active">
   <a ui-sref="admin.users">Administration Panel</a>
</li>

<!-- This will work -->
<li ui-sref-active="{ 'active': 'admin' }">
   <a ui-sref="admin.users">Administration Panel</a>
</li>
That’s it. Now we can link to children of abstract ui-router states and ui-sref-active will behave the way we expect it should.
It’s been about seven months since I setup a Wireless GitLab server. Since then I’ve figured out how to list updatable packages on Ubuntu Server. I’ve also performed several updates using sudo apt-get update && sudo apt-get upgrade.
gzip: stdout: No space left on device
Today I ran into a new problem. Upon trying to perform an update I was presented with a peculiar error. It said gzip: stdout: No space left on device and it told me to run apt-get -f install to fix things up. So… that’s what I tried doing. I tried running the apt-get -f install command but to no avail. The command would not complete successfully.
This is about the time when I start getting really annoyed with Linux and the command line and all the things associated with configuring things manually like do I really need to download the entirety of the Linux MAN files inside my HEAD? DO I NEED TO DO THAT? GAHasldkjsadljfsadfsdsdf!!!!
Calm yourself.
The /boot partition is 100% full
Ok, so it turns out that the apt-get process can fail if the /boot partition becomes 100% full. There were a number of suggestions online that indicated you needed to clean out the /boot partition by removing old linux-images that you don’t need anymore. Many of these suggestions involved using sudo apt-get remove [package-name] or using sudo apt-get autoremove which are both completely valid options… IF APT-GET WERE WORKING. But apt-get is not working, that’s the problem.
So… I Googled a lot and dug through a lot of forums. Finally I stumbled on this uber helpful answer on askUbuntu. I’ll go ahead and paraphrase the answer below so that I can easily find it again. Yes. This is all about me.
Cleaning up the /boot partition
In the case where your /boot partition becomes totally full you can use these steps to clean it up. (From flickerfly on AskUbuntu).
Run the following command to get a list of the linux-image files that you don’t need anymore.
Create a command to remove the folders you don’t need anymore. You can do that with a command like this (where brace-expansion is used to save keystrokes). Use the output from the command above to build your command.
EXAMPLE
sudo rm -rf /boot/*-3.2.0-{23,45,49,51,52,53,54,55}-*
Now that apt-get has space to work with you can actually run sudo apt-get -f install to clean things up.
Use Purge to manually resolve issues with “Internal Errors” (if you get any internal errors).
EXAMPLE
sudo apt-get purge linux-image-3.2.0-56-generic
Run `sudo apt-get autoremove ` to clean up anything orphaned by the manual clean.
Now you can finally proceed with those updates you were wanting to do.