Debug Chassis.io WordPress with Visual Studio Code

I just recently got Visual Studio Code hooked up with the virtual Vagrant machine hosting my local dev version of WordPress. I’m posting the steps I took here. In the end it’s fairly simple to do.

Most of the guides out there show you how to hook up VS Code with a locally running copy of WordPress. However, I’m using Chassis.io for my dev version of WordPress. Chassis.io makes use of Vagrant and a virtual machine. I did not find anything that showed me how to hook VS Code with a copy of WordPress running on a virtual machine, as is the case with a Chassis.io setup.

This post assumes that you’ve already setup the Chassis XDebug extension.

Setup Chassis for Debugging with Visual Studio Code

The first thing we need to do to setup the Chassis XDebug extension to work with Visual Studio Code is to setup the IDE Key. Setting up the IDE Key consists of two steps.

  1. Set the IDE Key in the Chrome XDebug Helper extension. (You should have this extension if you followed the Chassis XDebug Extension setup guide)
  2. Set the IDE Key for the Vagrant machine.

Set the IDE Key in the XDebug Helper Extension

Bring up the XDebug Helper extension options page. You can do this by Right Clicking the extension icon and selecting Options.
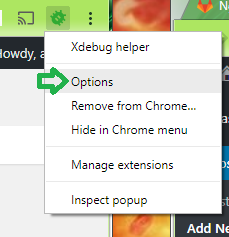
XDebug Extension Options

Find the section for the IDE Key. Select Other as the default sessionkey and type in VSCODE.
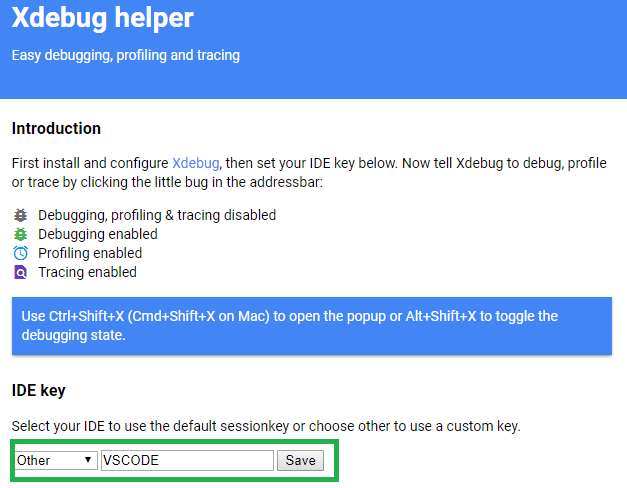
XDebug Extension IDE Key Setting

Save it. Next we need to set the IDE Key for the Vagrant machine.

Set the IDE Key for the Vagrant Machine

This step is pretty simple. First you need to navigate to the root Chassis directory. Mine is located at C:\projects\chassis.

  1. Create a config.local.yaml file if one doesn’t already exist.
  2. Add ide: VSCODE to the config.local.yaml file.
  3. Run vagrant provision which should update the settings on your local vagrant machine.

To confirm that the IDE Key is indeed VSCODE see the “xdebug” section on the PHPInfo page for the machine.
Example: http://vagrant.local/phpinfo.php
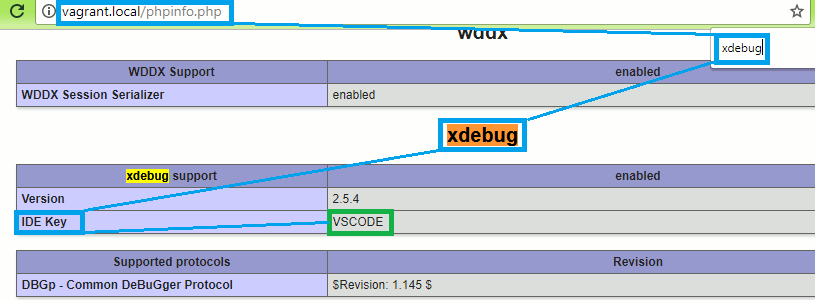
xdebug section on the PHP Info page

Setup Visual Studio Code for Debugging with Chassis

If you are using Visual Studio Code to develop PHP than you should install the PHP Extension Pack. Bring up the VS Code Extensions menu and search for “PHP Extension Pack”. This extension will include the PHP Intellisense plugin and the PHP Debugger plugin. You will need the PHP Debugger plugin for debugging.

Next we need to setup a debugging configuration.
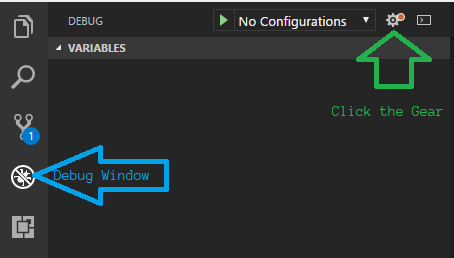
VS Code Debugging Window
Click the Gear to setup a Debugging configuration.
  1. Bring up the VS Code debugging window.
  2. Click the “Gear” icon.
  3. Select “PHP” as your environment from the popup textbox.

Now you will see a “launch.json” file in your VS Code window. This contains some default settings for debugging PHP. The file will not work for our purposes as it is. We need to add a couple properties to the JSON to hook VS Code up with our WordPress site.

  1. serverSourceRoot – This is the directory for your code on the server (Chassis.io).
  2. localSourceRoot – This is the directory for your code on your development machine.

The serverSourceRoot needs to be the path to your source code on the server. In my case the value is /vagrant/content/plugins/my-awesome-plugin.

The localSourceRoot is used to match the server source up with your local source. In my case I set this to ${workspaceRoot} which is a special variable referring to the path of the opened folder in VS Code.

In the end my launch.json file looked like this:

{
    "version": "0.2.0",
    "configurations": [
        {
            "name": "Listen for XDebug",
            "type": "php",
            "request": "launch",
            "port": 9000,
            "serverSourceRoot": "/vagrant/content/plugins/my-awesome-plugin",
            "localSourceRoot": "${workspaceRoot}"
        },
        {
            "name": "Launch currently open script",
            "type": "php",
            "request": "launch",
            "program": "${file}",
            "cwd": "${fileDirname}",
            "port": 9000
        }
    ]
}

All Done

Alright! That should be it. Save your launch.json file, set a breakpoint in your code, and start the debugger. When you visit the relevant WordPress page on your Chassis box you will notice your breakpoint is hit.
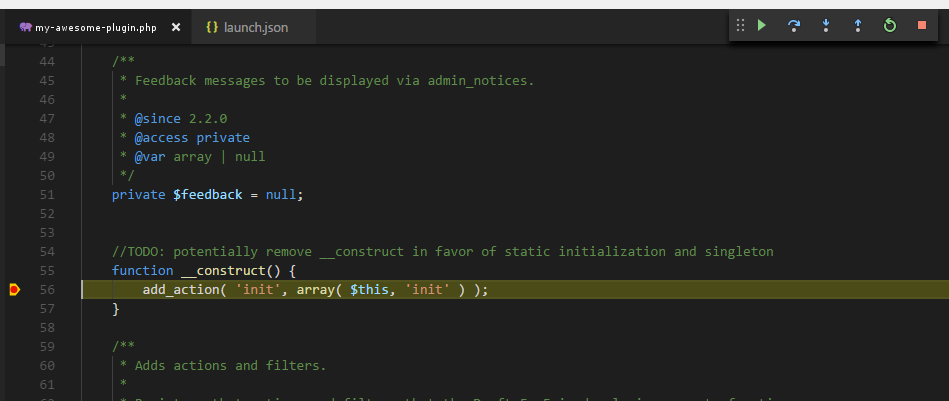
VS Code Caught Breakpoint
We caught a breakpoint!

Connect to a Chassis.io Vagrant Hosted WordPress Database

Chassis.io is an excellent tool to get you quickly setup for WordPress development. Barring any timeout issues, the setup is typically as simple as following their QuickStart guide.

Chassis.io uses Vagrant and VirtualBox to setup a Virtual Machine that hosts your WordPress site. This post covers how you can connect to your WordPress database that exists on that Virtual Machine. I’ll be using Windows and HeidiSQL for the purpose of this post. The connection information I use in this post comes from this GitHub issue.

Connecting with HeidiSQL

HeidiSQL is my favorite query browser for MySQL and MariaDB databases. I like the layout and the interface is nice and clean.

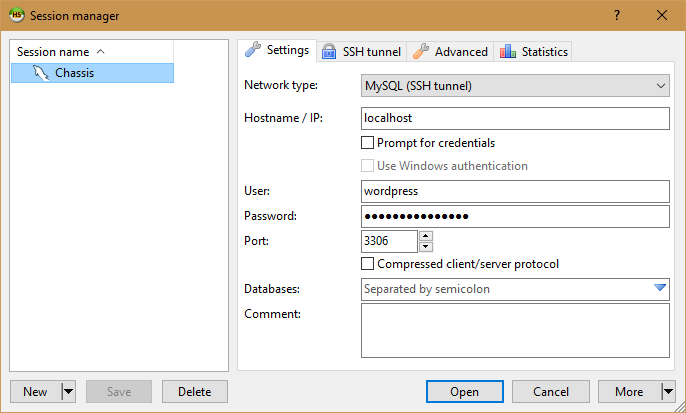
When you first open HeidiSQL you will see the interface for creating a new Database connection.HeidiSQL Session Manager
Choose whichever name you want to help you remember what this connection is for. I’ve named mine “Chassis” because it’s my connection to the database Chassis.io setup. You’ll also want to set the following settings:

  • Network type: MySQL (SSH tunnel)
  • Hostname / IP: localhost
  • User: wordpress
  • Password: vagrantpassword
  • Port: 3306

That’s it for the basic settings. Now for the SSH Tunnel settings.

HeidiSQL – Plink.exe and Private Key

HeidiSQL uses a utility called “plink.exe” for it’s SSH capabilities. plink.exe is made by the same author who wrote PuTTY (which I’m sure you’ve heard of). If you haven’t got plink.exe downloaded you can find the latest exe on this page. You’ll want to grab both plink.exe and puttygen.exe. I stuck both utilities inside a “PuTTY” folder in my Program Files (x86) directory. You can stick them wherever you want to.

Ok, before we setup the SSH Tunnel settings we are going to want to setup the Private key file that plink.exe will use to communicate with your Virtual Machine. PuTTY utilities use specific private key files called .ppk files. We are going to want to convert the Vagrant provided private key file to a .ppk file for use by plink.exe. Luckily, the puttygen.exe utility you downloaded makes this conversion simple.

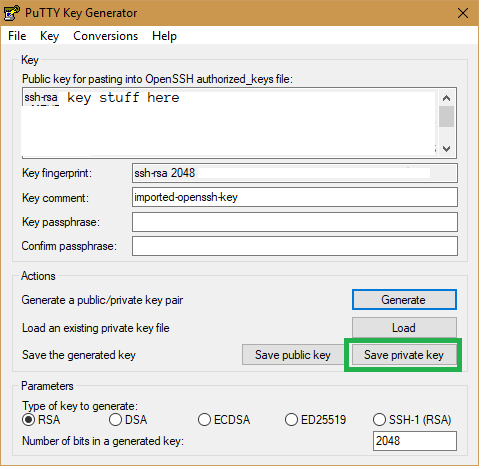
Launch puttygen.exe. This will launch the “PuTTY Key Generator”. Load in the Vagrant provided private key file by using File > Load Private Key. Navigate to the location of your Vagrant private key file. Mine was located in C:\projects\chassis\.vagrant\machines\default\virtualbox. Your location may be different depending on where your Chassis project is. Find the “private_key” file and open that. The PuTTY Key Generator will take care of loading the key in for you. You should see a “Successfully imported foreign key …” message. Now click “Save private key”, choose a name for it, and save it. I just saved it exactly where the other private_key was.

PuTTY Key Generator
Location of the “Save private key” button

Woot! Now we can fill out the HeidiSQL SSH tunnel settings. Remember where you saved that .ppk file because you’ll need it for this next step.

HeidiSQL – SSH Tunnel Settings

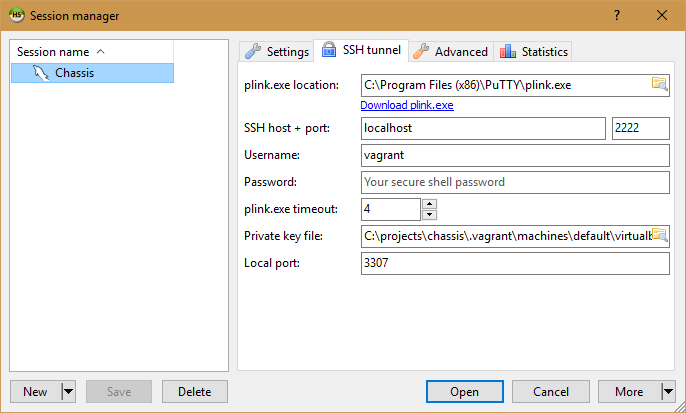
Click on the tab for “SSH tunnel” to access the HeidiSQL Session Manager SSH Tunnel settings.

HeidiSQL SSH Tunnel Settings

Alright, let’s plug in the values!

  • plink.exe location: Insert the path to your plink.exe utility.
  • SSH host + port: localhost and 2222
  • Username: vagrant
  • Password: just leave this blank
  • plink.exe timeout: default is fine
  • Private key file: Path to the .ppk file we created above
  • Local port: 3307 is fine

Now we come to the moment of truth. Push the “Save” button on the HeidiSQL session manager to save your changes. Now push the “Open” button and HeidiSQL should connect to your Vagrant hosted WordPress database. Woot!

Chassis.io Timeout Issue

TL:DR -> Try enabling Virtualization in your BIOS.

I’m trying out http://chassis.io as a way to easily setup a WordPress development environment on Windows. It’s actually quite easy and everything works almost exactly like the Chassis Get Started guide describes.

However, I ran into a timeout issue when attempting to boot up the Virtual Machine using vagrant up. On first run the process installed necessary dependencies and wired most things up. However, it hung for a considerable amount of time when booting up the virtual machine. Eventually it told me that it had timed out. It didn’t start the virtual machine.

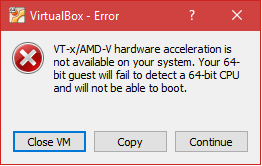
VT-x/AMD-V hardware acceleration is not available on your system

Hrmm… I wonder why it’s timing out. Chassis.io uses Vagrant and VirtualBox. So I spun up VirtualBox to see if I could manually start the VM myself. As it turns out, I could not. VirtualBox threw up the following error:

VirtualBox - Error
VT-x/AMD-V hardware acceleration is not available on your system. Your 64-bit guest will fail to detect a 64-bit CPU and will not be able to boot.

Well, that’s nice… (Hint: it’s not nice).

First Try: Disabling Hyper-V

I did some searching. I found a number of posts that indicated the solution was to disable Hyper-V. It sounds like this works for a lot of people. Scott Hanselman actually wrote up a post about how to “Switch easily between VirtualBox and Hyper-V with a BCDEdit boot Entry in Windows 8.1“. I tried this approach. It did not work for me (you can remove a bcdEdit entry using bcdedit /delete {ENTRYGUID} btw).

Second Try: Enabling Virtualization via BIOS

During my search I stumbled upon this SuperUser answer. The answer indicated that, depending on your system, Virtualization could be enabled via the BIOS.

In my case, enabling Virtualization via BIOS involved booting to the UEFI Firmware Settings. I’ve outlined the steps below.

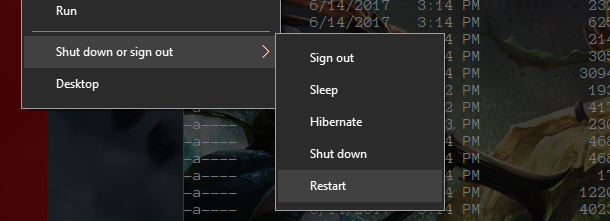
  1. Hold down the Shift key while you click Restart. This will cause your computer to bring up a special menu.

    Hold Down Shift and Restart
    Hold down “SHIFT” and click Restart
  2. Next you need to navigate the option screens to find “UEFI Firmware Settings”
    1. Select “Troubleshoot”
    2. Select “Advanced options”
    3. Select “UEFI Firmware Settings”
    4. Restart

    Steps to UEFI Firmware Settings
    Steps to UEFI Firmware Settings
  3. This will reboot you into your PC’s UEFI settings which looks a lot like a typical BIOS menu.
  4. Enable Virtualization
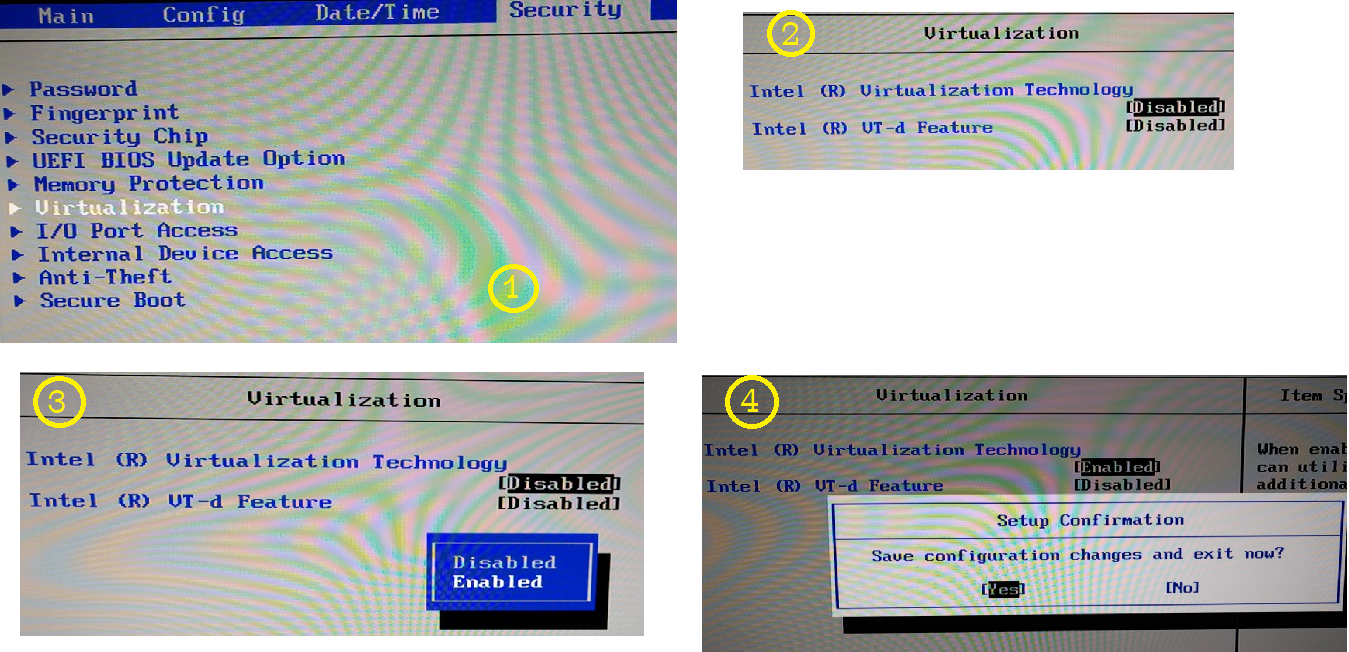
    Your system may be different. My system had a “Virtualization” setting located under the “Security” tab. Once I located the “Virtualization” setting I noticed that “Intel (R) Virtualization Technology” was indeed set to Disabled. I enabled it, saved the setting, and restarted my machine.

    Enable Virtualization via BIOS
    Enable Virtualization via BIOS

After enabling “Virtualization” I tried to start the VirtualBox VM one more time. BOOM. It worked. I ran vagrant up via a ConEmu console and… success.

In Conclusion

Chassis.io is a pretty sweet project. If your system is setup correctly then Chassis.io “just works”. In my case my system needed “Virtualization” enabled via a UEFI Firmware Setting.

Have a stupendous day! 🙂

Password Protect a WordPress Subdirectory with .htaccess

There are questions all over the internet regarding how to password protect a sub-directory when you are using WordPress.

I just spent a long time fighting a frustrating battle with this as well. So I’m documenting the resolution here for my (and anyone’s) benefit.

 In short

  1. WordPress does not mess with requests to actual directories or files.
  2. If WordPress is messing with your request then you aren’t requesting an actual directory or file.
  3. It’s likely your Error codes aren’t setup to return actual files.
  4. Make sure your .htaccess file isn’t generating 500 errors (i.e. ensure the path to your .htpasswd file is correct).

Problem

I’ve added a .htaccess and .htpasswd file but all I see is a WordPress 404 page. I can’t stop crying because it’s not working and my brain hurts.

Yep. That happens. WordPress comes with the following .htaccess file by default:

# BEGIN WordPress
<IfModule mod_rewrite.c>
RewriteEngine On
RewriteBase /
RewriteRule ^index\.php$ - [L]
RewriteCond %{REQUEST_FILENAME} !-f
RewriteCond %{REQUEST_FILENAME} !-d
RewriteRule . /index.php [L]
</IfModule>
# END WordPress

Let’s break this down.  First we are checking if the mod_rewrite module is even installed. If it is then we are turning the RewriteEngine on. That’s all great. We wouldn’t want to use the engine if it didn’t exist… right?

RewriteBase / – This sets the base of every subsequent Rule and Condition to the root `/`.  This way we don’t have to include the root directory at the beginning of any of our rules.

RewriteRule ^index\.php$ - [L] – This rewrite rule checks to see if we are on the index.php page already. The dash in the rule means do nothing. So… if we are already on index.php don’t do anything. The [L] option means that we should stop processing rules now. Don’t do anything else, we’ve got what we wanted. Quite literally this is the [L]ast rule that should be processed.

RewriteCond %{REQUEST_FILENAME} !-f – This condition makes sure that if the current request is hitting an actual existing file then we should do nothing. So WordPress won’t mess with your requests if you try to link to an actual file.

RewriteCond %{REQUEST_FILENAME} !-d – This condition makes sure that if the current request is hitting an actual existing directory that we should do nothing. So WordPress won’t mess with your requests if you try to link to an actual directory.

RewriteRule . /index.php [L] – Finally, if our request passed the above two conditions (it’s not an actual file and not an actual directory) then map the request to index.php. Now the request is mapped and WordPress can do its thing!

That’s Great But…

I know what you are thinking. You are thinking:

If what you are saying is true, then I shouldn’t be seeing a 404 page. My password protected directory actually exists!

Yes. You are correct, your directory does exist.

Solution

When you password protect a directory with .htaccess you are telling the server to return a certain response code. The 401 response code meaning the user is unauthorized, to be precise. When the browser received this response code it triggers a username and password prompt. However, and here is the problem, the browser is never receiving the response code.

Why is the browser not receiving the response code?

Good question. If you remember the WordPress .htaccess checks if the requested url points an actual file or directory. It only rewrites you to the index.php file if you aren’t actually requesting a file or directory. When you throw the 401 response code you aren’t actually requesting a file or directory. You are essentially requesting nothing (because you are unauthorized). So the WordPress .htaccess file is behaving correctly – it’s rewriting you to the index.php page and giving you a 404 (because more than likely your password protected directory does not match a permalink on your WordPress blog).

So… if WordPress is making sure that you actually requested a file then… you need to make sure that you are actually getting a file! You can do this by adding the following line to the top of your WordPress .htaccess file:

ErrorDocument 401 default

What you are doing is telling the server to return the default 401 file when it encounters a 401 response code. Once you are returning an actual file WordPress won’t try to grab your request.

Ok. I added that and I’m still having issues. What gives?

If you are like me, then the 401 response code fix wasn’t enough. You are still having the same issue and by now you are wanting to… oh gosh I can’t even think of anything to describe this type of pain.

Let’s look at our .htaccess file we are using to password protect our sub-directory. If you are anything like me your file might’ve looked something like this.

AuthType Basic
AuthName "Password Protected Area"
AuthUserFile /public_html/jeremysawesome.com/mySecretDirectory/.htpasswd
Require valid-user

This looks perfectly valid to me. However, it turns out this file is generating Internal Server Errors!  (I know because I added a ErrorDocument 500 default line to my WordPress .htaccess file just for kicks.) But this shouldn’t be generating a 500 error unless I’m doing something wrong.

Turns out. I was.

The AuthUserFile argument needs to be the full server path to your .htpasswd file. Turns out, /public_html wasn’t actually the beginning of my server path. As a result the server was throwing a 500 error. Once I figured out what my entire full server path was, and added that to my .htaccess file, everything started working.

To Recap

  1. WordPress does not mess with requests to actual directories or files.
  2. If WordPress is messing with your request then you aren’t requesting an actual directory or file.
  3. It’s likely your Error codes aren’t setup to return actual files.
  4. Make sure your .htaccess file isn’t generating 500 errors (i.e. ensure the path to your .htpasswd file is correct).

Whew! Thank goodness that’s over. Happy Blogging 🙂