Capturing Animated GIFS on Linux with Spectacle

OK. Honestly, I’m just dropping a quick one in here because it’s necessary. You can easily capture Animated GIFS, Screen Recordings, Animated PNGS on Linux with KDE Spectacle.

Background

Here’s the deal. Windows 10 be complaining that it’s End-of-Life and it won’t run on my laptop anymore and they need me to update my hardware. You know what OS doesn’t need me to update my hardware? That’s right, it’s Linux. So I went ahead and dropped Fedora KDE Plasma Desktop on my laptop and it’s working great. I used Kubuntu years ago and I’m super impressed at how far Linux has come along. There’s pretty much a Linux alternative to all the tools I use, not to mention that a lot of the tools I use are Linux native anyways.

The one thing that I couldn’t quite replicate is ShareX on Linux. I used ShareX on Windows to do the following things:

  1. Capture screenshots
  2. Capture screen recordings

And that’s it. I don’t use any sharing features. Try as I may, I couldn’t find something that would allow me to do that easily in KDE. I tried Flameshot, and it’s pretty cool, but I found it’s not quite as good as what I’m used to with ShareX. My experience is that opening flameshot basically took a screenshot of what’s on my screen and then tried to give me a selection tool. But the way it worked was it offset all my screens so just opening Flameshot made everything on my screen look different.

There’s also a very promising ShareX fork called SnapX. It looks pretty cool, basically like ShareX but for everywhere! However, it’s still very much in active development and I didn’t feel like trying to beta test the tool.

Solution

Enter Spectacle. Yeah, I know what you’re thinking. That’s just a simple screenshot tool, it’s not going to check off both your boxes. But, here’s the thing. It does check off both boxes. The docs don’t tell you about it, nothing published seems to say anything about it, but the ability to capture both a screenshot and a screen recording is legit right there in the interface for Spectacle. (I’ll go ahead and drop in a super grainy picture of my monitor to illustrate).

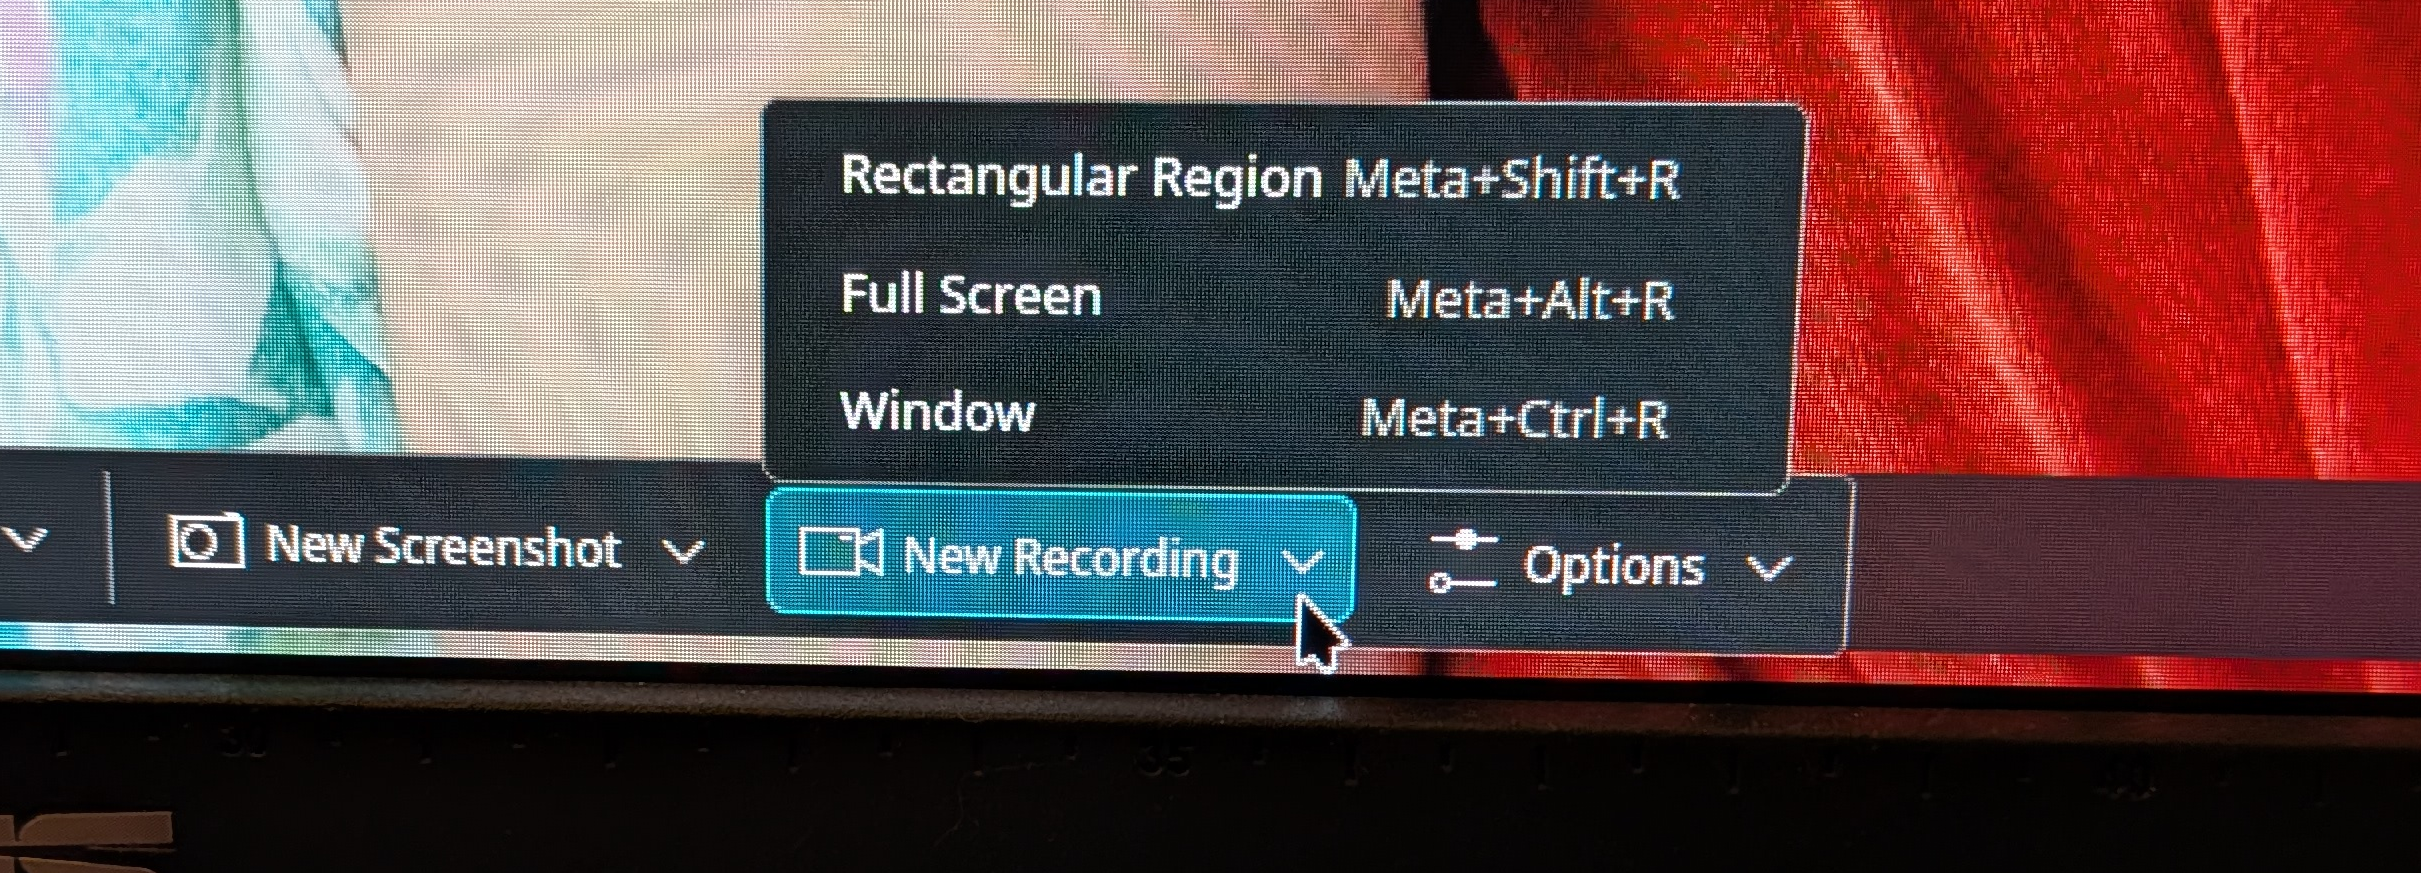
See – it’s right there. Spectacle gives you the opportunity to take a screenshot or a screen recording, right there with sweet rectangular selection, window, or fullscreen options.

How can you save animated gifs or png’s though? You just need to set that as the output format in Spectacle’s settings. The way I accessed that is by clicking the Options button just to the right of “New Recording” (see above uber grainy screenshot of monitor). From there you can navigate to Video Saving. Right next to the Filename text field there is a file type dropdown. Your options are WebM/VP9, MP4/H.264, Animated WebP (better than GIF), and GIF (compatible, but inefficient). Sweet right?

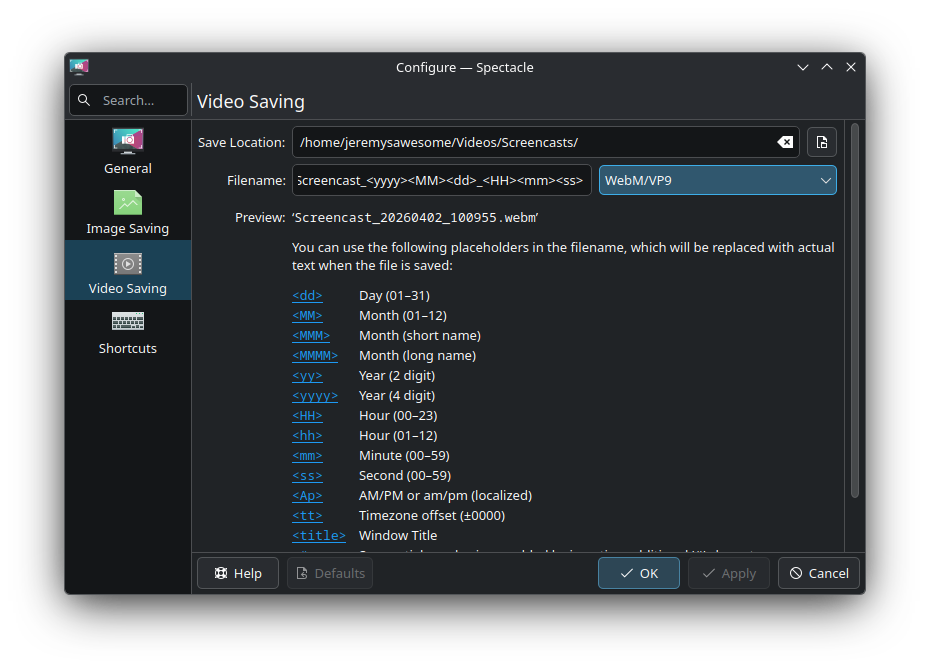
Important Note: Screenshots are stored in your Pictures/Screenshots folder and screen recordings are stored in your Videos/Screencasts folder.

Here’s a list of the keyboard shortcuts available to use.

KDE Spectacle – Screenshot & Recording Keyboard Shortcuts

Global keyboard shortcuts available in KDE Spectacle for screenshots and screen recording.
Action Global Shortcut Global Alternate
Capture Active Window Meta+Print
Capture Current Monitor Shift+Print
Capture Entire Desktop Meta+Shift+Print
Capture Rectangular Region Meta+Shift+Print
Capture Selected Window Meta+Ctrl+Print
Launch Spectacle Print Meta+Shift+S
Launch Spectacle without capturing
Start/Stop Region Recording Meta+Shift+R Meta+R
Start/Stop Screen Recording Meta+Alt+R
Start/Stop Window Recording Meta+Ctrl+R

Proof

A Screenshot taken with Spectacle
A Screen recording taken with Spectacle
An Animated GIF taken with Spectacle

Final Thoughts

While it was frustrating to find this tool, and that it doesn’t seem to be documented main stream – it’s awesome that it exists and it’s built in to KDE! Props to the Spectacle team.

Get the word out, you can screen capture and screen record right from Spectacle. The tool is awesome šŸ’„

The Morning Everything Went Wrong (and Still Worked Out)

LOL – first day of school for the kids today.

Obviously, I slept in. Planned to leave by 8:20 but woke up at 7:30. We’re out of bread. And my son was going to make a sandwich for lunch. That’s ok, I have time to run to the store and back.

Head out to the car. It’s not unlocking with the button, which is kind of odd. Open it up with the key. The light selector is turned to running lights… oh boy. I forgot to check the knobs after taking the toddler out of the front seat yesterday. I tried to turn the car on. Nothin.

I searched through two of our emergency kits. I have two sets of jumper cables, odd brands of band-aids, flashlights, batteries, foil blankets, cigarette lighter air compressors… but nothing to help me jump my car.

Not a problem, there’s a dude chillin in his truck two houses down. I walked over, he seemed annoyed but drove over to help me jump my car. I open the hood. I can’t find the battery, neither of us can. Where in the heck is the battery on this transit?!

Oh… it’s underneath the drivers seat. You have to literally take the drivers seat out to reach the battery. I apologize to my neighbor for wasting his time. It’s 7:58.

I figure I’d search the internet for how to jump a Ford Transit. Oh – there are specific jumper terminals in the main engine compartment. I found them. Turns out our transit is missing the very noticeable red jumper cable label that points directly to the terminal on most other Transits. It must’ve broken off. Had it been there my neighbor and I (first time I met him by the way) would’ve found it.

Great I found the terminals! But, my neighbor is gone…

I called my brother-in-law, he lives a few minutes away. Asked if he could come jump my car. He could. It would take him a bit to head over. My son probably isn’t going to get his sandwich.

Brother-in-law is here, I glance at the clock. It’s 8:15. Alright, I hope the car jumps. It totally does. Whew! I thank my brother-in-law profusely. He takes off, it’s 8:19. The kids get in the car. We’re out of there by 8:20am and I get the kids dropped off at school on time. My son doesn’t have a sandwich.

Yes, our kids are homeschooled. But for highschool they have a brand new co-op they are going to. They get 1 day of in class lessons from the teacher a week, and the rest of the week is homeschooled.

If only I would’ve “jumped” on a post from my boss 6 years ago 🤣

Anyways, after this whole situation I bought one of these Wolfbox things. Gonna be totally prepared next time. You never know when your toddler will leave your car lights on.

https://amzn.to/3JW5tYe šŸ‘ˆ (this is totally an affiliate link. šŸ˜†)
šŸ’”Heads up: I may earn a small commission if you buy through this link – at no extra cost to you!

Fixing ShareX Hotkeys: The Print Screen Conflict with Logi Options

Somewhat recently, I found that my ShareX hotkeys were not working. I tried a number of different things: re-installing ShareX, updating ShareX, and resetting the ShareX hotkey settings. Nothing worked.

And so, since I had more important things to do, I just left the situation alone and manually triggered the ShareX features via the menu when I needed them.

This morning, I attempted to use a ShareX hotkey again. However, I noticed something I’ve never noticed before—a little Logi Options logo appeared on my Windows taskbar for a brief moment. And that got me thinking… what am I doing to trigger Logi Options to show up?

So obviously, I opened up Logi Options. In the settings for my keyboard, I discovered that Print Screen is a configurable key. It was set, at some point, to Screen Capture. While that sounds good—it’s what Print Screen is supposed to do—this actually isn’t good! Screen Capture tells Logi Options to take a screenshot for you. It behaves almost like a native Windows Print Screen, and so it’s hard to notice.

In order to fix your ShareX hotkeys, you need to choose the Print Screen option. This tells Logi Options to get out of the way and treat a Print Screen press like normal.

Correcting the Print Screen behavior

Remove Gaps Between Monitors

Do you hate seeing a sliver of light between your monitors? I sure do. I’ve spent a lot of time getting my monitors lined up just right so that they are flush against eachother with no gaps. However, a slight bump of the desk can throw all that hard work out the window.

So, I figured out another solution. Instead of adjusting the monitors to make sure that they are “perfect” I took some black electrical tape and ran it down the seem behind the two monitors. The black tape matches the black border of my monitors and it blocks any light from coming in!

I highly suggest running black electrical tape down the back seem between your monitors. It really helps!

RocketChat server not running. Cancelling

As you might know, I’ve set up a RocketChat server recently on Digital Ocean. So far it’s been working great. An update every once and a while is all it needs.

However, yesterday, I attempted an update that failed. From then on every attempted update resulted in “RocketChat server not running. Cancelling”. This was very frutrating.

First, a few commands to try that might help:

  1. systemctl restart rocketchat.service – This will start your RocketChat server in case it is stopped.
  2. systemctl status rocketchat.service – Use this command to check the results of the previous command. Typically this will report that the service is “Active” if the previous command was successful.

In my case, the second command resulted in a “failed” state. The command itself gave me some information as to what the failure was, but not a lot of context as to what caused the failure. However, it did show me the process that it attempted to run. It said, ExecStart=/opt/nvm/versions/node/v14.19.3/bin/node /opt/Rocket.Chat/main.js (code=exited, status=1/FAILURE).

Alright! We’re getting somewhere. With that I was able to figure out what command failed and where that command was run. I navigated directly to the /opt/Rocket.Chat directory which was where the failure was occurring. From here I ran node main.js. The results of this command were much more helpful. They told me this, Error: Cannot find module '@meteorjs/reify/lib/runtime'. That looks like an issue with npm dependencies.

So, I poked around the Rocket.Chat directory structure and looked for dependencies for the Rocket.Chat server. I found what I was looking for in the /opt/Rocket.Chat/programs/server directory.

From this directory I ran two commands

  1. npm install
  2. npm ci

Afterwards I attempted to start the RocketChat server again using the systemctl restart rocketchat.service command. I checked it with systemctl status rocketchat.service and found that it was working now! RocketChat was back to running normally. The problem with “RocketChat server not running. Cancelling” was gone!

Google Fi Auto Connect Issues

Ok, so I use Google Fi (formerly known as Project Fi) as my phone provider. I have a Pixel 2 and haven’t felt the need to upgrade. Recently I’ve noticed issues with my service. Specifically, my Pixel 2 will connect to an H+ network or an Edge network in an area I know has reliable 4G LTE. So, what gives?

First a quick and dirty explanation of the Google Fi network based on my limited understanding ?. Google Fi utilizes the TMobile (which I believe includes Sprint now) and US Cellular networks as well as WI-Fi to provide cellular service to their customers. Phones on the Google Fi network smartly switch to whatever provider has the best signal. At least that’s the idea.

Knowing that Fi uses multiple cell networks to provide service I wondered what network my phone was using. Using SignalCheck Lite I was able to determine that my phone was connecting to the TMobile network by default. In my area US Cellular beats TMobile coverage hands down. There is no competition. So what is the deal with my phone auto connecting to Edge and H+ networks?

Honestly, I don’t know yet. I strongly suspect a recent update to the Google Fi app or services set my phone to prefer TMobile regardless of network speed. Whether this was an intentional change or a bug in the auto-connect code, I don’t know. I’ve been able to temporarily fix this issue by forcing a connection to US Cellular using Google Fi dialer code: *#*#34872#*#*

Google Fi Dialer Codes

I pulled these codes come from this post on ArkieNet. I’m including them here just in case the post poofs from the internet in the future.

Note this paragraph from the original article:

The following options are only available for ā€œDesigned for Fiā€ phones. They will not work on the iPhone or ā€œCompatible with Fiā€ phones because they are T-Mobile only.  See which class of phone you have here.

ArkieNet
ALPHA CODEDIALER CODEDESCRIPTION
FI AUTO*#*#342886#*#*Set carrier selection to automatic.
FI NEXT*#*#346398#*#*Select Next Carrier
FI SPR*#*#34777#*#*Select Sprint for 2 hours
FI TMO*#*#34866#*#*Select T-Mobile 2 hours
FI USC*#*#34872#*#*Select US Cellular 2 hours
FI SIMON*#*#3474666#*#*Select Three (UK only)
ALPHA CODE
DIALER CODE
DESCRIPTION
FIXME*#*#34963#*#*Force reactivation
FI INFO*#*#344636#*#*Get information about the current network.
INFO*#*#4636#*#*Get general phone information.
DEBUG*#*#33284#*#*Phone Debug Options
PRL*#*#775#*#*Force download of Preferred Roaming List (Sprint)
PRL*228Force download of Preferred Roaming List (US Cellular)
FI ROAM*#*#347626#*#*Turn on International Roaming
SWITCH
SIM
*#*#794824746#*#*Switch to / from eSim.

Issue with Mouse Auto Scrolling on Windows 10

Problem. I installed Adobe Premiere Pro and then all of a sudden my mouse starting automatically scrolling. This happened only in certain places. Like when opening the run command dialog, or when hovering over the Premiere Pro timeline. It did not happen in the browser unless I hovered over a section that had a custom scroll type listener.

The issue with auto scrolling was very frustrating. I was able to figure it out though. Here are the steps.

  1. Right click on This PC in the file explorer menu. Select Manage.
  2. Find and click the Device Manager
  3. Expand the Mice and other pointing devices option
  4. Right click the HID-compliant mouse entry and select Uninstall device.
  5. Your mouse will stop working…
  6. Unplug your mouse from the back of your computer, wait 10 seconds, plug it back in.
  7. Windows should redetect your mouse and the problem should go away.

Alternatively you could try to “Update driver” instead of Uninstalling the device. I didn’t try, my problem was solved with the steps documented above.

Validate the Hash or Checksum of a Downloaded File

Every once and a while I want to validate the hash of a downloaded file. Most of the time these are MD5 hashes, but I’ve seen SHA as well.

Windows actually has a couple built in ways of generating the hash of a file. You can use certutil or, in powershell you can use get-filehash.

With Certutil

To verify a checksum with certutil use the following command: certutil -hashfile {FILENAME} {ALGORITHM} replace the FILENAME and ALGORITHM with your choices.

With get-filehash

This is my preferred method. No reason, maybe I like the order of arguments better?

Use get-filehash -algorithm {ALGORITHM} {FILENAME}.

That’s it!