GitLab on Ubuntu Server with WiFi

Over the weekend I spent some time setting up GitLab on Ubuntu Server using a WiFi card. For those of you who do not know what GitLab is, check it out. I stumbled upon GitLab several years ago when I was looking for a self-hosted GitHub alternative. Since then, GitLab has greatly improved, and setting it up is fairly easy.

Setting up Ubuntu Server

First, you are going to want to obtain the Ubuntu Server install. You can download this from the Ubuntu Website.

The second step I took was to find an old desktop I wasn’t using anymore. This is going to be my server. I installed a PCI-E WiFi card in the sucker, because, honestly I’m too lazy to run the network cable.

Note: I tried to setup the server multiple times using just the WiFi card. I wouldn’t recommend it as it was a very frustrating process. I’d highly recommend hooking your new server up via an Ethernet cable at least until you setup the WiFi. It’s far easier and saves a ton of time.

After I hooked up my server with the Ethernet cable I booted to the Ubuntu Install disc and began the installation process. The process itself is really quite simple. There are a few questions you have to answer but the whole thing should be over in less than 30 minutes. I just overwrote everything on the hard disk. After it’s done installing it’s going to ask you to remove the installation media. At that point it should reboot, load up, and show the login screen.

Note: Ubuntu Server does not come with a GUI. Everything is done via the command line. You can install a GUI if you want, but there isn’t a GUI packaged in.

Now that I had Ubuntu Server installed I went ahead and logged in. The first thing it showed me was that there were some updates to be installed. So I ran the following commands to update the system:

sudo apt-get update && sudo apt-get upgrade

Getting WiFi up and Running on Ubuntu Server

Now that the system was updated I wanted to get the WiFi working. In order to get the WiFi working I used nmcli. nmcli is a command line tool that comes with the Network Manager package. Some people might not like using this tool because I believe it installs some GUI dependencies. Honestly, nmcli was the easiest method I found to get the WiFi working, so I don’t really care about the small amount of dependencies that the Network Manager package comes with.

sudo apt install network-manager

Alright. I had the network-manager package installed. Now to connect to my WiFi network.

I read through the “man” page for nmcli. It looks like I can get a list of wifi access points in the area by running the following command.

nmcli device wifi list

Yes! That actually gave me a list of WiFi access points in my area. I saw my home network listed. I was so happy to see this because it meant I didn’t need to configure anything else. The Ubuntu server had recognized my wireless card and the card was working. That made me so happy… 🙂

Next step would be to actually connect to my WiFi access point. According to the nmcli man page I can connect using nmcli device wifi connect. My access point requires a key, and it looks like nmcli supports connecting to an access point with a key… so this is a good thing.

nmcli device wifi connect MyAccessPoint password 123456789ACB

Boom! I ran that sucker and it actually worked! I had been struggling and struggling with this before – nmcli is like my new favorite thing ever. EVER.

At this point I rebooted the server and disconnected the Ethernet cable. I wanted to see if the server would automatically connect to the WiFi access point on boot. It seemed to take a long time to start. After it started up I logged in. I tried to ping google.com. No dice. I waited a few moments and tried again… it worked!

I made sure OpenSSH was installed on the server so that I could manage it from another computer.

My WiFi was now working on the Ubuntu Server. It was connected to my home network, and it automatically connected after the server was turned on.

Setting Up GitLab on Ubuntu Server

Now that I had the WiFi connected I wanted to get GitLab all setup. Luckily, the folks at GitLab have made this incredibly easy. They have a great guide setup here. There are really only a few commands you need to run and then you are good to go. Let’s go ahead and list those commands really quick.

Install the Dependencies
sudo apt-get install curl openssh-server ca-certificates postfix

These are things that GitLab needs in order to run successfully.

Add the GitLab package server and install the package.
curl -sS https://packages.gitlab.com/install/repositories/gitlab/gitlab-ce/script.deb.sh | sudo bash
sudo apt-get install gitlab-ce

I used the above command. However, GitLab mentions an alternative if you aren’t comfortable with a piped script. You can find the alternative on their guide page.

Configure and Start GitLab
sudo gitlab-ctl reconfigure

The people behind GitLab have really made it incredibly easy to get this up and running. Now you just need to login to your new GitLab server. When you first visit the page you will be asked to create a new password. This password can be used in conjunction with the “root” username to login to the system.

Finishing Touches

That should be it. Your GitLab server is setup and working. You’ve setup the WiFi card so the server is connected to your network. You’ve got OpenSSH installed so you can manage the server from another machine. You’ve installed GitLab so you can host your own internal Git repositories (as well as collaborate with others on your team etc…).

The last things I would do:

  1. Change your GitLab username from “root” to something else. You can do this within the GitLab interface.
  2. Setup your router so that it always assigns a certain IP address to your server. This way you don’t have to worry about static IP addresses on the Ubuntu Server itself.
  3. Update your internal DNS so that you can refer to your GitLab server by an actual domain name. I set mine up as “gitlab.jeremysawesome.com”.
  4. Download PuTTY on your Windows machine so that you can remote manage your server.
    1. Optionally hook this up with ConEmu 🙂
    2. Optionally update with the Solarized theme for PuTTY.
  5. Set your server up somewhere inconspicuous. Hey, you’ve got a WiFi server. Throw it somewhere out of the way.

Alright – that’s it. This post ended up being a bit longer than I thought, however I’m glad I’ve got it documented it. (Even if there wasn’t much to document).


Discovery Benefits – A Frustrating Experience

What follows is my experience thus far with Discovery Benefits. This post is more of a frustration dump for me than anything else. Discovery Benefits administers the COBRA accounts for my previous employer. My experience with them thus far has been frustrating. Their website is: https://www.discoverybenefits.com/

Discovery Benefits runs very slow and has little knowledge about the internal workings of their organization.

I have contacted Discovery Benefits multiple times. Each time asking them to add a dependent to my COBRA plan. Initially I provided dependent information to them via their own forms. After I contacted my insurance provider I was informed that not only did Discovery Benefits enter my wife’s name incorrectly, but they also did not pass on my dependents information.

I called Discovery Benefits and talked to a COBRA representative. The representative looked through my file and found the information I originally provided. They did not have any idea why that information was not entered into their system. The representative informed me they were entering the information now. They told me everything should be resolved within 3-5 business days.

Nine business days later I contact my insurance company to confirm that my dependents have been added. Most of the information is correct, but they are still missing information about one of my dependents. The insurance company tells me that I need to call Discovery Benefits to add the dependent. (Which I’ve already done).

I call Discovery Benefits up again. The customer service representative tells me that they have all the information that they need from me. However, the internal department responsible for adding dependents has not added the dependent yet. I ask the representative for a reason why. The representative cannot give me a reason. The representative repeats that “for some reason” the dependent has not been added. The representative tells me that they will add a note to my account about this issue.

I call Discovery Benefits back. I ask to talk to the department responsible for adding dependents. The representative does not know what I am talking about. I have to explain to them. There is a department within Discovery Benefits responsible for adding dependents to COBRA accounts. I then explain to them that one of my dependents has not been added and I want to talk to someone who can tell me why. The representative tells me that I cannot talk to that department. The representative still cannot give me a valid reason why the dependent has not been added. They continuously repeat “for some reason”. When I ask to talk to someone who knows what’s going on, the representative tells me that there is nobody I can talk to who knows what is going on. They communicate to me that the best that can be done is to add a “prioritized note” to my account.

Discovery Benefits - Delighted Customers
Not so much

To summarize. Discovery Benefits does not know what is going on. They cannot connect me to somebody who knows what is going on. And furthermore, there is nobody at that company who knows what is going on.

The best that Discovery Benefits can do for me is to add a prioritized note to my account. I am stuck. All I can do is hope that somebody sees this note and chooses to address it.

Discovery Benefits has proven that it is not capable of providing satisfactory service or information.

Why I no longer contribute to StackOverflow – Michael T. Richter

I ran into this post by Michael T. Richter a while ago and found it to be an interesting read. I certainly recall the regex question he’s talking about and I remember stumbling upon that question myself back in the day. In the past StackOverflow did seem more like a community of developers who wanted to have fun and help eachother out. The dude makes some good points in his (now old and deleted) post.

However it has been archived and so I link to the archive here, mainly for my own future reference.

Why I no longer contribute to StackOverflow – Michael T. Richter

GIT CLI SSH PassPhrase

I use the GIT command line interface a lot. It helps me keep my Git repositories looking sharp and clean. Interactive rebase auto-squashing with posh-git+ConEmu ftw!

However, from time to time I will notice that the GIT cli is asking me for my SSH RSA passphrase more often than I’d like. Sometimes it even asks on every pull. That’s annoying.

It is possible, however, to only enter your passphrase once per session. Setting this up should be as simple as doing the following:

  1. Add the “bin/” folder of your GIT install to your $PATH. This will allow you to reference ssh-agent in your powershell environment.
  2. From your Powershell environment run
    ssh-agent
  3. Now run
    ssh-add

Excellent! That should be it. Now you should be able to push, pull all you want without having to insert your passphrase more than once per session.

Launch Programs as Domain User from Non-Domain Computer

So I found this amazing post that has helped me a ton:

http://codebetter.com/jameskovacs/2009/10/12/tip-how-to-run-programs-as-a-domain-user-from-a-non-domain-computer/

I am constantly referring to that post in order to get the correct commands for launching something (like ManStu) as a domain user.

So, I figured I would post the command here just in case that post goes away (as posts on the internet tend to do).

The command is:

runas /netonly /user:domain\username <program you want to run>

Example:

runas /netonly /user:domain\username "C:\Program Files (x86)\Microsoft SQL Server\120\Tools\Binn\ManagementStudio\Ssms.exe"

Google Music Canceled, Panic and Resolution

I love Google Music. I’ve been using it since the day (or the month) it came out and I will most likely be using it until it goes away (or I die, one of the two). I’ve built up a large number of playlists and a library. I have go to playlists for when I’m down or when I need to get into that “Work” mode. I have never canceled the service and I still get the promotional price.

And then Google Music was canceled

Imagine my surprised panic this morning when I found the following in my inbox:

Google Music Subscription has been canceled.
WHAT?!!!! NOOOOOOOOOOoooooooo!!!!

Egagh! Wha? Panic panic panic panic… what? Why has this happened to me?! WHY?!!!!

If they canceled my order, did they kill my promotional price?

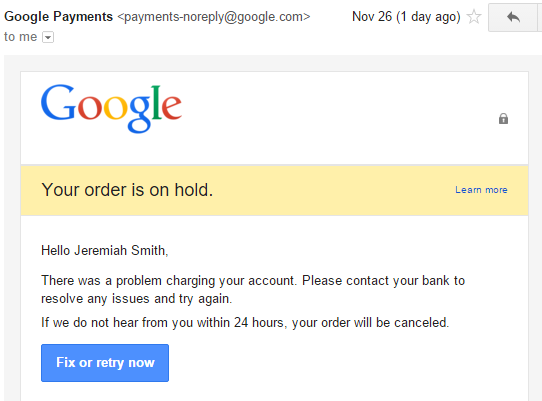
Still panicking I went and searched through my emails from the last several days. I found the following email regarding my payment method not working (those credit cards, always expiring).

Google Music Order is on Hold Email
My order is on hold and will be canceled. Thank goodness for this Fix button.

They gave me a whole day to update my payment method. Why hadn’t I done it? Oh, yeah, the day that they gave me was Thanksgiving. Thanksgiving is quite possibly one of the busiest days of the year (besides Christmas).

Excellent! The email that Google sent me includes a “Fix or Retry now” button. This should be able to “Fix” the issue! Unfortunately, no. There was no information on the resulting page that indicated or alluded to how to fix the issue.

So I did what any other normal extremely panicked person would do. I started up a support chat with Googles Customer Service.

The Customer Service Representative was very nice. They told me that I should be able to “Resubscribe” to Google Music and that I should be able to maintain my promotional price.

So that’s what I did. I visited https://music.google.com. There was a friendly banner right at the top asking me if I wanted to resubscribe. So I resubscribed and everything is great – panic subsided.

That said I do have a couple of suggestions based on this experience.

  1. If you are going to provide a “Fix” button… then at the very least it should point the user to how to fix the problem. A simple “Order Canceled by mistake?” would’ve done wonders in my situation.
  2. Maybe give the user more than a day to fix the issue? Especially if the day you give them just happens to be a national holiday.

MailTo Links Not Working Correctly

Backstory

Once upon a time there was a person named Jeremy. He used Google Chrome as a browser. He was very happy. One day Jeremy clicked on a mailto: link. Some program (Google Chrome or Windows) helpfully asked how it could handle that action. Jeremy, who hates modal windows and was not paying attention, hastily clicked on the first thing that looked like it would close the modal. He soon found that his hasty actions lead to a larger problem. Now, mailto: links did not do anything when clicked on within Google Chrome.

Present Day

(Spoiler: Jeremy is me.)
Today I got fed up with mailto: links not working as they should in Google Chrome. So I went looking for a solution. I found several different potential solutions. My goal was to get mailto: links to open in Mozilla Thunderbird.

  1. Remove the mailto: handler from chrome://settings/handlers.

    I tried this, unfortunately there were no handlers listed under: chrome://settings/handlers.

  2. Register a new setting with registerProtocolHandler

    I stumbled upon this Paul Irish post. However, it seemed hacky to use a handler to open Thunderbird.

  3. Finally

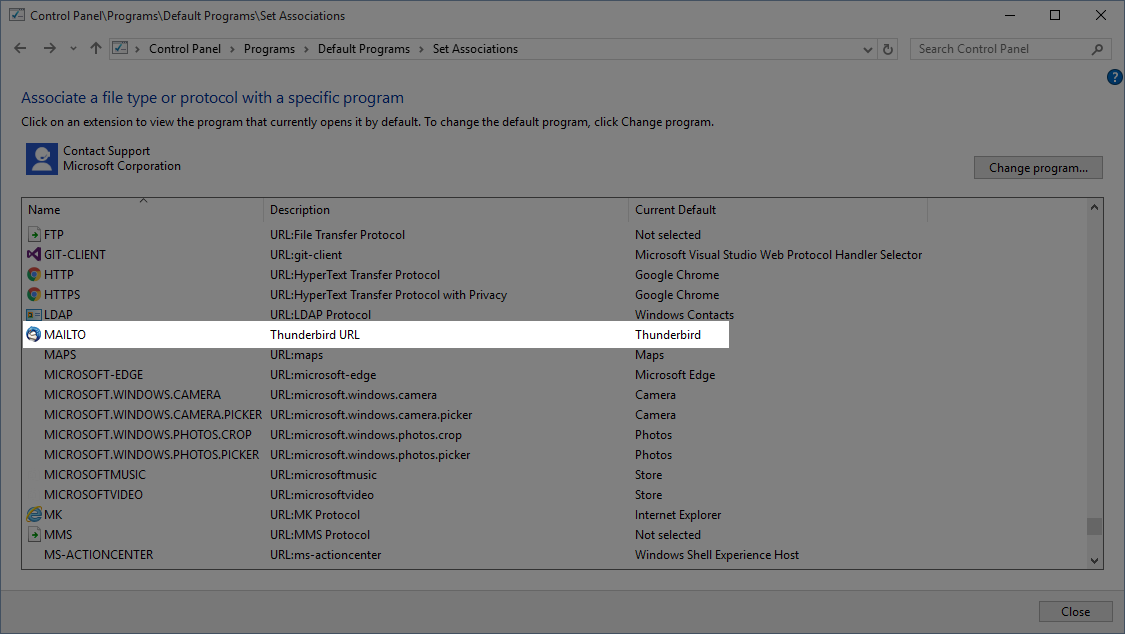
    I decided to take a look at my Windows settings. I’m using Windows 10 so I brought up the Start Menu and searched for “Default Programs”. I found Control Panel\Programs\Default Programs. From there I saw an option to “Associate a file type or protocol with a specific program”. This led me to Control Panel\Programs\Default Programs\Set Associations which displays a LONG list of associations, and unfortunately no intuitive way to search through them. So I scrolled and scrolled and eventually found an option named “MAILTO”.

Mail To Default Association
The Current Default is now Thunderbird

Lo and behold the Current Default for this option was set to “Google Chrome”. That looked suspicious. So… I changed the Current Default to “Thunderbird”. Saved the setting, restarted Google Chrome, and BOOM, mailto: links started working correctly.

Meld rocks for Merging Code Conflicts

I’ve tried a number of different merge/differencing tools in the past. BeyondCompare, TortoiseMerge, WinMerge, etc…

I’ve never found one that’s as easy to use and as understandable as Meld is. Do yourself a favor and head over to http://meldmerge.org/ and grab yourself a copy. It’s great.

When you’ve got it go ahead and throw this in your git config. (Psst, the command for that is: git config --global --edit)

[merge]
tool = meld
[mergetool "meld"]
cmd = 'C:/Program Files (x86)/Meld/meld.exe' $REMOTE $MERGED $LOCAL

You’ll probs want to update the path to your Meld exe.

BOOM.

Luke Skywalker, Jedi Knight

In response to: https://medium.com/@robconery/luke-skywalker-sith-lord-f8a11072f246#.79t1rov5m

Not sure I can get on board with the description in that article. It’s interesting, and it could be possible, but the optimistic/skeptic inside of me doubts it.

First we’ve got the Emperors words.

Take your weapon. Strike me down with all of your hatred and your journey towards the dark side will be complete

So let’s distill that into an if statement

var lukesSide = light;
if(takesWeapon && strikesEmperorDownWithHatred){
    lukesSide = darkSide;
}
else{
    // Lukes side is ?
}

So… we know that Luke didn’t both take the weapon AND kill the Emperor so we have to jump into the else block. Assuming that Luke’s side did not change, and he started out Light, then he would still be light.

Then the next thing: the false assumption that hate makes you powerful. This claim is not substantiated. Luke asks Yoda about this straight up in the Empire Strikes Back.

Excerpt

Luke: (…) Is the dark side stronger?
Yoda: No, no, no. Quicker, easier, more seductive.
Luke: But how am I to know the good side from the bad?
Yoda: You will know… when you are calm, at peace, passive. A Jedi uses the Force for knowledge and defense, NEVER for attack.

The author tries to make the claim (as does the Emperor) that hatred leads to power and that Luke feels it coarsing through him. However, we know, as did Luke, that the dark side is not stronger.

I’d like to think that Luke is having an internal struggle between both sides. It is at this crucial point that he remembers his conversation with Yoda back on Dagobah. When it comes down to it, how will he know the good side from the bad side? The answer, as you read above, is that you will know when you are calm, at peace, and passive.

The author of this article carefully leaves out the bit just after Luke stares at his hand and supposedly claims power. Let me fill it in. Luke calmly collects himself, turns off his Lightsaber, throws it away, and then addresses the Emperor.

So… the very last actions that Luke takes are ones that a “good” Jedi would take, given our definition of what makes a “good” Jedi.

Here, Luke clearly chooses to be calm, peaceful, and passive – the Emperors plans to turn him have failed. Obviously, the Emperor would then be a bit miffed, but to say that he now viewed Luke as a rival is taking it a bit too far. If Luke had truly turned, do you honestly think he would’ve turned off his lightsaber? No… he would’ve used the force to attack the Emperor and strike him down.

Remember: Luke does not strike the Emperor down, so his journey to the darkside is not complete. Here, in the moment where he could’ve claimed evil victory he chooses not to.

In the moment of his greatest temptation Luke chose Light side qualities. Thus, I can say with confidence, that Luke Skywalker is a Jedi Knight.

Password Protect a WordPress Subdirectory with .htaccess

There are questions all over the internet regarding how to password protect a sub-directory when you are using WordPress.

I just spent a long time fighting a frustrating battle with this as well. So I’m documenting the resolution here for my (and anyone’s) benefit.

 In short

  1. WordPress does not mess with requests to actual directories or files.
  2. If WordPress is messing with your request then you aren’t requesting an actual directory or file.
  3. It’s likely your Error codes aren’t setup to return actual files.
  4. Make sure your .htaccess file isn’t generating 500 errors (i.e. ensure the path to your .htpasswd file is correct).

Problem

I’ve added a .htaccess and .htpasswd file but all I see is a WordPress 404 page. I can’t stop crying because it’s not working and my brain hurts.

Yep. That happens. WordPress comes with the following .htaccess file by default:

# BEGIN WordPress
<IfModule mod_rewrite.c>
RewriteEngine On
RewriteBase /
RewriteRule ^index\.php$ - [L]
RewriteCond %{REQUEST_FILENAME} !-f
RewriteCond %{REQUEST_FILENAME} !-d
RewriteRule . /index.php [L]
</IfModule>
# END WordPress

Let’s break this down.  First we are checking if the mod_rewrite module is even installed. If it is then we are turning the RewriteEngine on. That’s all great. We wouldn’t want to use the engine if it didn’t exist… right?

RewriteBase / – This sets the base of every subsequent Rule and Condition to the root `/`.  This way we don’t have to include the root directory at the beginning of any of our rules.

RewriteRule ^index\.php$ - [L] – This rewrite rule checks to see if we are on the index.php page already. The dash in the rule means do nothing. So… if we are already on index.php don’t do anything. The [L] option means that we should stop processing rules now. Don’t do anything else, we’ve got what we wanted. Quite literally this is the [L]ast rule that should be processed.

RewriteCond %{REQUEST_FILENAME} !-f – This condition makes sure that if the current request is hitting an actual existing file then we should do nothing. So WordPress won’t mess with your requests if you try to link to an actual file.

RewriteCond %{REQUEST_FILENAME} !-d – This condition makes sure that if the current request is hitting an actual existing directory that we should do nothing. So WordPress won’t mess with your requests if you try to link to an actual directory.

RewriteRule . /index.php [L] – Finally, if our request passed the above two conditions (it’s not an actual file and not an actual directory) then map the request to index.php. Now the request is mapped and WordPress can do its thing!

That’s Great But…

I know what you are thinking. You are thinking:

If what you are saying is true, then I shouldn’t be seeing a 404 page. My password protected directory actually exists!

Yes. You are correct, your directory does exist.

Solution

When you password protect a directory with .htaccess you are telling the server to return a certain response code. The 401 response code meaning the user is unauthorized, to be precise. When the browser received this response code it triggers a username and password prompt. However, and here is the problem, the browser is never receiving the response code.

Why is the browser not receiving the response code?

Good question. If you remember the WordPress .htaccess checks if the requested url points an actual file or directory. It only rewrites you to the index.php file if you aren’t actually requesting a file or directory. When you throw the 401 response code you aren’t actually requesting a file or directory. You are essentially requesting nothing (because you are unauthorized). So the WordPress .htaccess file is behaving correctly – it’s rewriting you to the index.php page and giving you a 404 (because more than likely your password protected directory does not match a permalink on your WordPress blog).

So… if WordPress is making sure that you actually requested a file then… you need to make sure that you are actually getting a file! You can do this by adding the following line to the top of your WordPress .htaccess file:

ErrorDocument 401 default

What you are doing is telling the server to return the default 401 file when it encounters a 401 response code. Once you are returning an actual file WordPress won’t try to grab your request.

Ok. I added that and I’m still having issues. What gives?

If you are like me, then the 401 response code fix wasn’t enough. You are still having the same issue and by now you are wanting to… oh gosh I can’t even think of anything to describe this type of pain.

Let’s look at our .htaccess file we are using to password protect our sub-directory. If you are anything like me your file might’ve looked something like this.

AuthType Basic
AuthName "Password Protected Area"
AuthUserFile /public_html/jeremysawesome.com/mySecretDirectory/.htpasswd
Require valid-user

This looks perfectly valid to me. However, it turns out this file is generating Internal Server Errors!  (I know because I added a ErrorDocument 500 default line to my WordPress .htaccess file just for kicks.) But this shouldn’t be generating a 500 error unless I’m doing something wrong.

Turns out. I was.

The AuthUserFile argument needs to be the full server path to your .htpasswd file. Turns out, /public_html wasn’t actually the beginning of my server path. As a result the server was throwing a 500 error. Once I figured out what my entire full server path was, and added that to my .htaccess file, everything started working.

To Recap

  1. WordPress does not mess with requests to actual directories or files.
  2. If WordPress is messing with your request then you aren’t requesting an actual directory or file.
  3. It’s likely your Error codes aren’t setup to return actual files.
  4. Make sure your .htaccess file isn’t generating 500 errors (i.e. ensure the path to your .htpasswd file is correct).

Whew! Thank goodness that’s over. Happy Blogging 🙂