Getting Started with Rocket Chat Using Digital Ocean Backing

Note – RocketChat is making moves to severely limit their PAAS offering. They have baked in a bunch of limitations in the codebase and now claim that if you self-host you are using their “free version” ?


RocketChat (https://rocket.chat) is a chatting tool similar to MatterMost and Slack. It offers a self-managed community edition as well as some paid plans and is in active development. I’m just learning how to use it, so I’m planning on documenting my journey here.

I installed and set up RocketChat installed in a matter of minutes. The QuickStart guide, though short, includes most of what you need to get up and running.

To get started with your RocketChat instance on DigitalOcean you need to:

  1. Create a DigitalOcean account
  2. Install RocketChat
  3. Create an A Record that points to your Digital Ocean Droplet. *
  4. Setup your Let’s Encrypt certificate.
    rocketchatctl configure --lets-encrypt --root-url=YOUR_DOMAIN --letsencrypt-email=YOUR_EMAIL
  5. Update your RocketChat installation. Run the following commands from your droplet command line interface.
    1. Run sudo rocketchatctl upgrade-rocketchatctl
    2. Run sudo rocketchatctl update

* I use Cloudflare to host my DNS. In this case I had to disable the proxying on the A Record in order to allow RocketChat to work correctly.

Now visit your site (you should not run into any problems) and create your administration account.

One Note

From time to time the Rocket Chat server responds with “Bad Gateway”. I’m not sure exactly why. However, a DigitalOcean droplet can be restarted by using the reboot command from the command line interface.

Future Logging

The other day I was thinking about how, in the future, “street-view-esque” spherical cameras will be used to capture events. These events can then be played back via VR, and eventually encoded directly to the brain via a project like Neuralink. Add in “kinect-esque” sensors that can map a 3 dimensional environment, and you could reconstruct an event in a virtual 3 dimensional space. I wouldn’t be surprised if future “videos” went that way, especially given FB’s push towards VR (think Meta).


But today I was thinking about being able to predict the future. Imo, the best way to accurately predict the future is to receive messages from the future. Receiving messages from the future sounds a bit weird, until I realized that’s literally what we work on every day. We design interfaces that receive future interactions. Code written to record transactions from today will record transactions from tomorrow. Webhooks are written specifically to receive receive future events. All of the code we write is intended to receive messages from the future. Think of the simple logging methods we use log('location', 'message'), even those are intended to log messages from the future.

That got me thinking of quantum entanglement, mapping polarization states to binary 1’s and 0’s, quantum routers, and an article I read years ago about delayed-choice entanglement swapping. The idea, in the article, was that a choice made in the present can “affect” measurements made in the past. It occurs to me that this also means, a choice made in the future can “affect” measurements made in the present. Could that same delayed-choice mechanism be used to receive a string of bits from the future?

Assume you define a state-binary mapping that you consistently use. Imagine measuring the polarization state of eight separately entangled photons, mapping those states to binary, you’d have yourself a byte of information from the future. Expand this to a logging method, maybe one that sits on a Starlink satellite, and you can imagine logging a bit, byte, kilobyte, megabyte of data that passes through that satellite all of it “from the future”. Assuming you have information from the future, could you then predict the future?

Google Fi Auto Connect Issues

Ok, so I use Google Fi (formerly known as Project Fi) as my phone provider. I have a Pixel 2 and haven’t felt the need to upgrade. Recently I’ve noticed issues with my service. Specifically, my Pixel 2 will connect to an H+ network or an Edge network in an area I know has reliable 4G LTE. So, what gives?

First a quick and dirty explanation of the Google Fi network based on my limited understanding ?. Google Fi utilizes the TMobile (which I believe includes Sprint now) and US Cellular networks as well as WI-Fi to provide cellular service to their customers. Phones on the Google Fi network smartly switch to whatever provider has the best signal. At least that’s the idea.

Knowing that Fi uses multiple cell networks to provide service I wondered what network my phone was using. Using SignalCheck Lite I was able to determine that my phone was connecting to the TMobile network by default. In my area US Cellular beats TMobile coverage hands down. There is no competition. So what is the deal with my phone auto connecting to Edge and H+ networks?

Honestly, I don’t know yet. I strongly suspect a recent update to the Google Fi app or services set my phone to prefer TMobile regardless of network speed. Whether this was an intentional change or a bug in the auto-connect code, I don’t know. I’ve been able to temporarily fix this issue by forcing a connection to US Cellular using Google Fi dialer code: *#*#34872#*#*

Google Fi Dialer Codes

I pulled these codes come from this post on ArkieNet. I’m including them here just in case the post poofs from the internet in the future.

Note this paragraph from the original article:

The following options are only available for “Designed for Fi” phones. They will not work on the iPhone or “Compatible with Fi” phones because they are T-Mobile only.  See which class of phone you have here.

ArkieNet
ALPHA CODEDIALER CODEDESCRIPTION
FI AUTO*#*#342886#*#*Set carrier selection to automatic.
FI NEXT*#*#346398#*#*Select Next Carrier
FI SPR*#*#34777#*#*Select Sprint for 2 hours
FI TMO*#*#34866#*#*Select T-Mobile 2 hours
FI USC*#*#34872#*#*Select US Cellular 2 hours
FI SIMON*#*#3474666#*#*Select Three (UK only)
ALPHA CODE
DIALER CODE
DESCRIPTION
FIXME*#*#34963#*#*Force reactivation
FI INFO*#*#344636#*#*Get information about the current network.
INFO*#*#4636#*#*Get general phone information.
DEBUG*#*#33284#*#*Phone Debug Options
PRL*#*#775#*#*Force download of Preferred Roaming List (Sprint)
PRL*228Force download of Preferred Roaming List (US Cellular)
FI ROAM*#*#347626#*#*Turn on International Roaming
SWITCH
SIM
*#*#794824746#*#*Switch to / from eSim.

Git Commits for the Current Branch

I had need to get a list of a simple list of all commits for the Current branch. This approach was simple enough and gave me what I wanted. I modified it to just use HEAD so that I can easily run it against the current branch.

git shortlog --no-merges --graph --abbrev-commit master..HEAD

This came from Alex who posted it on StackOverflow here: https://stackoverflow.com/a/61284456/296889

Issue with Mouse Auto Scrolling on Windows 10

Problem. I installed Adobe Premiere Pro and then all of a sudden my mouse starting automatically scrolling. This happened only in certain places. Like when opening the run command dialog, or when hovering over the Premiere Pro timeline. It did not happen in the browser unless I hovered over a section that had a custom scroll type listener.

The issue with auto scrolling was very frustrating. I was able to figure it out though. Here are the steps.

  1. Right click on This PC in the file explorer menu. Select Manage.
  2. Find and click the Device Manager
  3. Expand the Mice and other pointing devices option
  4. Right click the HID-compliant mouse entry and select Uninstall device.
  5. Your mouse will stop working…
  6. Unplug your mouse from the back of your computer, wait 10 seconds, plug it back in.
  7. Windows should redetect your mouse and the problem should go away.

Alternatively you could try to “Update driver” instead of Uninstalling the device. I didn’t try, my problem was solved with the steps documented above.

Change the Display of the Tab Character in PHPStorm

Update 2022-02-18

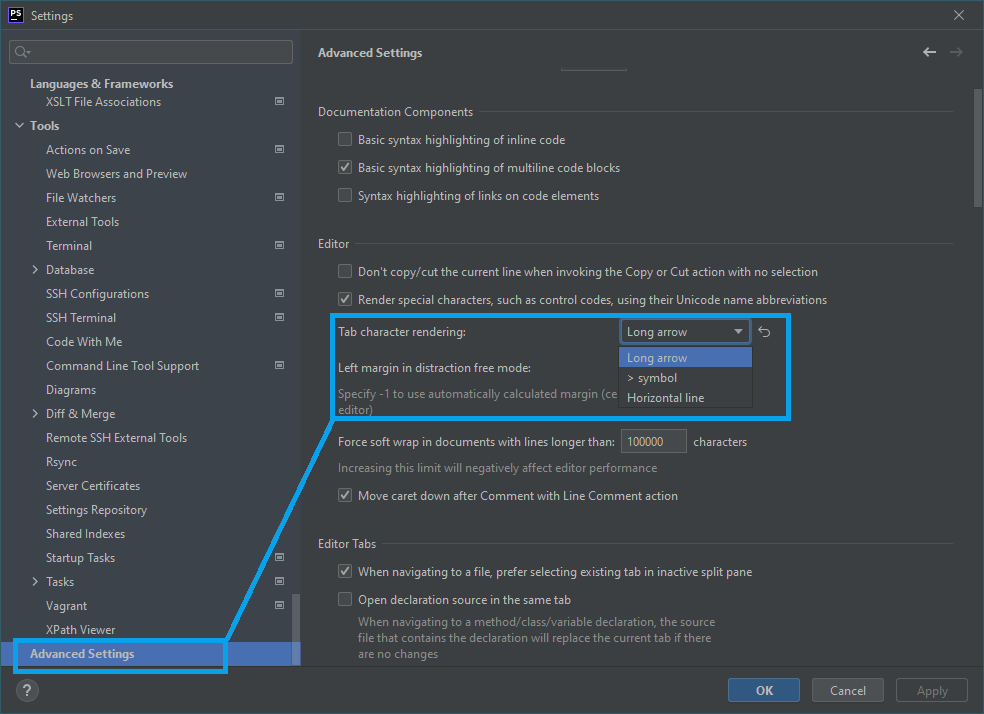
You can now change the display of the Tab Character directly in the PHPStorm advanced settings. (Thanks to a comment by destinydriven!)

The Tab Character Rendering can be changed in Advanced Settings

Original Article

Recently the way the Tab Character is rendered in PHPStorm was changed. The character used to be rendered in a way that allowed you to see the entire tab character. However, after a recent change the tab character now displays as a single >.

The new tab character is likely a welcome change for some. But there are others of us who really appreciated the old rendering. The new rendering does not indicate how much whitespace is taken by the tab character. For this reason I don’t find it helpful and wanted a way to change it back.

Luckily, recently, the JetBrains team threw in a small registry setting to re-enable to old rendering of tab characters. This setting is available in version 2019.3.2. Access this setting by pressing “Shift” + “Shift” while in PHPStorm. Afterwards search for and select the “Registry…” option.

A Comparison of default tab rendering in PHPStorm
A Comparison of styles – it’s nice to have options.

You’ll find the editor.old.tab.painting option about a quarter of the way down the list. Check it to re-enable the old PHPStorm tab rendering. You can breathe freely now.

The location of the editor.old.tab.painting within the registry.
The editor.old.tab.painting option is about a quarter of the way down the list

SSH Agent Service is Disabled

I’ve just run into an issue while trying to start the ssh-agent in PowerShell Core. The problem displayed was:
unable to start ssh-agent service, error :1058

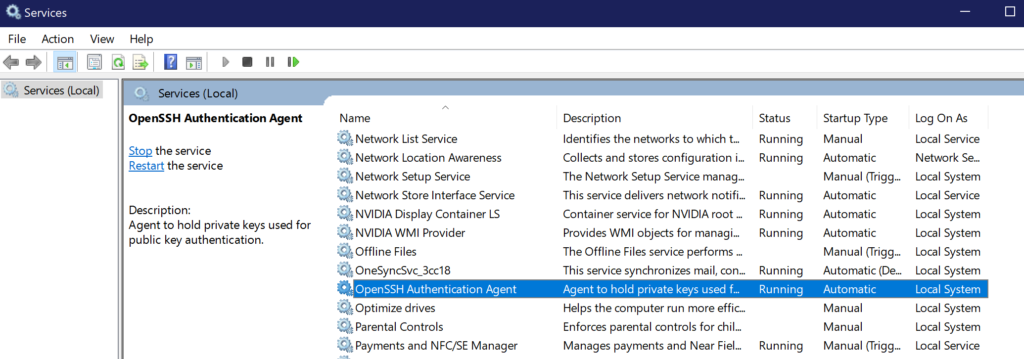
For my own personal future reference, the problem was that the OpenSSH Authentication Agent service startup type was set to Disabled. The solution was to set the startup type to Automatic.

In Windows 10 you can find the list of services pretty easily. Bring up the start menu and type Services. You’ll see the Services app listed. Open the Services app and you will see a list of services on your machine.

The location of the OpenSSH Authentication Agent within the Services list.
Finding the OpenSSH Authentication Agent

Once the Services app is open, find the OpenSSH Authentication Agent service and set the startup type to Automatic.

? You win

PHP Get First and Last Day of Week by Week Number

I’m adding a simple post here with a PHP method that has helped me. This method calculates the beginning and ending of a week given the year and week number. The problem I’ve run into is that “first day of the week” is subjective. Some people believe the first day of the week is “Monday” while others believe the first day of the week is “Sunday”. ISO-8601 specifies the first day of the week as “Monday”. Whereas, most western calendars display Sunday as the first day of the week and Saturday as the last day of the week.

To add to the confusion, PHP’s methods themselves seem confused about what the first and last day of the week are.

For example:

$new_date = new DateTime;
// returns Monday, Jan 29 2018
$new_date->setISODate(2018, 5);

// returns Sunday, Feb 4 2018
$new_date->modify('sunday this week');

// returns Sunday, Jan 28 2018
$new_date->setISODate(2018, 5 ,0);

You’ll notice that the string “sunday this week” actually returns Sunday, Feb 4 whereas setting the date to the 0 day of the same week returns Sunday, Jan 28. I’m not saying that Sunday doesn’t happen twice a week… but Sunday doesn’t happen twice a week.

All this to say, the method below is the one I’ve found returns the most helpful results:

function get_first_and_last_day_of_week( $year_number, $week_number ) {
	// we need to specify 'today' otherwise datetime constructor uses 'now' which includes current time
	$today = new DateTime( 'today' );

	return (object) [
		'first_day' => clone $today->setISODate( $year_number, $week_number, 0 ),
		'last_day'  => clone $today->setISODate( $year_number, $week_number, 6 )
	];
}

Validate the Hash or Checksum of a Downloaded File

Every once and a while I want to validate the hash of a downloaded file. Most of the time these are MD5 hashes, but I’ve seen SHA as well.

Windows actually has a couple built in ways of generating the hash of a file. You can use certutil or, in powershell you can use get-filehash.

With Certutil

To verify a checksum with certutil use the following command: certutil -hashfile {FILENAME} {ALGORITHM} replace the FILENAME and ALGORITHM with your choices.

With get-filehash

This is my preferred method. No reason, maybe I like the order of arguments better?

Use get-filehash -algorithm {ALGORITHM} {FILENAME}.

That’s it!

Turn off Google Chromes “Switch To Tab” Feature

When I’m browsing, I tend to use tabs a lot. I clean up my tabs when I’m done with them, and I open new ones when I want new ones.

Recently, Google Chrome, introduced a feature which attempts to fix issues of tab proliferation by offering a “Switch to Tab” feature. This feature shows up in the Omnibar when you start typing something in the Omnibar that is similar to a tab you already have open.

It’s an interesting idea, but not useful to me. I find that it negatively impacts my experience using Chrome. Things that use to work (example, right arrow copies selected tab url into current url bar) don’t work with Google Chrome’s new “Switch to Tab Feature”.

I like to think I’m knowledgeable and responsible enough to switch tabs when I want to switch tabs, and open new tabs when I want to open new tabs. That said, I’ll be disabling the “Switch To Tab” feature.

To disable the “Switch to Tab” feature in Google Chrome first find the omnibox-tab-switch-suggestions flag in the Chrome flags menu. (Psst: it’s here: chrome://flags/#omnibox-tab-switch-suggestions). Then… select “Disabled” from the dropdown options.

Restart Google Chrome and you should be free of that annoying “Switch to Tab” feature ??