I am currently looking into alternative forms of user authorization and authentication. Among the solutions I am looking into is Clerk. It’s pretty sweet and has a lot of cool features baked in. (Although the MFA support is a premium add-on and they aren’t super upfront about that).
One of the issues I ran into while implementing Clerk was a redirect loop. I set my home page within the Clerk Dashboard and when I reloaded my app, boom REDIRECTION FOR DAYS. Clerk was continuing to reload the home page for all eternity.
So, I added an onbeforeunload event into the page with a debugger call inside of it. This paused the page in the inspector before it reloaded and allowed me to actually see what was going on.
It turns out that Clerk was outputting an error message into the console. This error message is pictured below:
The <SignUp/> and <SignIn/> components cannot render when a user is already signed in, unless the application allows multiple sessions. Since a user is signed in and this application only allows a single session, Clerk is redirecting to the Home URL instead. (This notice only appears in development)
? Clerk
Well – ok then. Clerk is redirecting to the Home URL (which is the one it’s already on) and causing a permanent redirect loop. It seems like this would be handled better by simply _not_ loading the SignIn or SignUp components should the conditions for their existence fail.
Hopefully this helps you out! You might consider making your home page and your sign in pages different pages, or conditionally load those components, so that Clerk can be happy and not mess things up.
Do you hate seeing a sliver of light between your monitors? I sure do. I’ve spent a lot of time getting my monitors lined up just right so that they are flush against eachother with no gaps. However, a slight bump of the desk can throw all that hard work out the window.
So, I figured out another solution. Instead of adjusting the monitors to make sure that they are “perfect” I took some black electrical tape and ran it down the seem behind the two monitors. The black tape matches the black border of my monitors and it blocks any light from coming in!
I highly suggest running black electrical tape down the back seem between your monitors. It really helps!
As you might know, I’ve set up a RocketChat server recently on Digital Ocean. So far it’s been working great. An update every once and a while is all it needs.
However, yesterday, I attempted an update that failed. From then on every attempted update resulted in “RocketChat server not running. Cancelling”. This was very frutrating.
First, a few commands to try that might help:
systemctl restart rocketchat.service – This will start your RocketChat server in case it is stopped.
systemctl status rocketchat.service – Use this command to check the results of the previous command. Typically this will report that the service is “Active” if the previous command was successful.
In my case, the second command resulted in a “failed” state. The command itself gave me some information as to what the failure was, but not a lot of context as to what caused the failure. However, it did show me the process that it attempted to run. It said, ExecStart=/opt/nvm/versions/node/v14.19.3/bin/node /opt/Rocket.Chat/main.js (code=exited, status=1/FAILURE).
Alright! We’re getting somewhere. With that I was able to figure out what command failed and where that command was run. I navigated directly to the /opt/Rocket.Chat directory which was where the failure was occurring. From here I ran node main.js. The results of this command were much more helpful. They told me this, Error: Cannot find module '@meteorjs/reify/lib/runtime'. That looks like an issue with npm dependencies.
So, I poked around the Rocket.Chat directory structure and looked for dependencies for the Rocket.Chat server. I found what I was looking for in the /opt/Rocket.Chat/programs/server directory.
From this directory I ran two commands
npm install
npm ci
Afterwards I attempted to start the RocketChat server again using the systemctl restart rocketchat.service command. I checked it with systemctl status rocketchat.service and found that it was working now! RocketChat was back to running normally. The problem with “RocketChat server not running. Cancelling” was gone!
Note – RocketChat is making moves to severely limit their PAAS offering. They have baked in a bunch of limitations in the codebase and now claim that if you self-host you are using their “free version” ?
RocketChat (https://rocket.chat) is a chatting tool similar to MatterMost and Slack. It offers a self-managed community edition as well as some paid plans and is in active development. I’m just learning how to use it, so I’m planning on documenting my journey here.
I installed and set up RocketChat installed in a matter of minutes. The QuickStart guide, though short, includes most of what you need to get up and running.
To get started with your RocketChat instance on DigitalOcean you need to:
Create an A Record that points to your Digital Ocean Droplet. *
Setup your Let’s Encrypt certificate. rocketchatctl configure --lets-encrypt --root-url=YOUR_DOMAIN --letsencrypt-email=YOUR_EMAIL
Update your RocketChat installation. Run the following commands from your droplet command line interface.
Run sudo rocketchatctl upgrade-rocketchatctl
Run sudo rocketchatctl update
* I use Cloudflare to host my DNS. In this case I had to disable the proxying on the A Record in order to allow RocketChat to work correctly.
Now visit your site (you should not run into any problems) and create your administration account.
One Note
From time to time the Rocket Chat server responds with “Bad Gateway”. I’m not sure exactly why. However, a DigitalOcean droplet can be restarted by using the reboot command from the command line interface.
Ok, so I use Google Fi (formerly known as Project Fi) as my phone provider. I have a Pixel 2 and haven’t felt the need to upgrade. Recently I’ve noticed issues with my service. Specifically, my Pixel 2 will connect to an H+ network or an Edge network in an area I know has reliable 4G LTE. So, what gives?
First a quick and dirty explanation of the Google Fi network based on my limited understanding ?. Google Fi utilizes the TMobile (which I believe includes Sprint now) and US Cellular networks as well as WI-Fi to provide cellular service to their customers. Phones on the Google Fi network smartly switch to whatever provider has the best signal. At least that’s the idea.
Knowing that Fi uses multiple cell networks to provide service I wondered what network my phone was using. Using SignalCheck Lite I was able to determine that my phone was connecting to the TMobile network by default. In my area US Cellular beats TMobile coverage hands down. There is no competition. So what is the deal with my phone auto connecting to Edge and H+ networks?
Honestly, I don’t know yet. I strongly suspect a recent update to the Google Fi app or services set my phone to prefer TMobile regardless of network speed. Whether this was an intentional change or a bug in the auto-connect code, I don’t know. I’ve been able to temporarily fix this issue by forcing a connection to US Cellular using Google Fi dialer code: *#*#34872#*#*
Google Fi Dialer Codes
I pulled these codes come from this post on ArkieNet. I’m including them here just in case the post poofs from the internet in the future.
Note this paragraph from the original article:
The following options are only available for “Designed for Fi” phones. They will not work on the iPhone or “Compatible with Fi” phones because they are T-Mobile only. See which class of phone you have here.
The Tab Character Rendering can be changed in Advanced Settings
Original Article
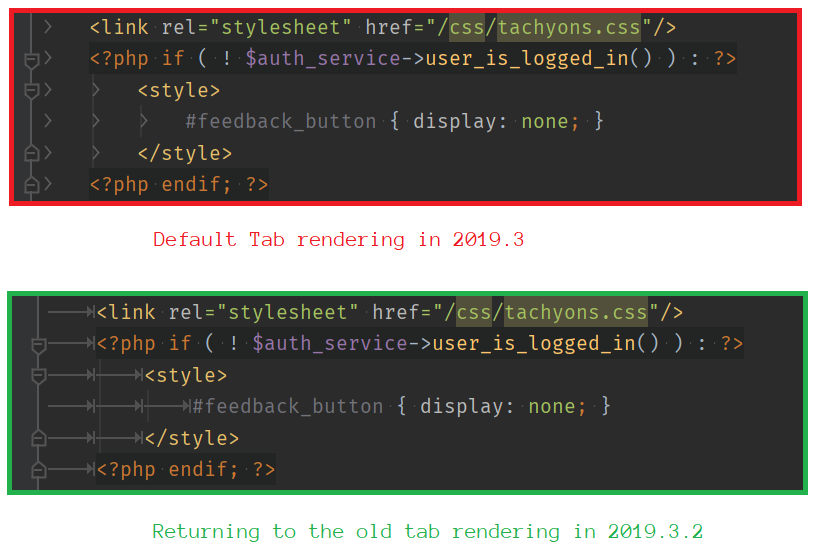
Recently the way the Tab Character is rendered in PHPStorm was changed. The character used to be rendered in a way that allowed you to see the entire tab character. However, after a recent change the tab character now displays as a single >.
The new tab character is likely a welcome change for some. But there are others of us who really appreciated the old rendering. The new rendering does not indicate how much whitespace is taken by the tab character. For this reason I don’t find it helpful and wanted a way to change it back.
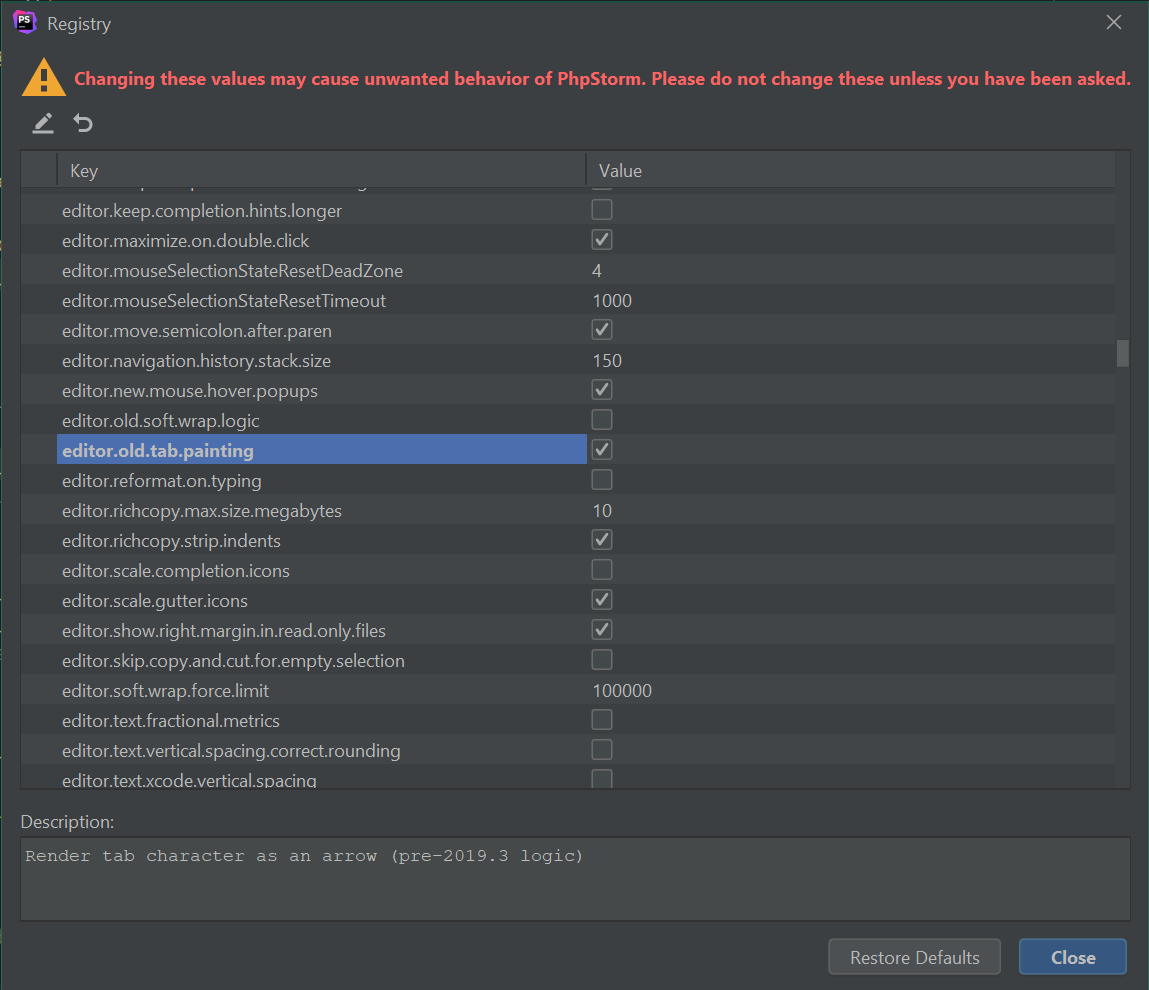
Luckily, recently, the JetBrains team threw in a small registry setting to re-enable to old rendering of tab characters. This setting is available in version 2019.3.2. Access this setting by pressing “Shift” + “Shift” while in PHPStorm. Afterwards search for and select the “Registry…” option.
A Comparison of styles – it’s nice to have options.
You’ll find the editor.old.tab.painting option about a quarter of the way down the list. Check it to re-enable the old PHPStorm tab rendering. You can breathe freely now.
The editor.old.tab.painting option is about a quarter of the way down the list
When I’m browsing, I tend to use tabs a lot. I clean up my tabs when I’m done with them, and I open new ones when I want new ones.
Recently, Google Chrome, introduced a feature which attempts to fix issues of tab proliferation by offering a “Switch to Tab” feature. This feature shows up in the Omnibar when you start typing something in the Omnibar that is similar to a tab you already have open.
It’s an interesting idea, but not useful to me. I find that it negatively impacts my experience using Chrome. Things that use to work (example, right arrow copies selected tab url into current url bar) don’t work with Google Chrome’s new “Switch to Tab Feature”.
I like to think I’m knowledgeable and responsible enough to switch tabs when I want to switch tabs, and open new tabs when I want to open new tabs. That said, I’ll be disabling the “Switch To Tab” feature.
To disable the “Switch to Tab” feature in Google Chrome first find the omnibox-tab-switch-suggestions flag in the Chrome flags menu. (Psst: it’s here: chrome://flags/#omnibox-tab-switch-suggestions). Then… select “Disabled” from the dropdown options.
Restart Google Chrome and you should be free of that annoying “Switch to Tab” feature ??
I find it extremely useful to include surrounding lines when I’m searching through log files or whatnot for a string of text. It certainly helps provide some context as to what I’m looking at.
However, I constantly forget the flag for including surrounding lines. So I’m posting it here so that, at least when I forget, I know where to find it ?
The flag is -C. I suppose it should be easy to remember since I want “Context” and “Context” begins with “C”. ?
Below is a quick example for just in case you want the whole command or you enjoy copying and pasting all the things – hey… no judgement here.
I just recently got Visual Studio Code hooked up with the virtual Vagrant machine hosting my local dev version of WordPress. I’m posting the steps I took here. In the end it’s fairly simple to do.
Most of the guides out there show you how to hook up VS Code with a locally running copy of WordPress. However, I’m using Chassis.io for my dev version of WordPress. Chassis.io makes use of Vagrant and a virtual machine. I did not find anything that showed me how to hook VS Code with a copy of WordPress running on a virtual machine, as is the case with a Chassis.io setup.
Setup Chassis for Debugging with Visual Studio Code
The first thing we need to do to setup the Chassis XDebug extension to work with Visual Studio Code is to setup the IDE Key. Setting up the IDE Key consists of two steps.
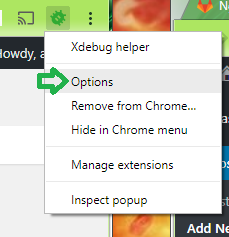
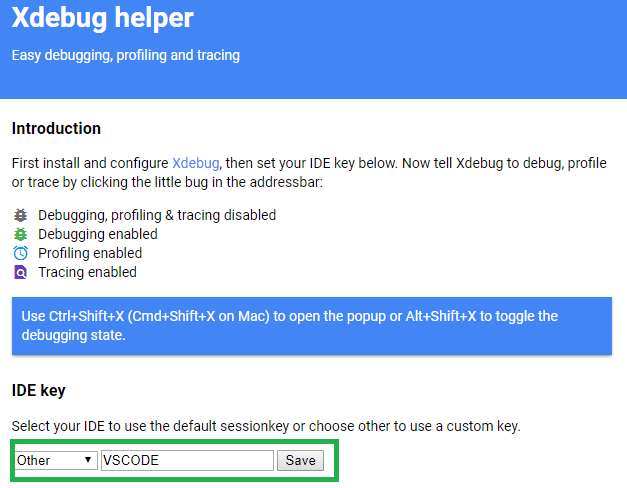
Bring up the XDebug Helper extension options page. You can do this by Right Clicking the extension icon and selecting Options.
XDebug Extension Options
Find the section for the IDE Key. Select Other as the default sessionkey and type in VSCODE.
XDebug Extension IDE Key Setting
Save it. Next we need to set the IDE Key for the Vagrant machine.
Set the IDE Key for the Vagrant Machine
This step is pretty simple. First you need to navigate to the root Chassis directory. Mine is located at C:\projects\chassis.
Create a config.local.yaml file if one doesn’t already exist.
Add ide: VSCODE to the config.local.yaml file.
Run vagrant provision which should update the settings on your local vagrant machine.
To confirm that the IDE Key is indeed VSCODE see the “xdebug” section on the PHPInfo page for the machine.
Example: http://vagrant.local/phpinfo.php
xdebug section on the PHP Info page
Setup Visual Studio Code for Debugging with Chassis
If you are using Visual Studio Code to develop PHP than you should install the PHP Extension Pack. Bring up the VS Code Extensions menu and search for “PHP Extension Pack”. This extension will include the PHP Intellisense plugin and the PHP Debugger plugin. You will need the PHP Debugger plugin for debugging.
Next we need to setup a debugging configuration.
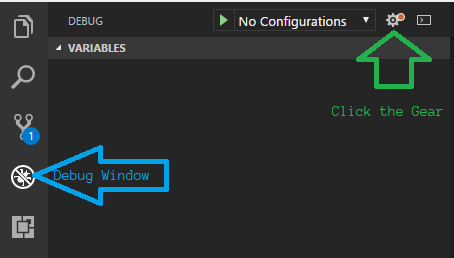
Click the Gear to setup a Debugging configuration.
Bring up the VS Code debugging window.
Click the “Gear” icon.
Select “PHP” as your environment from the popup textbox.
Now you will see a “launch.json” file in your VS Code window. This contains some default settings for debugging PHP. The file will not work for our purposes as it is. We need to add a couple properties to the JSON to hook VS Code up with our WordPress site.
serverSourceRoot – This is the directory for your code on the server (Chassis.io).
localSourceRoot – This is the directory for your code on your development machine.
The serverSourceRoot needs to be the path to your source code on the server. In my case the value is /vagrant/content/plugins/my-awesome-plugin.
The localSourceRoot is used to match the server source up with your local source. In my case I set this to ${workspaceRoot} which is a special variable referring to the path of the opened folder in VS Code.
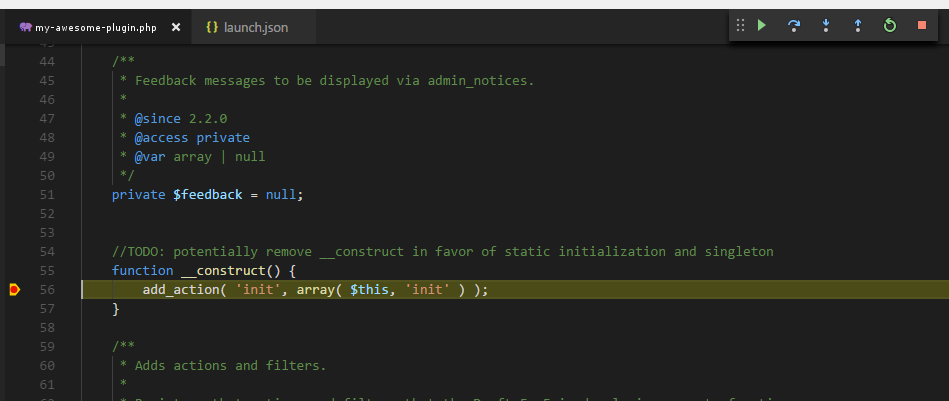
Alright! That should be it. Save your launch.json file, set a breakpoint in your code, and start the debugger. When you visit the relevant WordPress page on your Chassis box you will notice your breakpoint is hit.
Chassis.io is an excellent tool to get you quickly setup for WordPress development. Barring any timeout issues, the setup is typically as simple as following their QuickStart guide.
Chassis.io uses Vagrant and VirtualBox to setup a Virtual Machine that hosts your WordPress site. This post covers how you can connect to your WordPress database that exists on that Virtual Machine. I’ll be using Windows and HeidiSQL for the purpose of this post. The connection information I use in this post comes from this GitHub issue.
Connecting with HeidiSQL
HeidiSQL is my favorite query browser for MySQL and MariaDB databases. I like the layout and the interface is nice and clean.
When you first open HeidiSQL you will see the interface for creating a new Database connection.
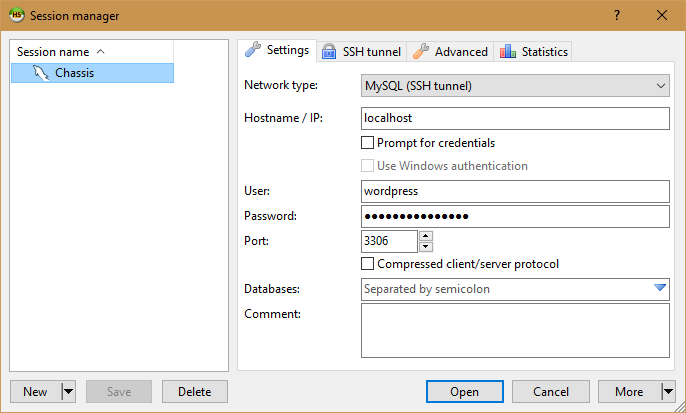
Choose whichever name you want to help you remember what this connection is for. I’ve named mine “Chassis” because it’s my connection to the database Chassis.io setup. You’ll also want to set the following settings:
Network type: MySQL (SSH tunnel)
Hostname / IP: localhost
User: wordpress
Password: vagrantpassword
Port: 3306
That’s it for the basic settings. Now for the SSH Tunnel settings.
HeidiSQL – Plink.exe and Private Key
HeidiSQL uses a utility called “plink.exe” for it’s SSH capabilities. plink.exe is made by the same author who wrote PuTTY (which I’m sure you’ve heard of). If you haven’t got plink.exe downloaded you can find the latest exe on this page. You’ll want to grab both plink.exe and puttygen.exe. I stuck both utilities inside a “PuTTY” folder in my Program Files (x86) directory. You can stick them wherever you want to.
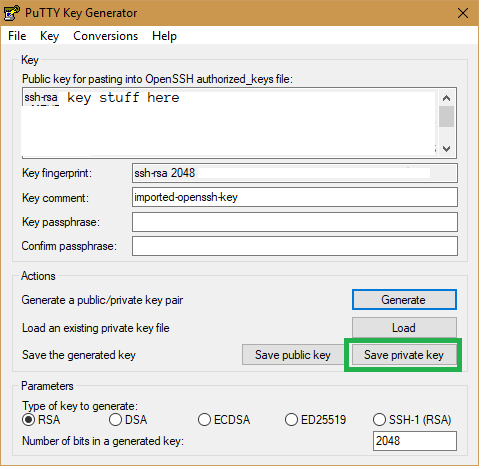
Ok, before we setup the SSH Tunnel settings we are going to want to setup the Private key file that plink.exe will use to communicate with your Virtual Machine. PuTTY utilities use specific private key files called .ppk files. We are going to want to convert the Vagrant provided private key file to a .ppk file for use by plink.exe. Luckily, the puttygen.exe utility you downloaded makes this conversion simple.
Launch puttygen.exe. This will launch the “PuTTY Key Generator”. Load in the Vagrant provided private key file by using File > Load Private Key. Navigate to the location of your Vagrant private key file. Mine was located in C:\projects\chassis\.vagrant\machines\default\virtualbox. Your location may be different depending on where your Chassis project is. Find the “private_key” file and open that. The PuTTY Key Generator will take care of loading the key in for you. You should see a “Successfully imported foreign key …” message. Now click “Save private key”, choose a name for it, and save it. I just saved it exactly where the other private_key was.
Location of the “Save private key” button
Woot! Now we can fill out the HeidiSQL SSH tunnel settings. Remember where you saved that .ppk file because you’ll need it for this next step.
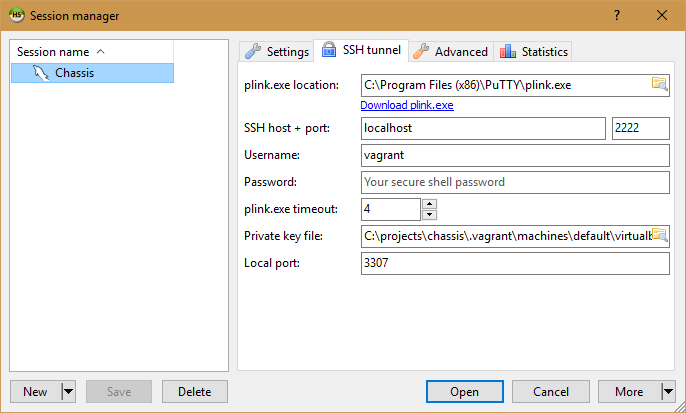
HeidiSQL – SSH Tunnel Settings
Click on the tab for “SSH tunnel” to access the HeidiSQL Session Manager SSH Tunnel settings.
HeidiSQL SSH Tunnel Settings
Alright, let’s plug in the values!
plink.exe location: Insert the path to your plink.exe utility.
SSH host + port: localhost and 2222
Username: vagrant
Password: just leave this blank
plink.exe timeout: default is fine
Private key file: Path to the .ppk file we created above
Local port: 3307 is fine
Now we come to the moment of truth. Push the “Save” button on the HeidiSQL session manager to save your changes. Now push the “Open” button and HeidiSQL should connect to your Vagrant hosted WordPress database. Woot!