Problem. I installed Adobe Premiere Pro and then all of a sudden my mouse starting automatically scrolling. This happened only in certain places. Like when opening the run command dialog, or when hovering over the Premiere Pro timeline. It did not happen in the browser unless I hovered over a section that had a custom scroll type listener.
The issue with auto scrolling was very frustrating. I was able to figure it out though. Here are the steps.
Right click on This PC in the file explorer menu. Select Manage.
Find and click the Device Manager
Expand the Mice and other pointing devices option
Right click the HID-compliant mouse entry and select Uninstall device.
Your mouse will stop working…
Unplug your mouse from the back of your computer, wait 10 seconds, plug it back in.
Windows should redetect your mouse and the problem should go away.
Alternatively you could try to “Update driver” instead of Uninstalling the device. I didn’t try, my problem was solved with the steps documented above.
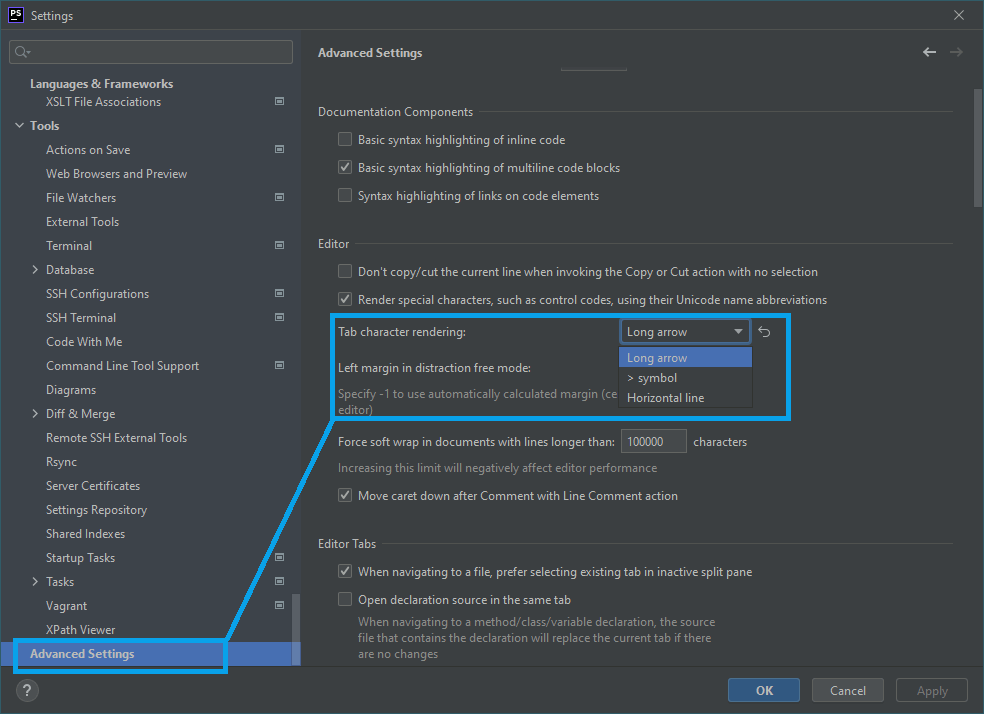
The Tab Character Rendering can be changed in Advanced Settings
Original Article
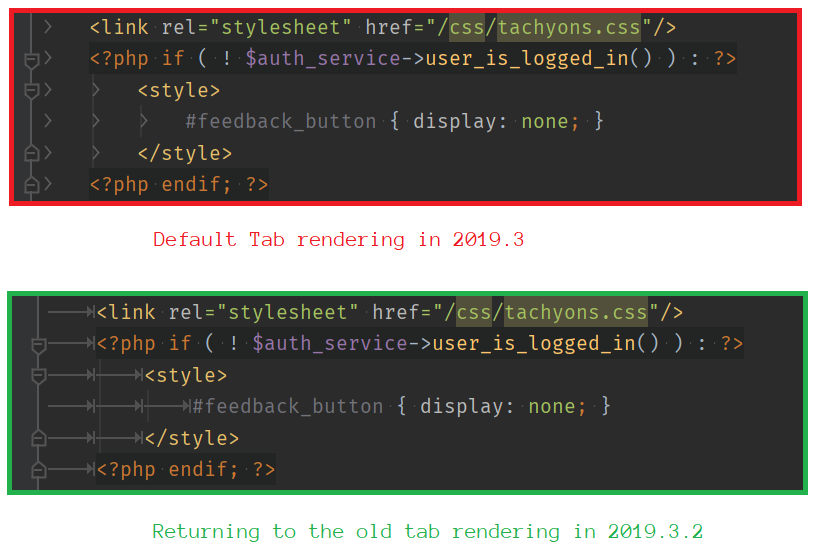
Recently the way the Tab Character is rendered in PHPStorm was changed. The character used to be rendered in a way that allowed you to see the entire tab character. However, after a recent change the tab character now displays as a single >.
The new tab character is likely a welcome change for some. But there are others of us who really appreciated the old rendering. The new rendering does not indicate how much whitespace is taken by the tab character. For this reason I don’t find it helpful and wanted a way to change it back.
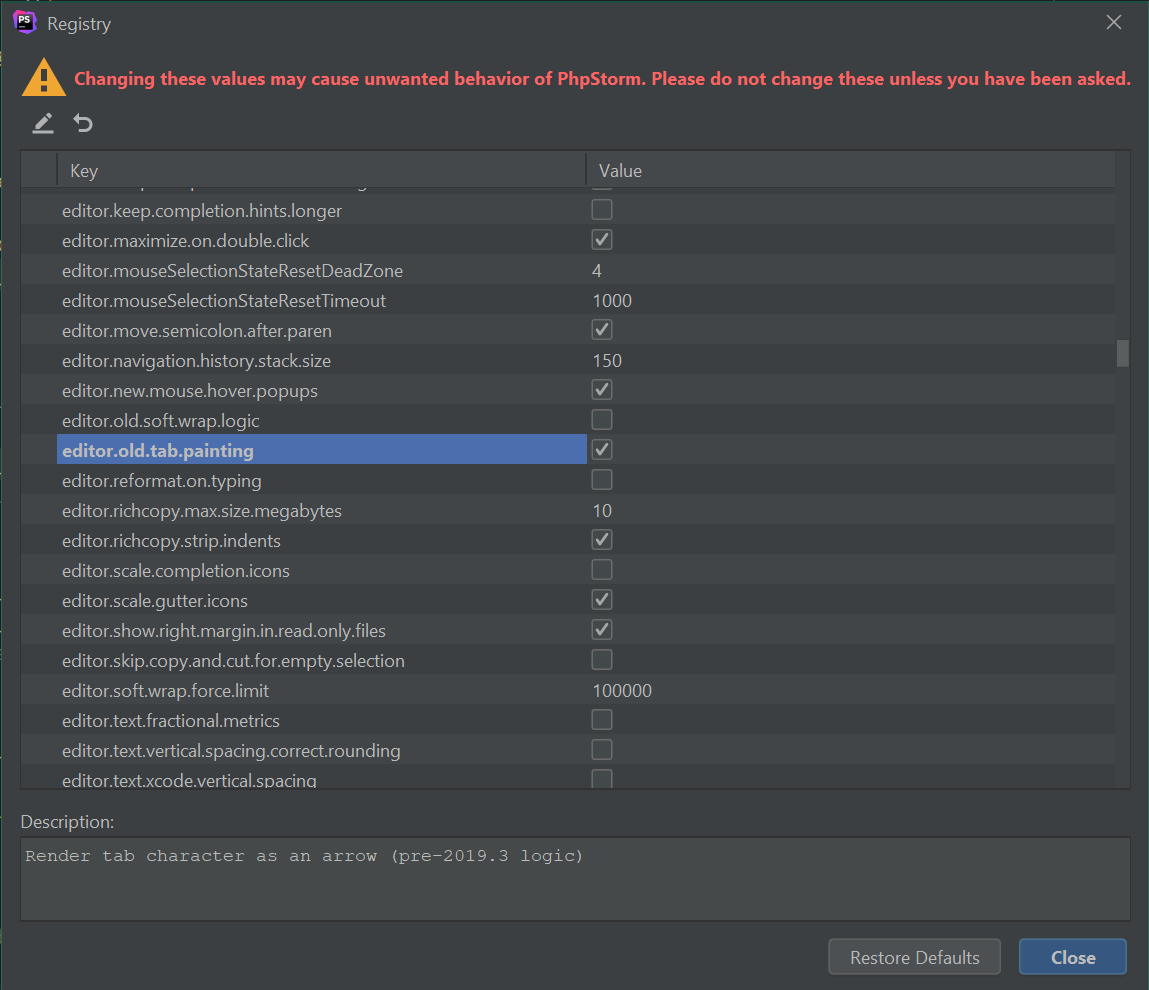
Luckily, recently, the JetBrains team threw in a small registry setting to re-enable to old rendering of tab characters. This setting is available in version 2019.3.2. Access this setting by pressing “Shift” + “Shift” while in PHPStorm. Afterwards search for and select the “Registry…” option.
A Comparison of styles – it’s nice to have options.
You’ll find the editor.old.tab.painting option about a quarter of the way down the list. Check it to re-enable the old PHPStorm tab rendering. You can breathe freely now.
The editor.old.tab.painting option is about a quarter of the way down the list
I’ve just run into an issue while trying to start the ssh-agent in PowerShell Core. The problem displayed was: unable to start ssh-agent service, error :1058
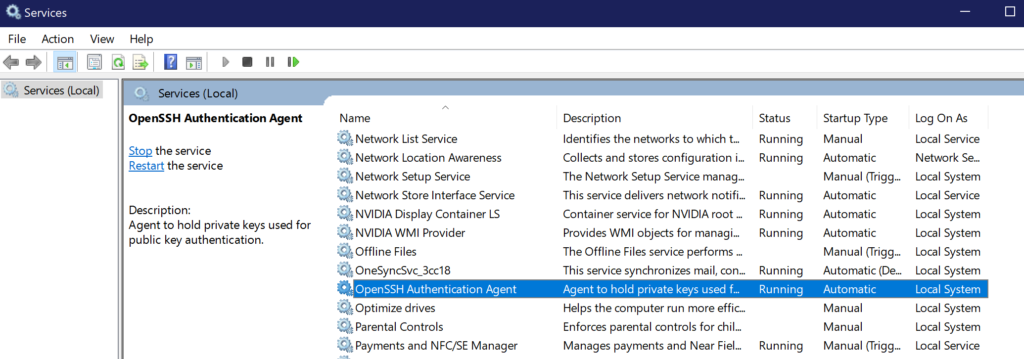
For my own personal future reference, the problem was that the OpenSSH Authentication Agent service startup type was set to Disabled. The solution was to set the startup type to Automatic.
In Windows 10 you can find the list of services pretty easily. Bring up the start menu and type Services. You’ll see the Services app listed. Open the Services app and you will see a list of services on your machine.
Finding the OpenSSH Authentication Agent
Once the Services app is open, find the OpenSSH Authentication Agent service and set the startup type to Automatic.
I’m adding a simple post here with a PHP method that has helped me. This method calculates the beginning and ending of a week given the year and week number. The problem I’ve run into is that “first day of the week” is subjective. Some people believe the first day of the week is “Monday” while others believe the first day of the week is “Sunday”. ISO-8601 specifies the first day of the week as “Monday”. Whereas, most western calendars display Sunday as the first day of the week and Saturday as the last day of the week.
To add to the confusion, PHP’s methods themselves seem confused about what the first and last day of the week are.
For example:
$new_date = new DateTime;
// returns Monday, Jan 29 2018
$new_date->setISODate(2018, 5);

// returns Sunday, Feb 4 2018
$new_date->modify('sunday this week');

// returns Sunday, Jan 28 2018
$new_date->setISODate(2018, 5 ,0);
You’ll notice that the string “sunday this week” actually returns Sunday, Feb 4 whereas setting the date to the 0 day of the same week returns Sunday, Jan 28. I’m not saying that Sunday doesn’t happen twice a week… but Sunday doesn’t happen twice a week.
All this to say, the method below is the one I’ve found returns the most helpful results:
function get_first_and_last_day_of_week( $year_number, $week_number ) {
	// we need to specify 'today' otherwise datetime constructor uses 'now' which includes current time
	$today = new DateTime( 'today' );

	return (object) [
		'first_day' => clone $today->setISODate( $year_number, $week_number, 0 ),
		'last_day'  => clone $today->setISODate( $year_number, $week_number, 6 )
	];
}
Every once and a while I want to validate the hash of a downloaded file. Most of the time these are MD5 hashes, but I’ve seen SHA as well.
Windows actually has a couple built in ways of generating the hash of a file. You can use certutil or, in powershell you can use get-filehash.
With Certutil
To verify a checksum with certutil use the following command: certutil -hashfile {FILENAME} {ALGORITHM} replace the FILENAME and ALGORITHM with your choices.
With get-filehash
This is my preferred method. No reason, maybe I like the order of arguments better?
Use get-filehash -algorithm {ALGORITHM} {FILENAME}.
When I’m browsing, I tend to use tabs a lot. I clean up my tabs when I’m done with them, and I open new ones when I want new ones.
Recently, Google Chrome, introduced a feature which attempts to fix issues of tab proliferation by offering a “Switch to Tab” feature. This feature shows up in the Omnibar when you start typing something in the Omnibar that is similar to a tab you already have open.
It’s an interesting idea, but not useful to me. I find that it negatively impacts my experience using Chrome. Things that use to work (example, right arrow copies selected tab url into current url bar) don’t work with Google Chrome’s new “Switch to Tab Feature”.
I like to think I’m knowledgeable and responsible enough to switch tabs when I want to switch tabs, and open new tabs when I want to open new tabs. That said, I’ll be disabling the “Switch To Tab” feature.
To disable the “Switch to Tab” feature in Google Chrome first find the omnibox-tab-switch-suggestions flag in the Chrome flags menu. (Psst: it’s here: chrome://flags/#omnibox-tab-switch-suggestions). Then… select “Disabled” from the dropdown options.
Restart Google Chrome and you should be free of that annoying “Switch to Tab” feature ??
First things first, I tend to build up a lot of local branches. No, I don’t pro-actively remove them from my machine. (Who does that extremely smart thing? ?) At work we use GitHub and Windows. As such I use posh-git to perform almost all my git interactions (you should too cause it’s ?).
Our current process is:
Create Feature Branch
Create Pull Request
Squash and Merge Pull Request
Delete Feature Branch from Remote
Any developer can have any number of feature branches out at a time waiting to be merged. As we are using a “Squash and Merge” process our branches are not *actually merged*. We delete the original branch after the squash.
But that doesn’t really matter to you. Come to think of it, it doesn’t really matter to future me. What does matter is, how can I remove local git branches that aren’t on the git remote anymore? (Remote meaning GitHub, Gitlab, Bitbucket, etc…). No, we aren’t talking about the remote tracking branches that are removed by pruning. Otherwise, one could just prune, no?
I continuously search for this, so I’m documenting it here so I NEVER HAVE TO SEARCH EVER AGAIN ?
If you are in a position where you Squash & Merge then you will need to replace the git branch -d with git branch -D. This will successfully remove all “:gone” branches from your local machine.
Any git branch you have checked out essentially has three branches. 1. The remote branch on GitHub 2. The remote tracking branch on your machine 3. The local branch you do your work on.
When we push a feature branch live (merge a pull request) we delete the “remote branch on GitHub” (#1 above).
When we run `git fetch origin –prune` we remove the remote tracking branch (taking care of #2) above.
However, taking care of #3 above often requires manual clean up. That’s where the piped command above comes into play, it takes care of cleaning up branch #3.
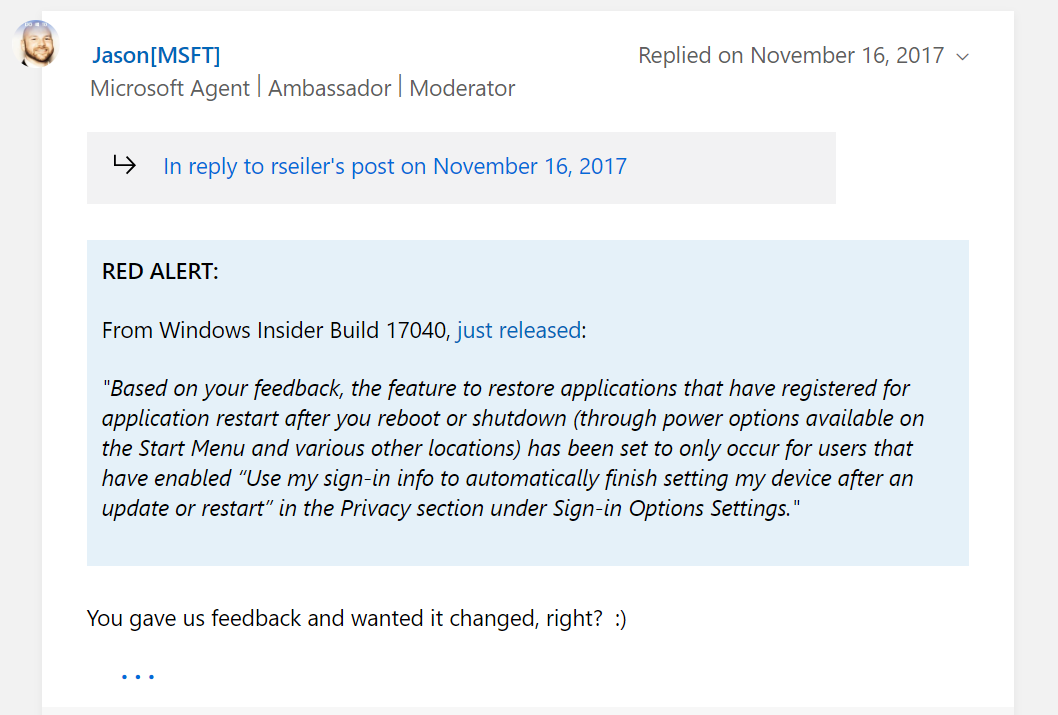
Last year around this time of year, Microsoft added an Autlolaunch feature to Windows 10. This feature will automatically relaunch certain programs after a Restart or Shutdown of Windows. You’ve likely seen this happen most often with Chrome.
The feature was originally introduced to make Windows Updates feel more seamless, and less invasive. The idea was that, while yes, Windows Updates automatically restart your computer, at least it keeps the windows you had open open! That’s good, right?!
No. That’s not good. That’s annoying. We who restart our computers like to know that they are starting from a fresh state. Those of us who don’t restart our computers like to keep a billion random windows open and probably fill our desktops up with icons. Desktop Icon pointillism art is a thing.
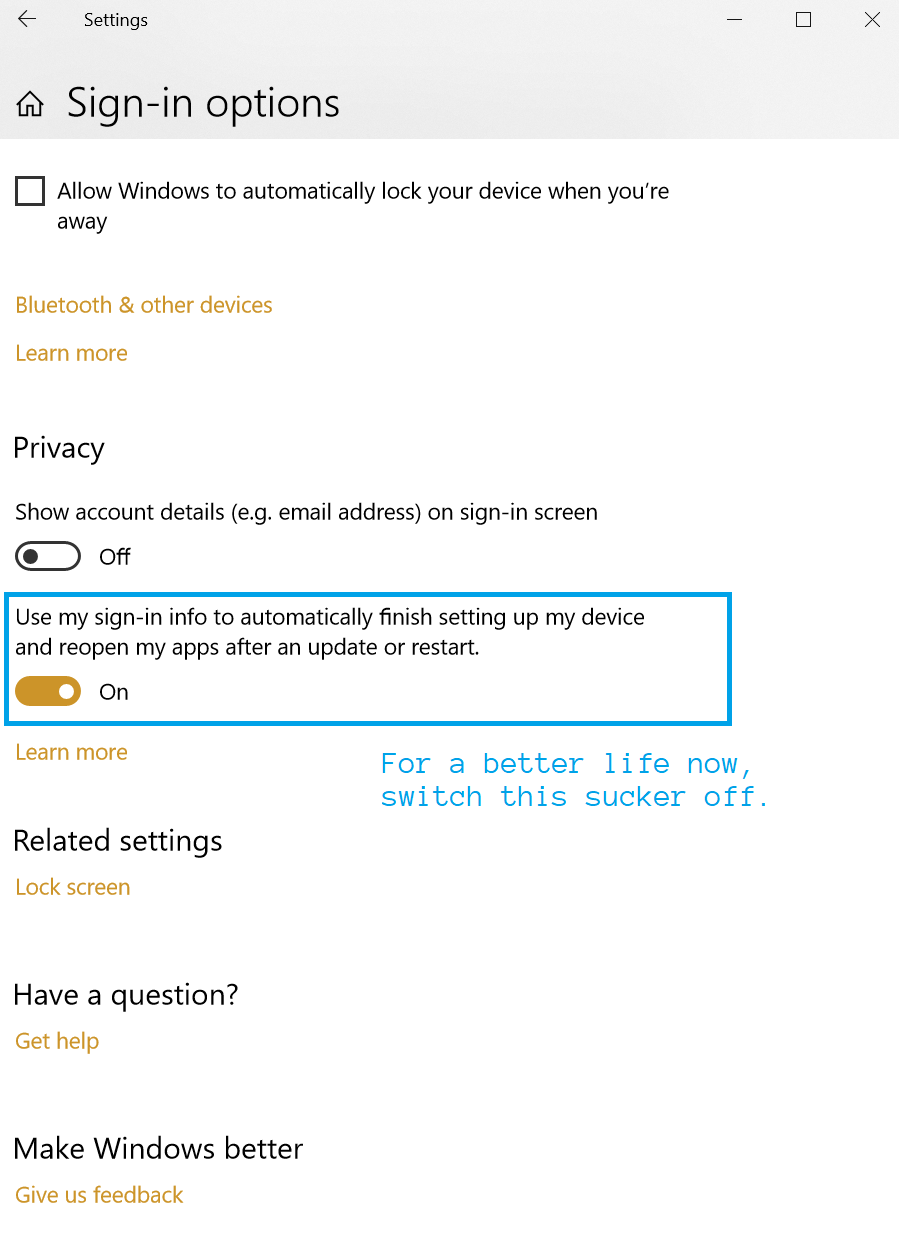
After an extreme amount of backlash from users Microsoft decided to adjust the way the Autolaunch feature worked. This is documented in this thread. You can *disable autolaunch* by disabling the “Use my sign-in info to automatically finish setting my device after an update or restart” setting. You would think Microsoft might make a completely different setting for “Automatically re-launch previously open programs on startup”. But – for now that’s not the case.
You can *disable autolaunch* by disabling the “Use my sign-in info to automatically finish setting my device after an update or restart” setting.
Above we have the description of how to turn off autolaunch, below we’ve got a picture of where this setting is.
Enjoy not having Chrome automatically start when you reboot your computer ?
I find it extremely useful to include surrounding lines when I’m searching through log files or whatnot for a string of text. It certainly helps provide some context as to what I’m looking at.
However, I constantly forget the flag for including surrounding lines. So I’m posting it here so that, at least when I forget, I know where to find it ?
The flag is -C. I suppose it should be easy to remember since I want “Context” and “Context” begins with “C”. ?
Below is a quick example for just in case you want the whole command or you enjoy copying and pasting all the things – hey… no judgement here.
I just recently got Visual Studio Code hooked up with the virtual Vagrant machine hosting my local dev version of WordPress. I’m posting the steps I took here. In the end it’s fairly simple to do.
Most of the guides out there show you how to hook up VS Code with a locally running copy of WordPress. However, I’m using Chassis.io for my dev version of WordPress. Chassis.io makes use of Vagrant and a virtual machine. I did not find anything that showed me how to hook VS Code with a copy of WordPress running on a virtual machine, as is the case with a Chassis.io setup.
Setup Chassis for Debugging with Visual Studio Code
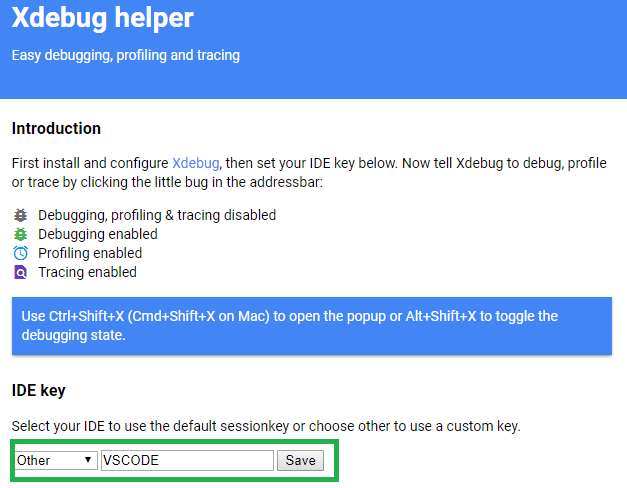
The first thing we need to do to setup the Chassis XDebug extension to work with Visual Studio Code is to setup the IDE Key. Setting up the IDE Key consists of two steps.
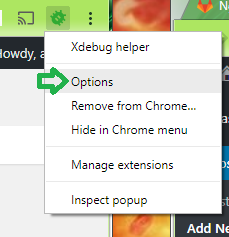
Bring up the XDebug Helper extension options page. You can do this by Right Clicking the extension icon and selecting Options.
XDebug Extension Options
Find the section for the IDE Key. Select Other as the default sessionkey and type in VSCODE.
XDebug Extension IDE Key Setting
Save it. Next we need to set the IDE Key for the Vagrant machine.
Set the IDE Key for the Vagrant Machine
This step is pretty simple. First you need to navigate to the root Chassis directory. Mine is located at C:\projects\chassis.
Create a config.local.yaml file if one doesn’t already exist.
Add ide: VSCODE to the config.local.yaml file.
Run vagrant provision which should update the settings on your local vagrant machine.
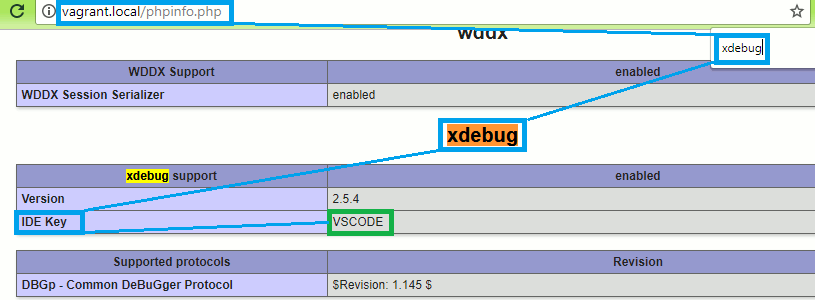
To confirm that the IDE Key is indeed VSCODE see the “xdebug” section on the PHPInfo page for the machine.
Example: http://vagrant.local/phpinfo.php
xdebug section on the PHP Info page
Setup Visual Studio Code for Debugging with Chassis
If you are using Visual Studio Code to develop PHP than you should install the PHP Extension Pack. Bring up the VS Code Extensions menu and search for “PHP Extension Pack”. This extension will include the PHP Intellisense plugin and the PHP Debugger plugin. You will need the PHP Debugger plugin for debugging.
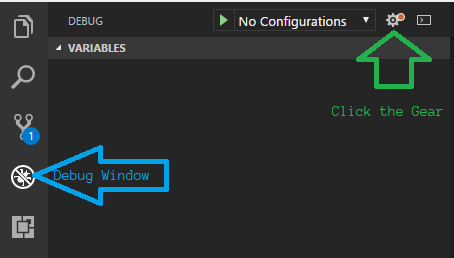
Next we need to setup a debugging configuration.
Click the Gear to setup a Debugging configuration.
Bring up the VS Code debugging window.
Click the “Gear” icon.
Select “PHP” as your environment from the popup textbox.
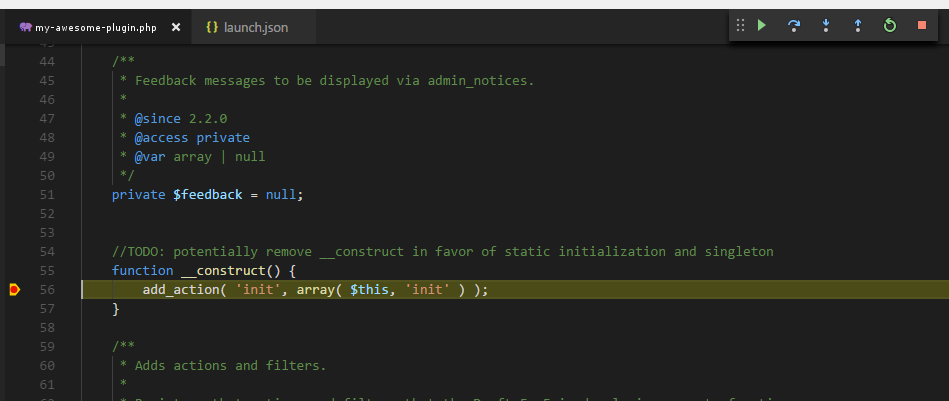
Now you will see a “launch.json” file in your VS Code window. This contains some default settings for debugging PHP. The file will not work for our purposes as it is. We need to add a couple properties to the JSON to hook VS Code up with our WordPress site.
serverSourceRoot – This is the directory for your code on the server (Chassis.io).
localSourceRoot – This is the directory for your code on your development machine.
The serverSourceRoot needs to be the path to your source code on the server. In my case the value is /vagrant/content/plugins/my-awesome-plugin.
The localSourceRoot is used to match the server source up with your local source. In my case I set this to ${workspaceRoot} which is a special variable referring to the path of the opened folder in VS Code.
Alright! That should be it. Save your launch.json file, set a breakpoint in your code, and start the debugger. When you visit the relevant WordPress page on your Chassis box you will notice your breakpoint is hit.